
This gluten-free Boston brown bread is naturally egg-free! It takes only moments to whip up the batter; however, the bread requires about 90 minutes to bake. So be sure to allow time for that. The finished loaf is sweet and flavorful thanks to the sorghum and brown rice flours. While it’s traditionally served with baked beans and hot dogs, this bread makes an excellent breakfast bread too! Toast and serve with butter on a cold winter day.
Gluten-Free Boston Brown Bread (Bread in a Can?!?! What the heck?!)
“Um, why is this bread in a can?!?!”
Ah, the immortal words spoken by my husband when he first saw a can of Boston brown bread on the shelf at the local grocery store. Greg grew up in Wisconsin and had never seen, let alone eaten, Boston brown bread until he moved to New York.
I, on the other hand, loved the stuff. In fact, each Halloween, before I went out trick-or-treating, my mother always made the same meal: hot dogs, baked beans, and a slice of Boston brown bread from a can. It was tradition! But it was one of those foods that I’d forgotten about until Greg pointed out the can.
Of course, we bought a can right away because the mere thought of bread in a can was mind boggling to him. While Greg isn’t usually a picky eater, he decided, before the can was even in the cart, that he was going to hate Boston brown bread. And that was that.
Until it wasn’t.
He loved it. Made with a combination of cornmeal, whole wheat flour and rye flour, plus a little molasses for sweetness, traditional Boston brown bread has an sweet, whole-grain flavor and a dense, pleasant texture.
Oh, and the reason for the can? It’s a steamed bread. So when made commercially, it’s baked right in the can. While steamed breads and other desserts are popular throughout the world, in the United States, we don’t really have this tradition. People seem to talk about steamed desserts at Christmas time when they make a figgy pudding. (Or wonder what the heck a figgy pudding is when they watch a Christmas Carol!)
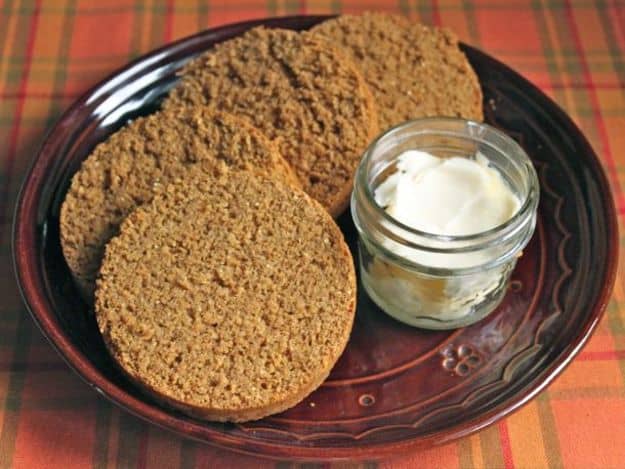
I’m not sure why steamed desserts and breads aren’t popular because they sure are delicious! The bread bakes up moist and dense. In many ways, it’s unlike any other bread. Thanks to the molasses, it’s on the sweet side. Basically, it’s not a bread I’d make a sandwich with but it is one that’s great in a bread basket or enjoyed for breakfast spread with butter. Of course, you can enjoy the bread with baked beans and hot dogs, just as they do in New England.
To make the bread gluten-free, the whole wheat and rye flours needed to be replaced. So I grabbed some brown rice and sorghum flours. This flour combination makes a loaf nearly identical to traditional Boston brown bread. In fact, it’s hard for me to tell the bread is gluten-free!
The biggest difference between the gluten-free loaf and a wheat-based loaf is the color. The bread bakes up a few shades lighter than traditional brown bread, especially when made with regular, unsulfured molasses and not dark molasses.
The batter comes together easily. You whisk together the dry ingredients, add buttermilk and molasses and stir. If you like raisins, go ahead and add them. They’re a traditional addition to the bread. As you can see in my photo, I didn’t add raisins because (whispering), I don’t like raisins.
Then the fun begins! It’s time to steam the bread! Place the batter in either two 28-ounce cans or one 9×5-inch loaf pan and cover with parchment. Bread baked in a can looks like traditional brown bread. But I know sometimes you might not have two empty cans on hand. So don’t worry about baking it in a loaf pan. It might look different but it still tastes great! Since brown bread is naturally egg-free, it doesn’t rise as high in a loaf pan as, say, pumpkin bread. Even thought it looks like it hasn’t risen, it still tastes AMAZING.
Boston brown bread takes a LONG time to bake–90 minutes–which is why I love this bread in the winter but wouldn’t dream of making it in the summer!
If you bake the loaves in a can, allow the bread to cool in the can for about an hour before removing. You need to give the can a vigorous shake to get the bread out! If you baked the bread in a loaf pan, allow it to cool for about 15 minutes before turing it out onto a wire rack.
Enjoy!
Gluten-Free Boston Brown Bread
Ingredients
- Nonstick cooking spray
- 4 ounces 3/4 cup gluten-free cornmeal
- 3 ounces 3/4 cup sorghum flour
- 3 ounces 3/4 cup brown rice flour
- 1/2 teaspoon baking soda
- 1/2 teaspoon baking powder
- 1/2 teaspoon salt
- 1/4 teaspoon xanthan gum
- 1 cup buttermilk
- 1/2 cup dark robust or regular molasses
- 1/2 cup raisins optional
Instructions
-
Adjust oven rack to lower postion. Preheat oven to 325°F. Grease two 28-ounce cans or one 9- by 5-inch loaf pan. Fill a Dutch oven or roasting pan large enough to fir the cans with enough water to reach halfway up the sides of the cans, about two inches. (If using a 9- by 5-inch loaf pan, heat about four cups of water.) Bring water to a simmer.
-
While water heats, whisk together cornmeal, sorghum flour, brown rice flour, baking powder, baking soda, salt, and xanthan gum. Add buttermilk and molasses. Whisk until smooth. If using raisins, gently stir into the batter. Divide batter evenly among the two cans or spread batter evenly into loaf pan. Cover cans or loaf pan with a piece of parchment paper. Secure parchment with a large rubber pan. If you don't have parchment paper, use a piece of greased foil.
-
Carefully transfer the cans to the simmering water. Cover the Dutch oven with the lid. If using loaf pan, nest the loaf pan in a 13- by 9-inch pan. Carefully pour simmering water into the 13- by 9-inch pan. Water should reach halfway up the loaf pan. Cover 13- by 9-inch pan with foil. Transfer to oven and bake until a skewer inserted into the middle of the loaf comes out clean, about 90 minutes.
-
Remove the pan from the oven. Carefully remove lid or foil (steam will escape as you do this.) Remove cans or pan from the water. Allow bread to cool in the can or pan for about five minutes. Turn bread out onto a wire rack to cool completely.
Paul M says
I made a double-batch of this today. I used five pint-sized Mason jars and used my pressure canner as a steaming pot. No, I did not “can” the bread, so no worries about botulism. I let it cook for about 75 minutes, checking it a couple times along the way. It’s so dense that it’s hard to really know when it’s done, but after it cooled it seemed just fine. It’s one of the better g-f bread recipes I’ve ever found.