
Hot cross buns are a classic Easter treat. This gluten-free recipe makes sweet and tender buns with spices, raisins, and finished with a icing cross. Yeast-based recipe.
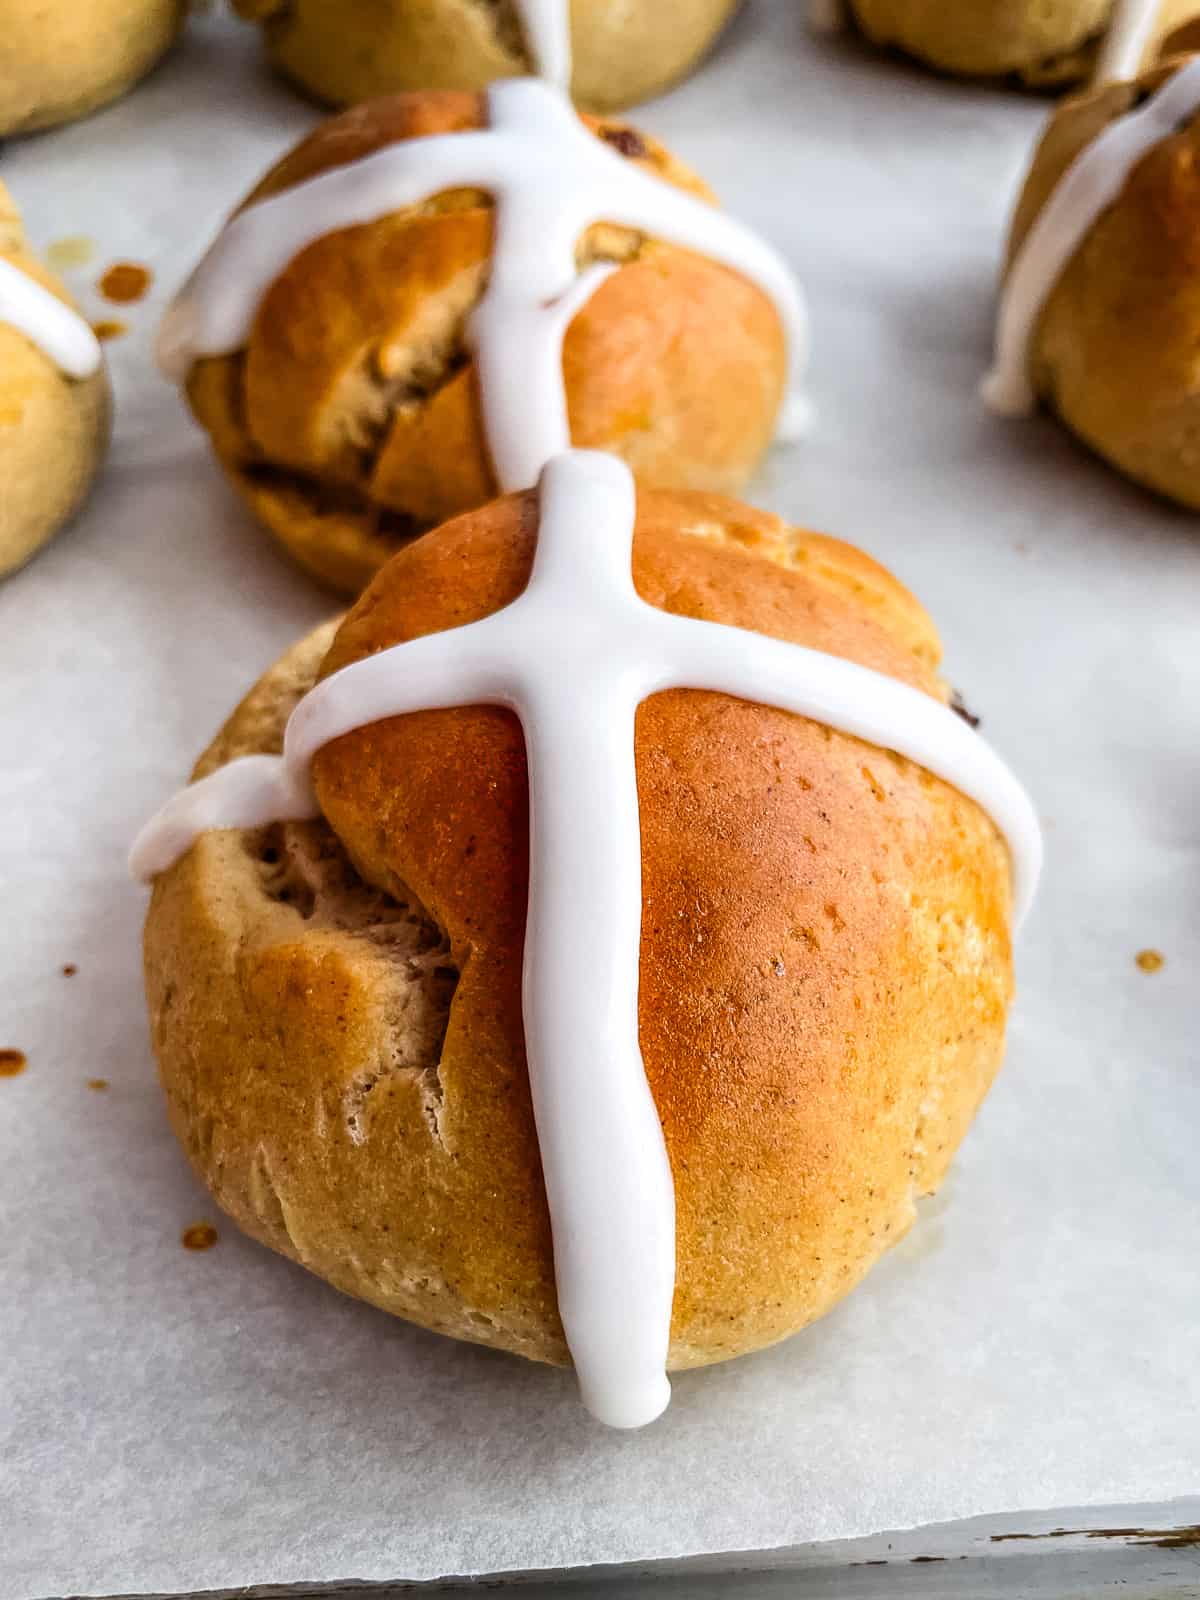
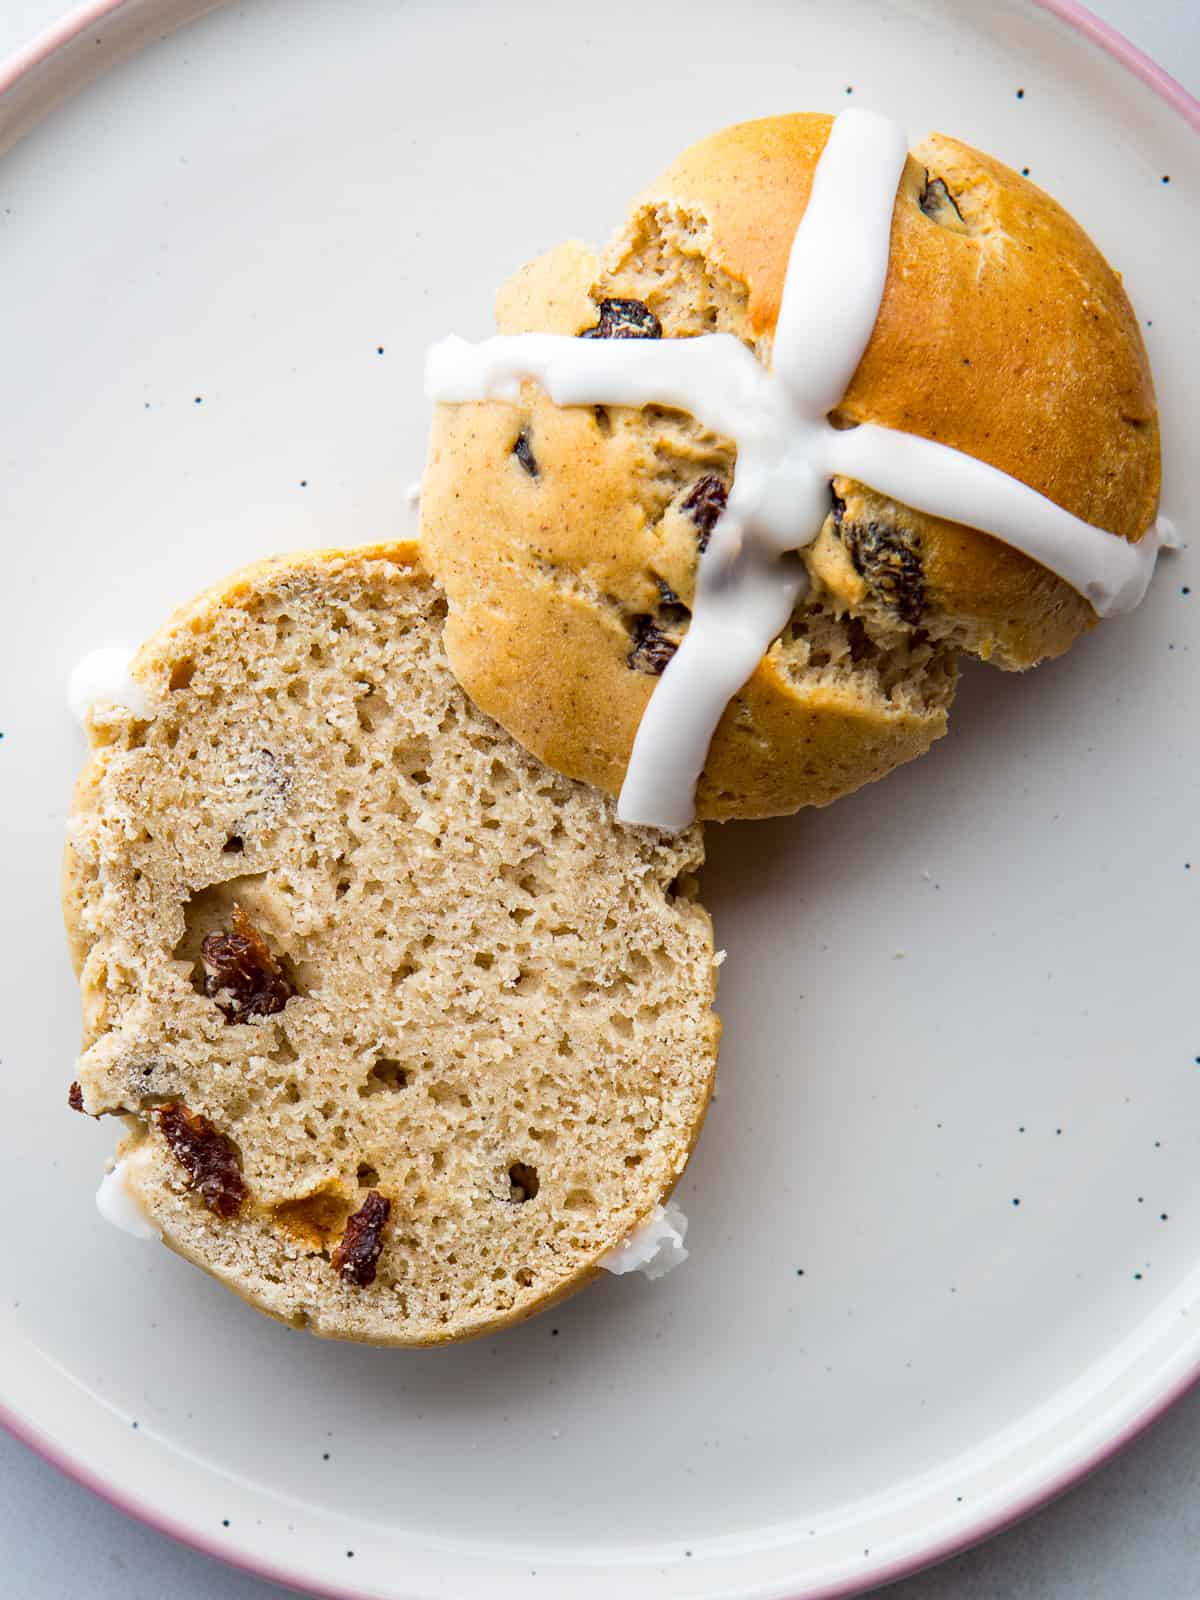
If you love hot cross buns, I’ve got some great news: the gluten-free version is wonderful. It makes buns that are soft and tender buns and filled with raisins and spices. While this is a traditional Easter recipe, you might find yourself baking them all year long.
Ingredients.
Here’s a look at the ingredients and what role they play in the recipe. As with any recipe, I suggest measuring all of your ingredients before you start mixing. This is especially important when making gluten-free yeast dough. You don’t want to get halfway into mixing and realize you’re out of an ingredient!
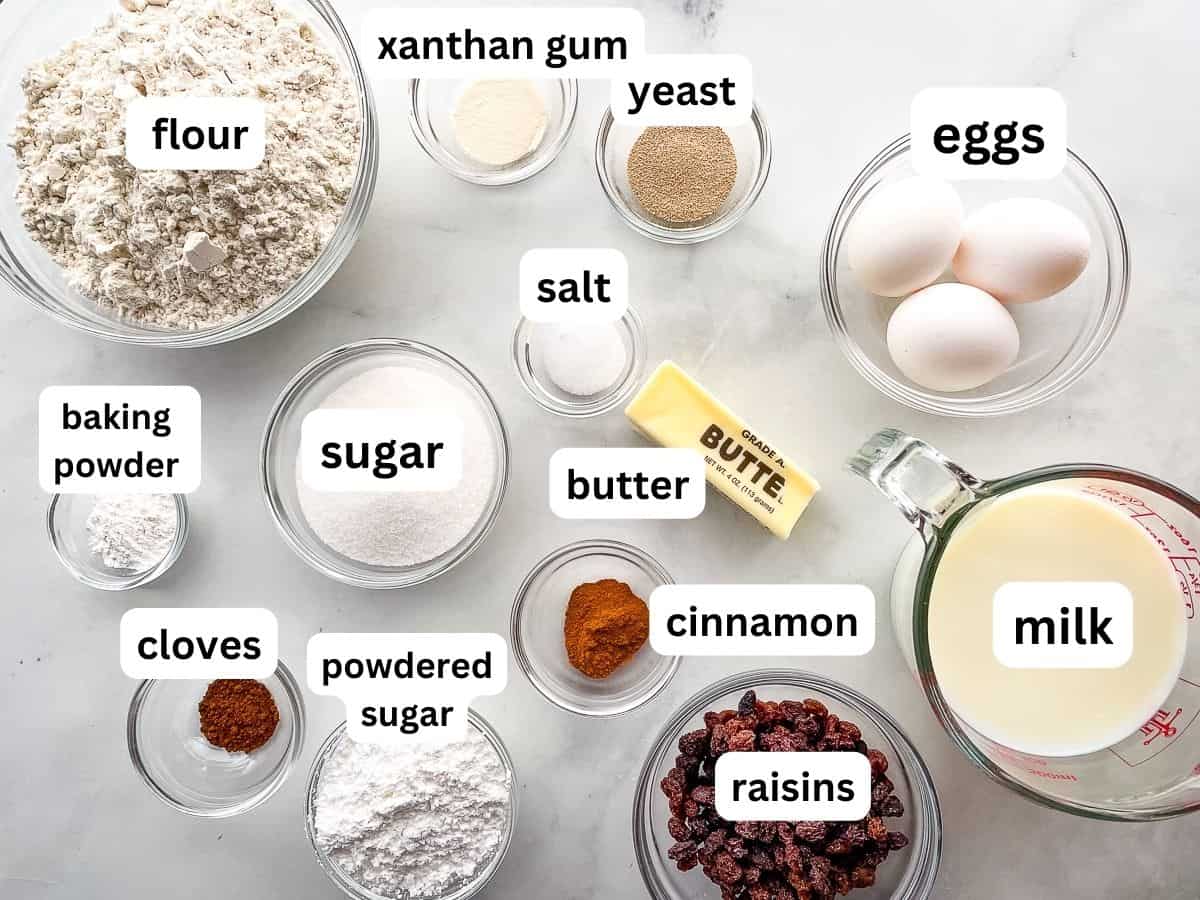
- Yeast. Instant dry yeast works perfectly for these rolls. Be sure to use yeast that’s gluten-free.
- Milk. Helps bring the dough together, adds flavor, and keeps the dough soft. If you’re dairy-free, use a dairy-free milk. Use a milk that’s about 100 degrees F.
- Gluten-Free All Purpose Flour. The recipe was tested with Bob’s Red Mill 1:1 Gluten-Free Baking Flour. Using a different flour might change the results.
- Granulated Sugar. Adds a light sweetness.
- Baking Powder. Works with the yeast to help the dough rise.
- Xanthan Gum. Important ingredient. Xanthan gum gives the dough structure. Without the additional xanthan gum, the rolls won’t rise as high and kneading the dough will be messy.
- Salt. Enhances all the other flavors and helps control yeast growth. Use table salt for this recipe.
- Cinnamon and Cloves. Adds a subtle spice.
- Eggs. Adds richness and flavor. You’ll use two large eggs in the dough and will need one egg white for the egg-wash that’s brushed onto the rolls right before baking.
- Butter. Melt the butter and let it cool slightly before using. You don’t want to pour hot, melted butter into the dough. If you’re dairy-free, use a dairy-free butter spread.
- Raisins. You can use use purple or golden raisins, dried currants, or any dried fruit you enjoy.
- Powdered Sugar. After baking, a powdered sugar cross is piped onto the top of the cooled rolls.
How to Make Gluten-Free Hot Cross Buns.
The full recipe and directions are included below. But I suggest you read through this–especially if you’ve never worked with a gluten-free yeast dough before.
Step One: Make the Dough.
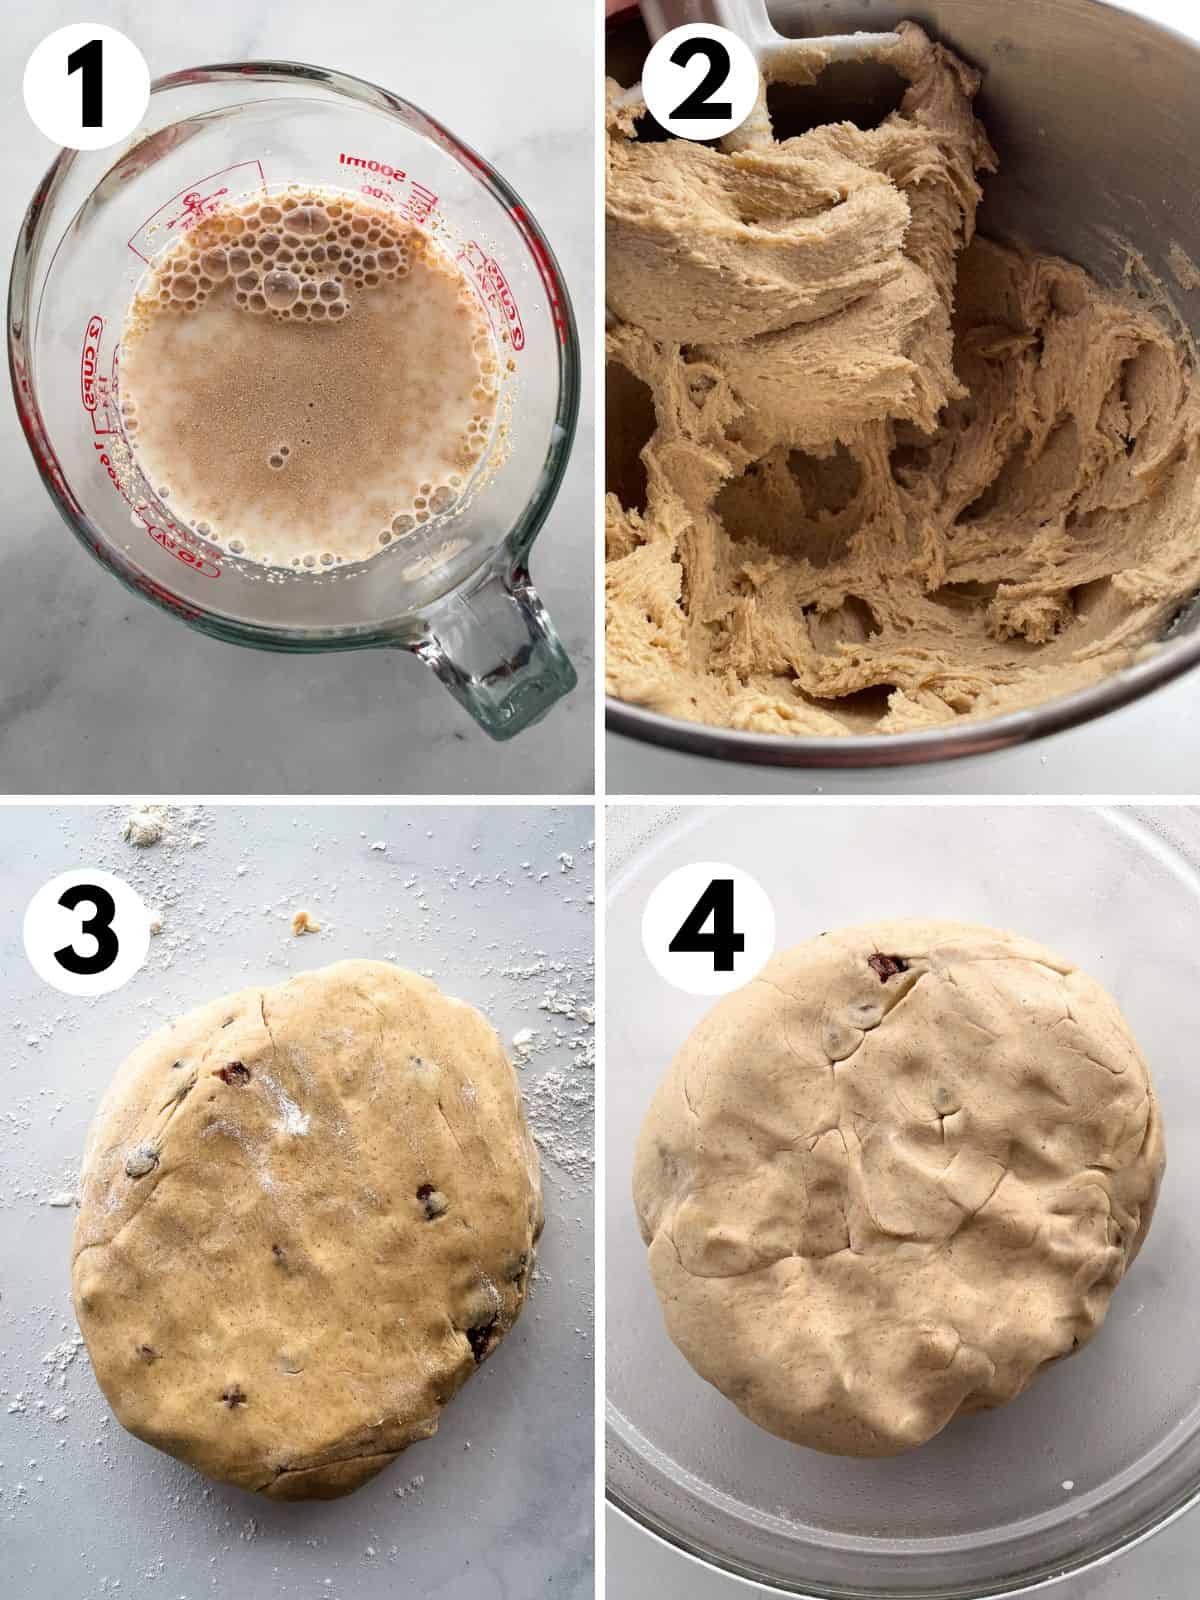
- Combine the warm milk and yeast. Let it sit for five minutes. This gives the yeast a chance to dissolve and start working. You’ll notice a few bubbles on top of the milk.
- Whisk the dry ingredients together in a large mixing bowl or in the bowl of a stand mixer.
Baker’s Note: If you don’t have a stand mixer, I suggest you mix this dough with a wooden spoon. It’s too thick for most handheld mixers.
Add the yeast-milk mixture, the melted butter, and eggs.
Mix until the dough comes together. It will be very thick but won’t form a ball in the mixing bowl. Add the raisins. Mix until they’re mixed throughout the dough. If you’re making this dough by hand, you can knead the raisins into the dough on the counter. - Dust your counter with gluten-free flour. Turn the dough out onto your counter. Knead it a few times until it’s smooth.
- Place the dough in a greased bowl. Cover with plastic wrap and let it rise until it looks light and puffy. This takes about an hour in a 70℉ room.
Step Two: Shape the Rolls.
After the dough is puffy, it’s time to shape the rolls. They’ll need another rise after shaping. But we’re getting close to baking!
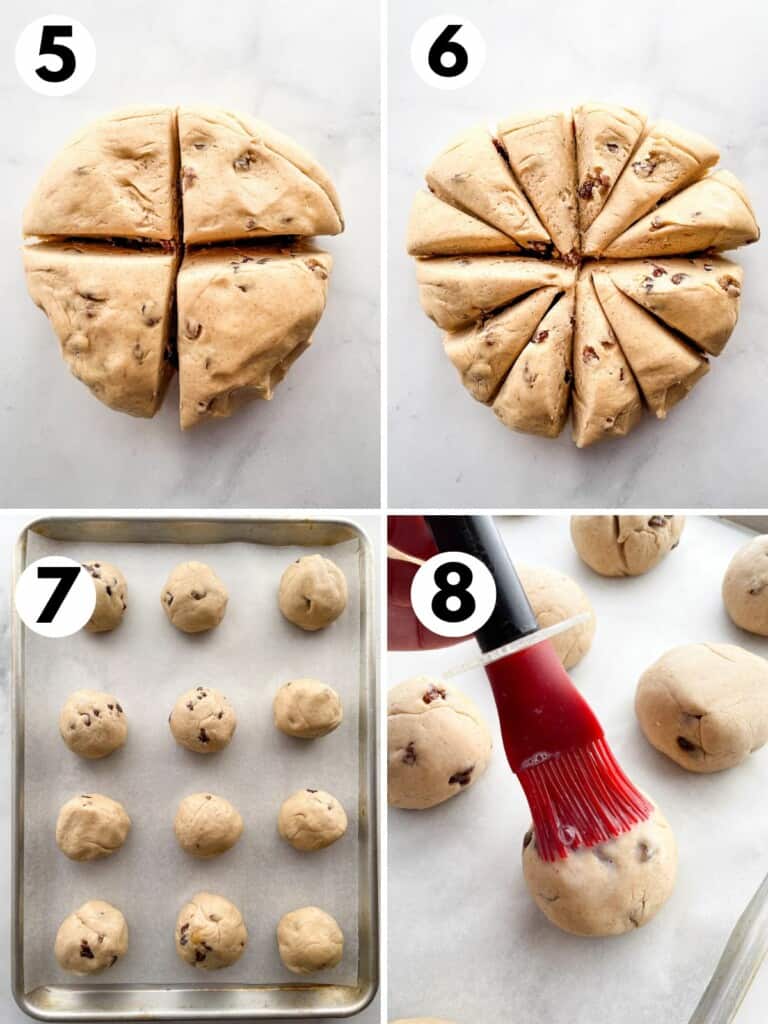
- Turn the dough back onto the counter. Knead it once or twice to deflate it. Pat it into a large round.
- Cut the dough into 12 pieces even pieces. Use a sharp knife for this step.
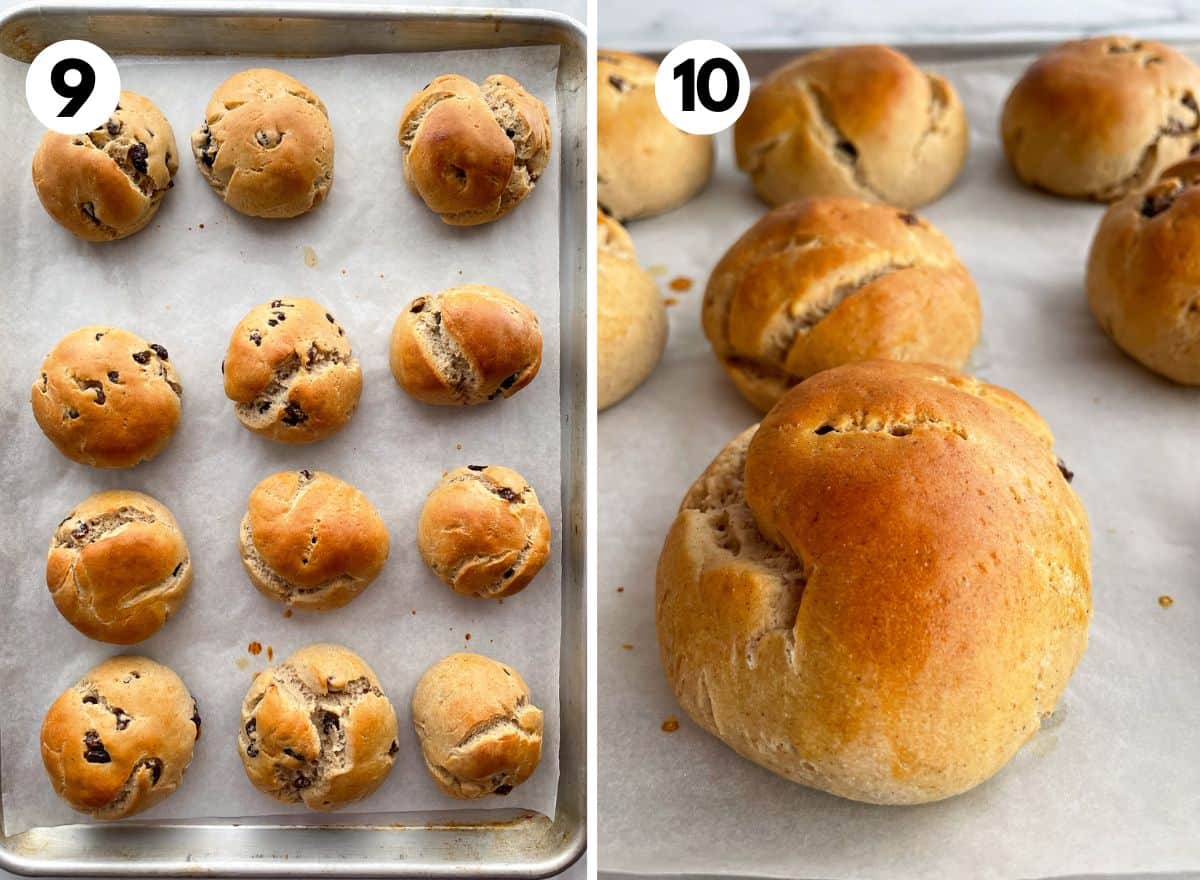
- Roll the dough into balls and place them onto a parchment-lined baking sheet. Cover the pan with a piece of greased plastic wrap. Let rise until the rolls are puffy. This takes about 45 minutes.
- When the rolls have risen, combine the egg white with milk. Brush this mixture onto the rolls right before baking. It adds a nice shine to the top of the rolls.
Baker’s Note: You can cut a cross in each roll with a sharp knife before baking. This gives the rolls a pretty appearance and can help the rolls from splitting as they bake. I didn’t cut a cross into the rolls pictured. So you can see what they look like without being cut.
Step Three: Bake and Ice.
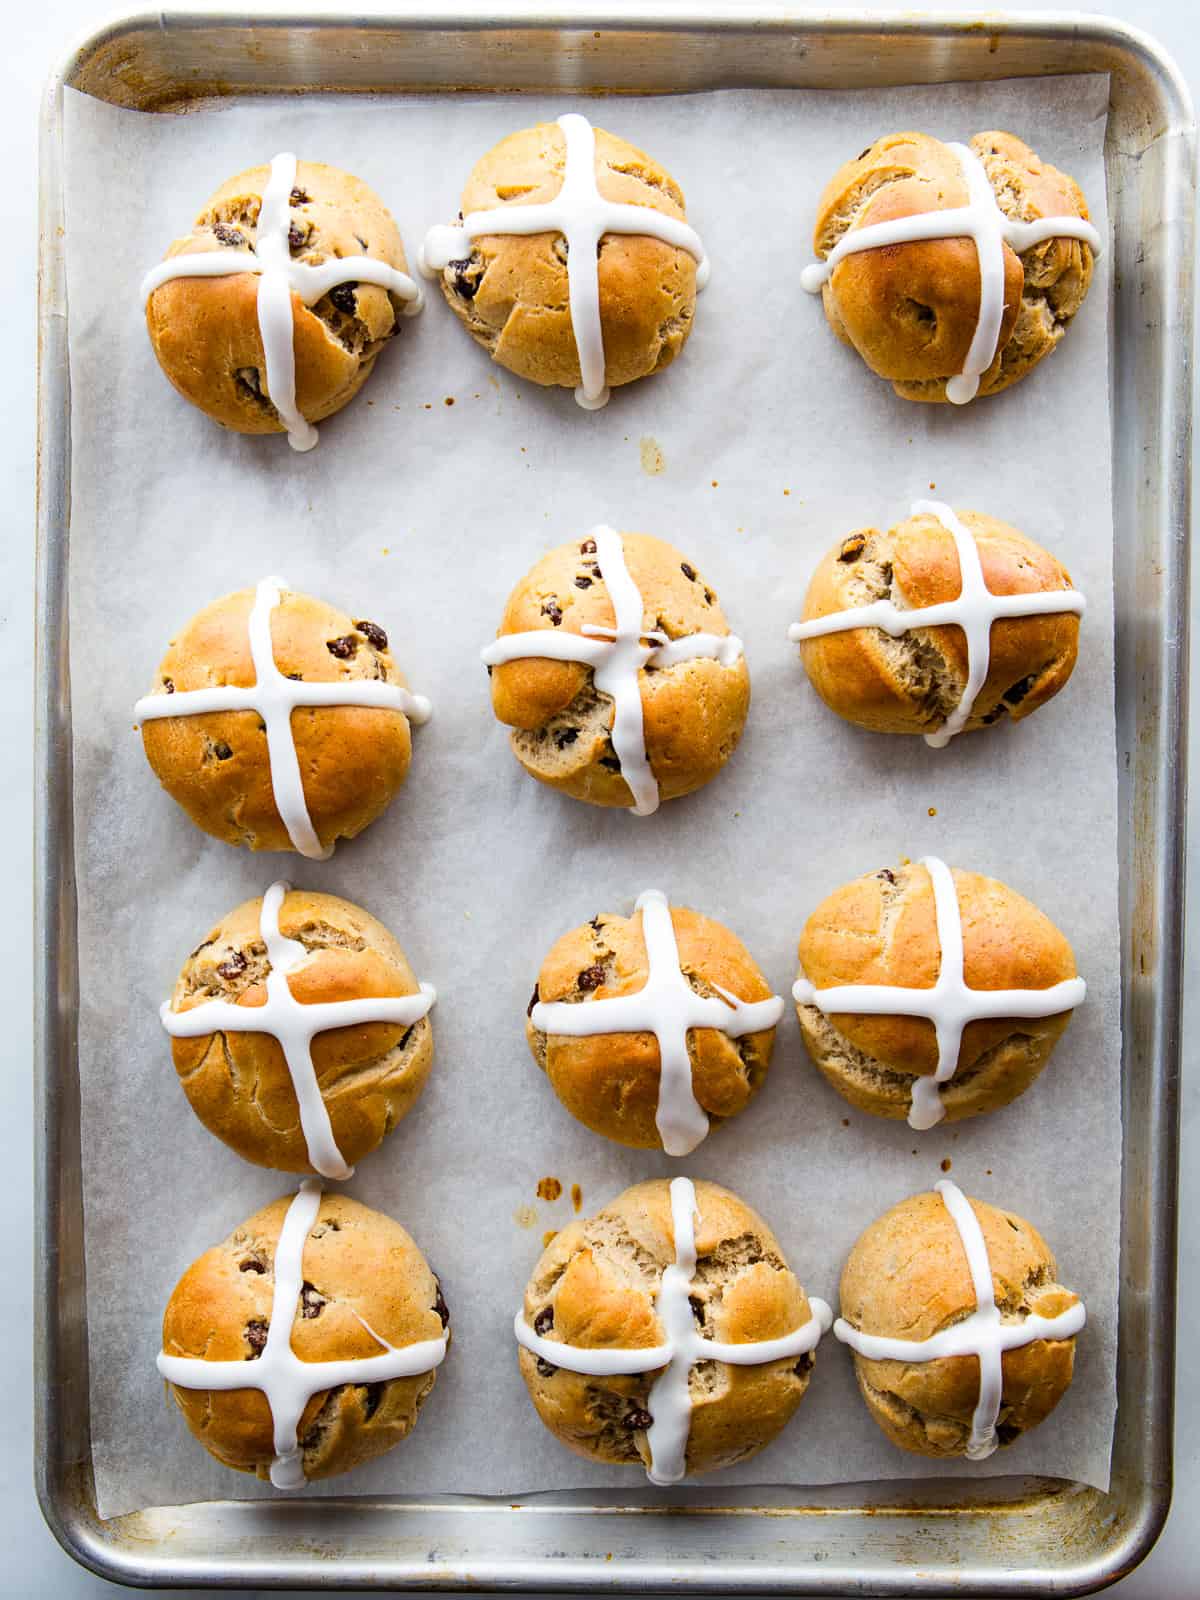
- Bake the rolls until they’re golden brown. If you don’t cut a cross into the buns, they might crack as they bake. This is normal. It gives them a rustic appearance that I really like. And those cracks are perfect for holding butter or jam.
- Let the buns cool before adding the icing cross.
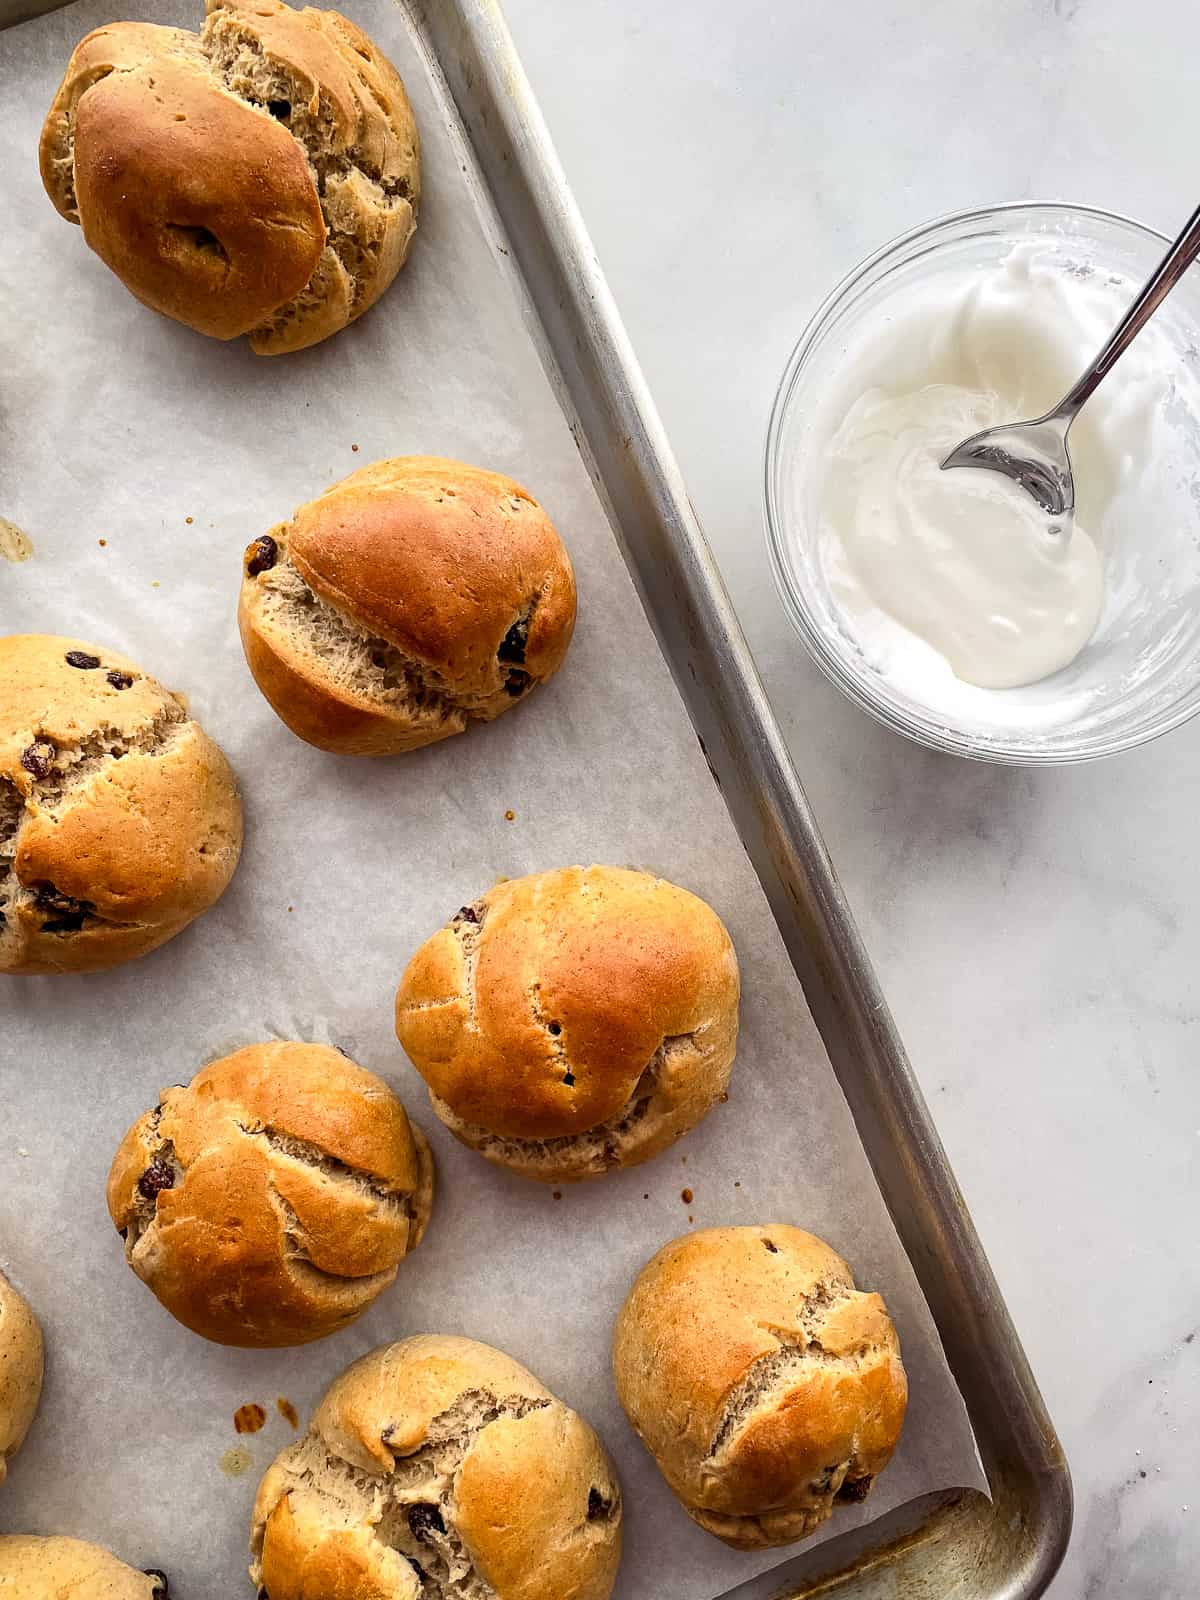
- When the rolls are cool, make the icing. It’s important that the rolls are fully cooled before icing. If they’re warm—even just a little warm—the icing will melt and run off.
Tips for Making the Best Gluten-Free Hot Cross Buns.
- Adjust the consistency of the dough. If it seems too sticky, add a little more gluten-free flour. If it seems dry–where you see flour at the bottom of the bowl or the dough doesn’t come together–add milk, one tablespoon at a time.
- Let the dough rise in a greased bowl. It’s important to transfer the dough from your mixing bowl to a greased bowl. (If you don’t have another bowl, no problem. Just wash out your mixing bowl and grease it.) The dough will stick to a non-greased bowl and won’t rise as high.
- This dough requires two rises. The first rise enhances the flavor of the finished buns. So you don’t want to skip it. If you’d like, you can mix the dough the night before you plan on baking and allow it to rise overnight in the refrigerator. The next morning, stir and shape as directed. The second rise might take a little longer since the dough will be cool from the refrigerator.
- Don’t rush the rise. If your kitchen is cool, the dough might take a little longer than an hour to rise. Look for the dough to feel light and puffy.
- Knead gently. When you knead this dough, use gentle pressure. If you press too hard, it can stick to the counter, instead of forming a ball.
- Preheat the oven early. Once the buns have almost doubled in size, preheat the oven. Don’t wait for the buns to fully double in size to preheat the oven or the rolls can rise too much and then collapse after baking.
Storing and Freezing.
These last about two days on the counter. Like all gluten-free bread, this largely depends on your location. If you live in a cold, dry area, the hot cross buns will stale faster than if you live somewhere warm and humid.
Store the cooled hot cross buns wrapped on the counter. If you aren’t going to finish them before they’ll stale, freeze them for up to two months.
To freeze, let the buns cool. Place them into a freezer container. If you need to stack them, place a piece of parchment paper between the layers.
Note: This recipe was originally shared in 2019. In 2024, it was updated. The blog posts now includes step-by-step directions and photos. The recipe has been updated to use a gluten-free flour blend and now makes a kneadable dough.

Gluten-Free Hot Cross Buns
Hot cross buns are a classic Easter treat. This easy gluten-free recipe makes sweet and tender buns with spices, raisins, and finished with an icing cross. (Yeast-based recipe.)
Ingredients
For the Dough
- 1 cup warm milk, about 105℉, plus more as needed (8 ounces; 226 grams)
- 2 ¼ teaspoons (1 packet) instant dry yeast
- 4 cups Bob's Red Mill 1:1 Gluten-Free Baking Flour, see note 1 (17 ounces; 480 grams)
- ½ cup granulated sugar (3 ¾ ounces; 105 grams)
- 2 teaspoons baking powder
- 1 teaspoon xanthan gum, see note 2
- 1 teaspoon salt
- 1 teaspoon cinnamon
- ¼ teaspoon ground cloves
- 2 large eggs
- 6 tablespoons butter, melted and cooled, see note 3 (3 ounces; 85 grams)
- ¾ cup raisins, see note 4 (about 4 ounces; 113 grams)
For the Egg Wash
- 1 egg white
- 1 tablespoon milk
For the Icing Crosses
- 1 ¼ cups powdered sugar (5 ounces; 140 grams)
- 1 tablespoon milk, plus more as needed
- 1 teaspoon vanilla extract
Instructions
-
See notes included below before making this recipe.
-
Make the Dough: Combine the warm milk and yeast in a small bowl. Stir to dissolve. Allow to stand for about five minutes.
-
In a large bowl or the bowl of a stand mixer, whisk together the gluten-free flour, sugar, baking powder, xanthan gum, salt, cinnamon, and cloves.
-
Add the milk-yeast mixture, eggs, and melted butter. Mix on medium-low speed until thick and smooth, about three minutes.
Note: If you don't have a stand mixer, mix the dough with a wooden spoon. This dough is very thick and might be too much for most handheld electric mixers.
-
Stop the mixer. Add the raisins. Mix until raisins are mixed throughout the dough.
Dust your counter with gluten-free flour. Turn the dough onto the counter and knead it a few times, until it's smooth. If the dough seems dry, add a little more milk, one tablespoon at a time. If it's very sticky, add a little more gluten-free flour until you can knead it.
Transfer dough to a large greased bowl. Cover the bowl with a piece of greased plastic wrap.
-
Rise: Allow dough to rise in a warm place until it looks light and puffy, about one hour in a 70℉ room. Or refrigerate overnight.
-
Shape: Turn the dough out onto a gluten-free floured counter.
Knead it a few times to deflate. Pat the dough into a large round. Cut into 12 pieces.
Roll each piece into a ball. Line a baking sheet with parchment paper. Place the buns on the baking sheet. Cover with greased plastic wrap. Allow buns to rise until light, about 45 minutes.
-
When buns have almost doubled in size, preheat oven to 375°. (If you wait until they double in size to preheat the oven, the buns can over-rise and sink during baking.)
-
Remove plastic wrap from the pan. Whisk together the egg white and milk. Brush each bun with the egg wash.
(optional) Using a sharp knife, cut a cross on top of each bun.
-
Bake for 20 minutes or until golden brown.
-
Once the buns are completely cool, combine the powdered sugar, milk, and vanilla extract in a small bowl. Stir until smooth. If icing is too thick, add more milk, one teaspoon at a time. Transfer icing to a pastry bag with a round tip or a disposable plastic bag with a small hole cut in the corner.
Pipe a cross on top of each bun.
-
Store buns covered on the counter for up to two days.
Freeze cooled buns for up to three months. To freeze gluten-free hot cross buns, allow them to cool completely. Place the buns in a freezer container or bag. If you need to layer the buns, place a piece of parchment paper between the layers.
Freeze for up to three months. Thaw the buns at room temperature overnight before serving.
Recipe Notes
Baker’s Note: Step by step directions with full instructions are included in the blog post. If this is your first time making this recipe or you’re new to working with gluten-free yeast dough, I suggest reading it before making the recipe. It includes a lot of helpful tips for making these buns. Have fun!
Note 1: This recipe was tested with Bob’s Red Mill 1:1 Gluten-Free Baking Flour. Using another flour might cause the recipe not to work as described.
Note 2: The xanthan gum is an important ingredients, even though the flour blend already contains it. Without the additional xanthan gum, the dough is too sticky to knead and won’t rise as high.
Note 3: Cool the butter after melting for a minute or so. You don’t want to pour hot, melted butter into the dough.
Note 4: If your raisins are hard, soak them in warm water for 15 minutes before using. Then drain, pat dry, and use as directed.
Courtenay says
My buns turned out a little flat – I used cup4cup because my supermarket was out of Bob’s 1-1, and added a half teaspoon more xanthan gum. Overnight proofing in the fridge went well, but they deflated quickly while proofing in the oven at 150F, clocking in at 32 mins until deflating rather than an hour like I normally would do. Do you recommend these be risen outside of a proofing oven/drawer for the second rise? They still smell and look/feel delicious, puffy, and yummy… they’re just a teeny bit flatter than normal.
Elizabeth says
I haven’t tested them in a proofing drawer. Based on what you describe, it sounds like they rise a bit too high. Next time, I’d bake them sooner.
Nicola Phillips says
Hi Good day to you i’m new to your site. i would like to know if i can use bob red mill gluten fee all purpose flour for this recipe. i would really like to try. since i can’t use the regular flour.
Elizabeth says
Yes! I’d use the Bob’s Red Mill 1:1 Gluten-Free Baking Flour. It’s the one in the blue bag. 🙂
Michael Varlas says
Tried this twice and could not get the dough to the right consistency for shaping. We even added a cup of brown rice flour and about a quarter cup of tapioca extra to try and get it to be a dough rather than a batter. They hydrated for an hour and a half, so that isn’t the problem. We did use instant yeast, but all my reading shows that it should have not made a difference, and it was properly bloomed. We ended up putting the batter in a muffin tin and a cake tin and baking. They had a bit of a baking powder taste also, but that didn’t stop me from eating a couple of them. I am wondering if there is a mis-print on the recipe?
Elizabeth says
Nope. No typo. The dough, as you can see in the photos above, is very soft, like a batter. So you scoop it with a muffin scoop or measuring cup.
As for the baking powder taste; that’s odd. There are only 2 teaspoons of baking powder to 2 2 1/2 cups of flour. That’s a standard ratio. You shouldn’t have been able to taste it. However, the baking powder provides a little lift. You can forgo it if you’d like.
Susanne says
My dough is like batter. It did rise but is still battery. Tried to scoop and it has run all over the pan. Trying second rising to see if anything happens. Any suggestions would be greatly appreciated.
I make your sandwich bread every week with no problem.
Many thanks.
Elizabeth says
I’d add a bit more flour to thicken the batter. That should solve the problem. Simply stir it into the dough until the dough thickens and then allow the dough to rise again. YOu should be all set.
Which gluten-free flour blend did you use, by the way?
Susanne says
I used brown rice flour and tapioca as the recipe said. I’m wondering if there should have been xantham gum in it.
Love your recipes!
Many thanks!
Elizabeth says
Argh! Argh! Argh! You are SO right. There was an omission in the recipe. It should have included one teaspoon xanthan gum. I am so sorry this happened.
Thank you so much for bringing this to my attention in such a kind way. The recipe should be fine now.
Again, I’m sorry about this error.
Susanne says
Thank you so much Elizabeth!
I will be trying this recipe again!
I love your recipes! This was the first one that didn’t turnout so I was quite surprised!
BUT now we know the answer!!!
Keep up the great work!
Many thanks!
Susanne says
Hi Elizabeth!
Great success this time!!
Many thanks and Happy Easter to you and your family!
Elizabeth says
Hooray! Same to you!
mary says
I had a good result, my husband bought gluten free flour for bread making by accident. We live in spain so not able to get the suggested strong wheat flour. The bread flour had yeast and xanthan gum added. I mixed up the ingredients adding some extra flour and left to rise, not much happened for an hour or so. So mixed up 15g of dry yeast in warm water let it bubble and then added to mixture. After around 2 hours it doubled in size all soft and light, Spooned onto baking tray in buns size portions and let rise again, then baked in oven. Kept an eye on them as the buns went brown quickly. The texture was very soft, not much flavour but great with butter. Happy Easter.
KO says
Loved how these turned out. I have baked with yeast in AGES, and I really liked the flavour.
Only thing is I am at a high altitude in Calgary, Canada and the crust on the bottom was way more done then the rest of the bun. We adjusted the temperature Down 25 degrees C, and added in a few minutes. The second tray was much better then the first.
Also, I made orange icing. That was fantastic with the cranberries we used instead of raisins.
Muriel says
Sounds wonderful, I am going to try as I miss them. But did you give the oven temp? I seem to not be able to find it. Thanks
Muriel says
Found it, read too fast and it was in the description of process. I looked at instructions and at spot where they were put in oven, sorry