
Soft Gluten-Free Dinner Rolls are easy to make! The rolls bake up soft and tender. Perfect recipe for a first-time bread baker.
I first shared this recipe for gluten-free soft rolls in 2019, and I’m so glad so many of you have used it for your holiday meals! Some of you mentioned that the rolls could be a bit easier to make, especially since scooping sticky, gluten-free dough can be quite messy.
So, I decided to tweak the recipe. The result is the same soft, tender rolls you love—now a little easier to make.
Instead of scooping the dough, you’ll simply cut it into nine pieces and roll them into balls. I’ve also switched to baking them in an 8×8-inch pan instead of a 9×13-inch pan. This helps the dough touch as it rises, giving the rolls more support and making them taller.
I hope you loved the recipe before, and I’m sure you’ll love it even more now!
Happy Baking,
Elizabeth
Ingredients Explained.
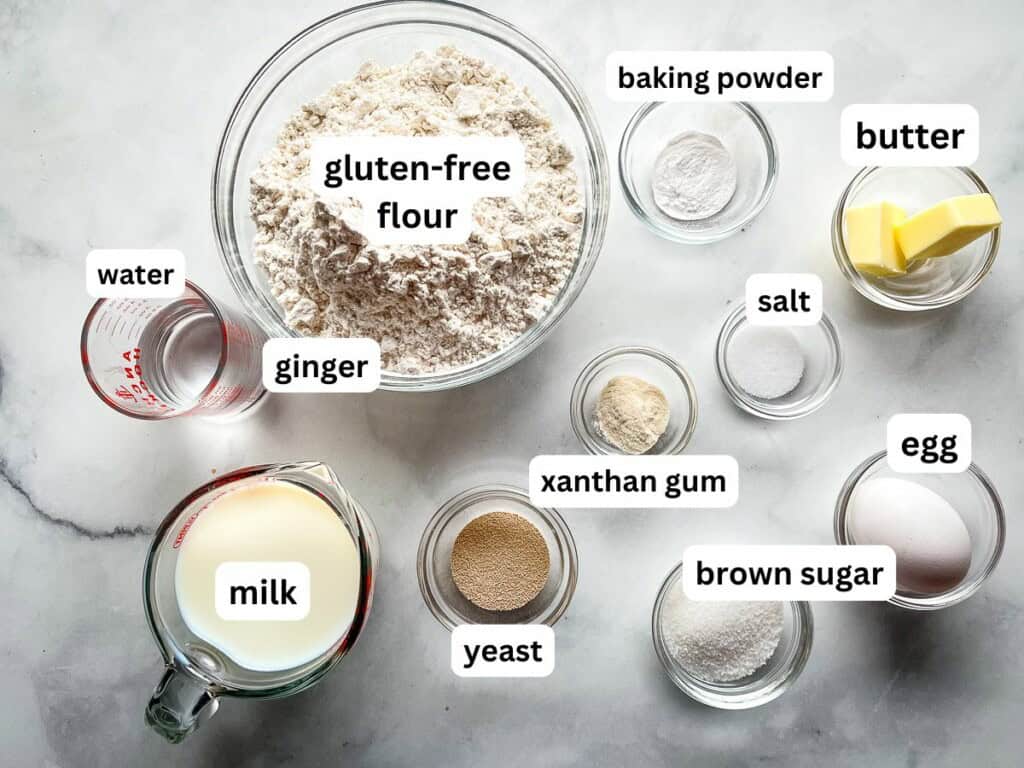
- Gluten-Free Flour. This recipe uses Bob’s Red Mill 1:1 Gluten-Free Flour Blend. If you prefer to mix your own flour, replace the flour with a mix of brown rice flour or millet and tapioca starch. The individual measurements are included with the recipe.
Ingredient note: Since all commercial flour blends vary, I can’t say if this recipe works with a different blend. - Egg. One egg brings the dough together. Without the egg, the rolls turn out dense and heavy.
- Milk and Butter. Whole milk and melted butter add richness and flavor
- Yeast. Instant dried yeast is my preferred yeast. Be sure to use a yeast that’s gluten-free.
- Baking Powder. Helps with rise.
- Xanthan Gum. A teaspoon of xanthan gum is needed for the best texture. (Use the xanthan gum even though the gluten-free flour already includes it.)
- Sugar. A little sugar helps with browning and flavor.
- Salt. Adds flavor and controls the yeast activity.
Dairy-Free Note: For a dairy-free version, use dairy-free milk and butter.
Rolls made without dairy tend not to brown as well as those made with dairy. They also stale a little faster without the fat from the whole milk and butter. To prevent the gluten-free/dairy-free rolls from stalling quickly, freeze the leftovers. (See directions below on how to best freeze gluten-free buns.)
How to Make Gluten-Free Soft Dinner Rolls: Step by Step.
There’s three parts to making this recipe: mixing the dough, letting it rise, and baking. Let’s take a look at each step.
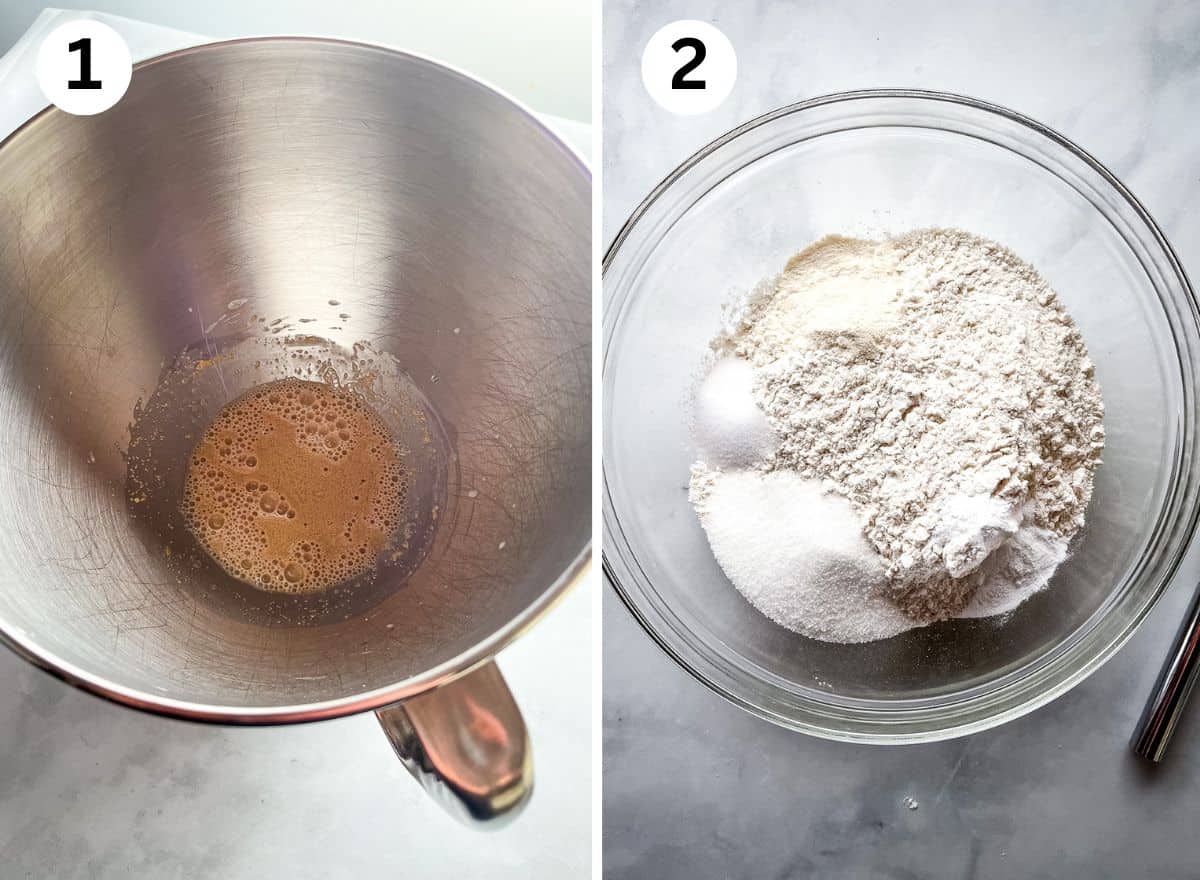
- Dissolve the yeast in a little warm water. I do this right in my mixing bowl.
- Whisk the dry ingredients together in a separate bowl. This helps the sugar, xanthan gum, baking powder, and salt mix evenly throughout the gluten-free flour.
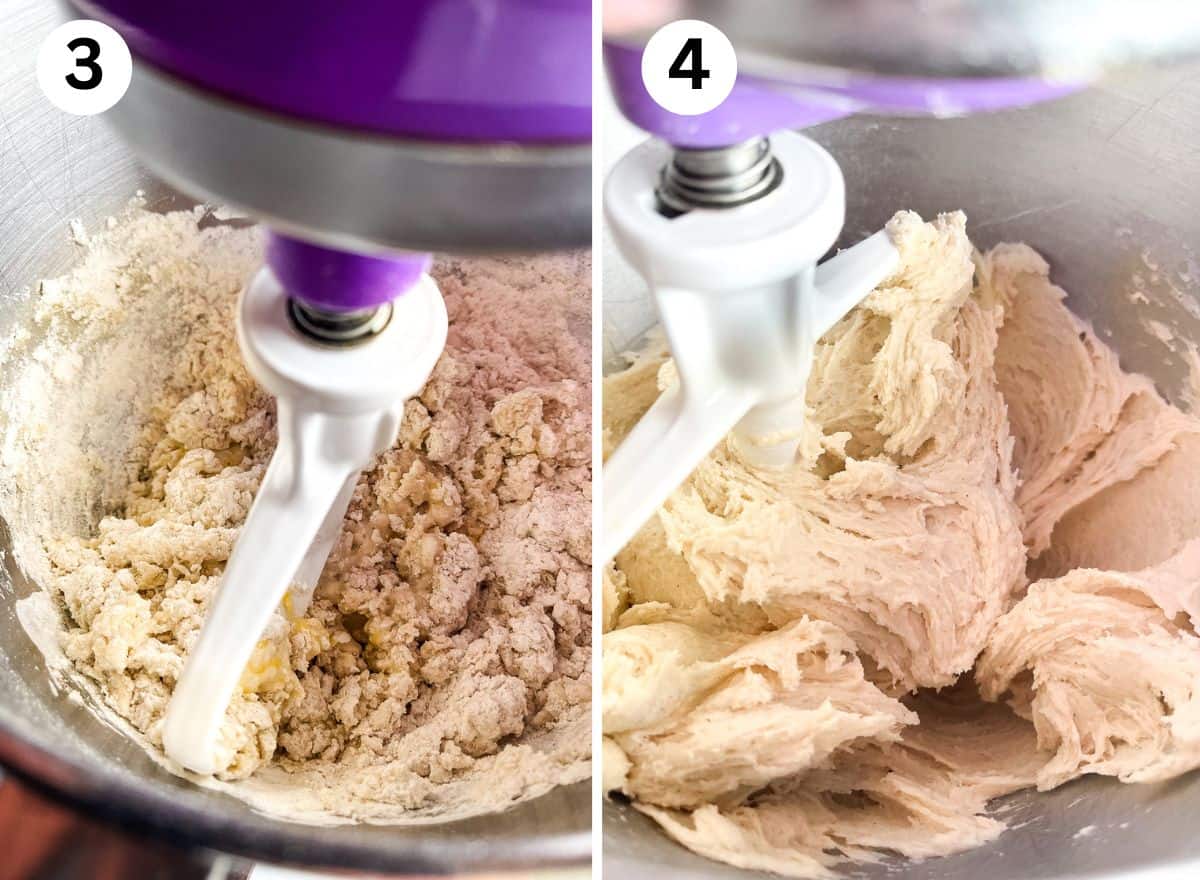
- Once the yeast is dissolved, add the remaining ingredients to the yeast mixture. Mix the dough on low speed. At first, the dough looks dry and crumbly. This is normal.
- Mix until a thick dough forms. This recipe makes a thick, sticky dough. For the best results, mix it together in a stand mixer with the flat paddle attachment. Note for new bakers: the dough won’t form a tight dough ball.
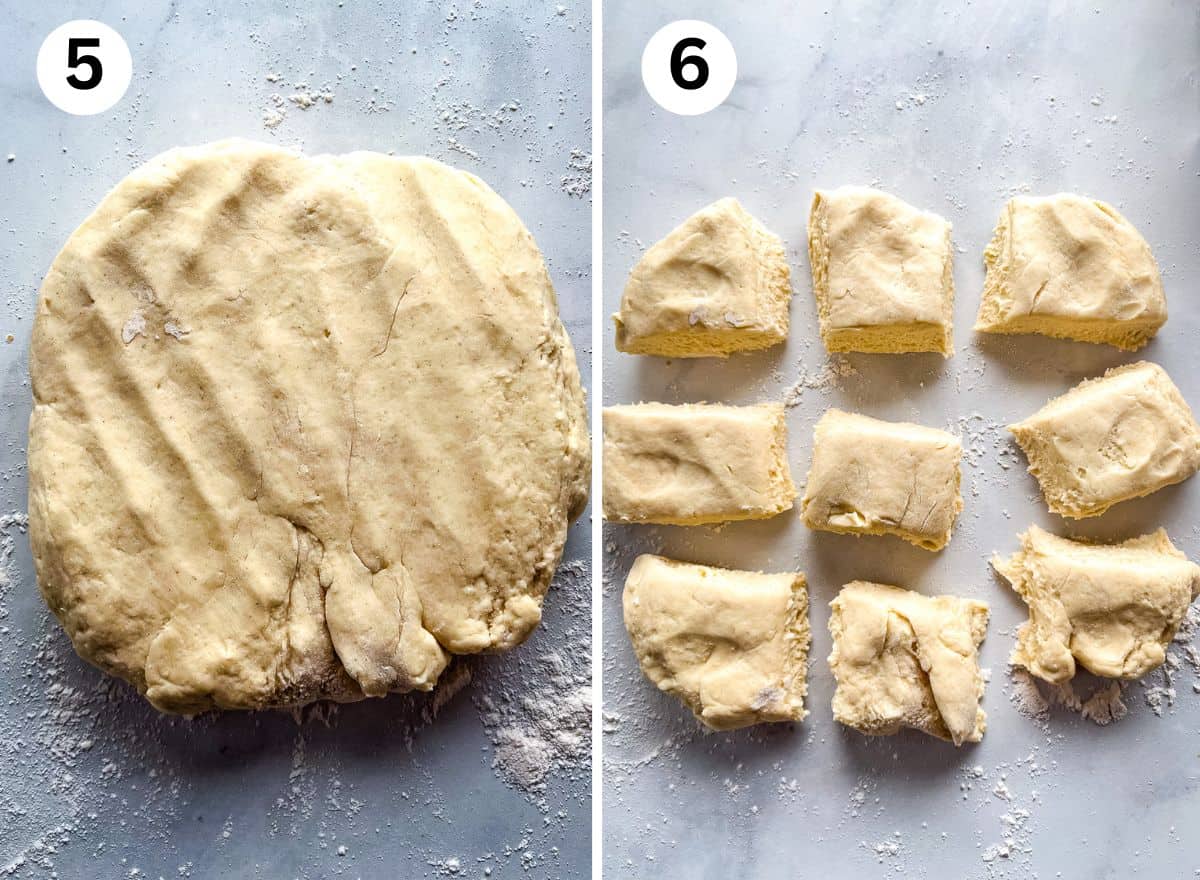
- Put a generous amount of gluten-free flour on your counter. Transfer the dough to the counter. Dust the top with additional gluten-free flour. Pat the dough into a rectangle.
- Cut into 9 pieces. Use a sharp knife for this.
- Lightly dust each piece of dough with gluten-free flour. Then roll into balls between your palms.
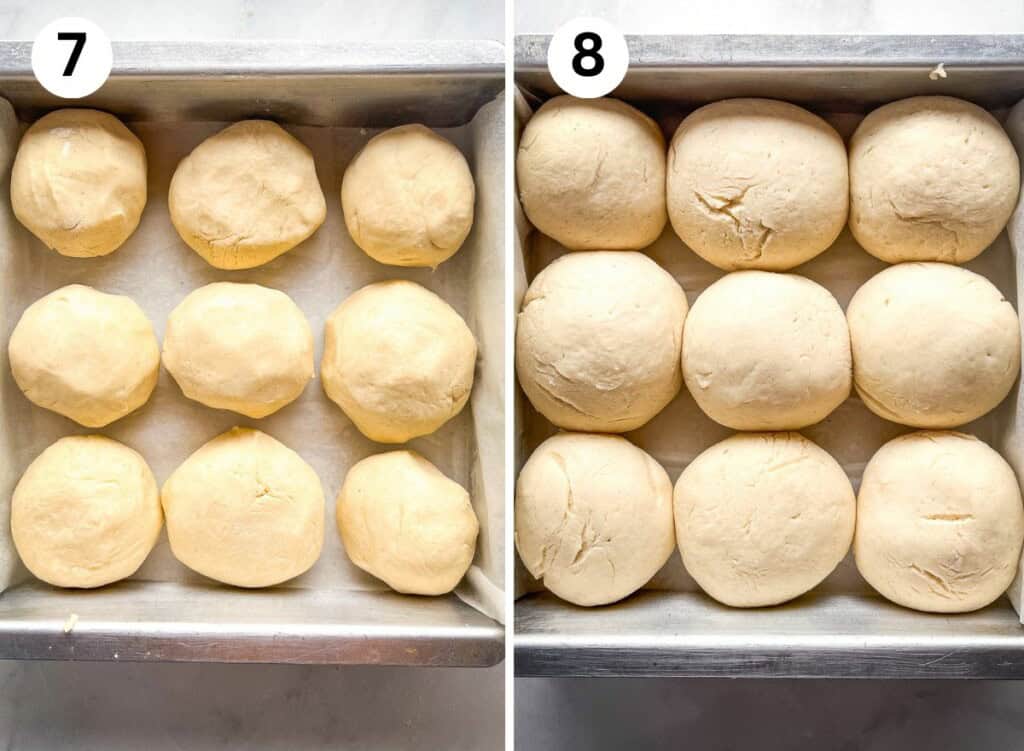
- Place the dough balls into a parchment-lined and greased 8-inch square pan. Cover with plastic wrap-this keeps the dough from drying out. Let the rolls rise in a warm place for about an hour. You want the rolls to almost double in size and look puffy when they’re ready.
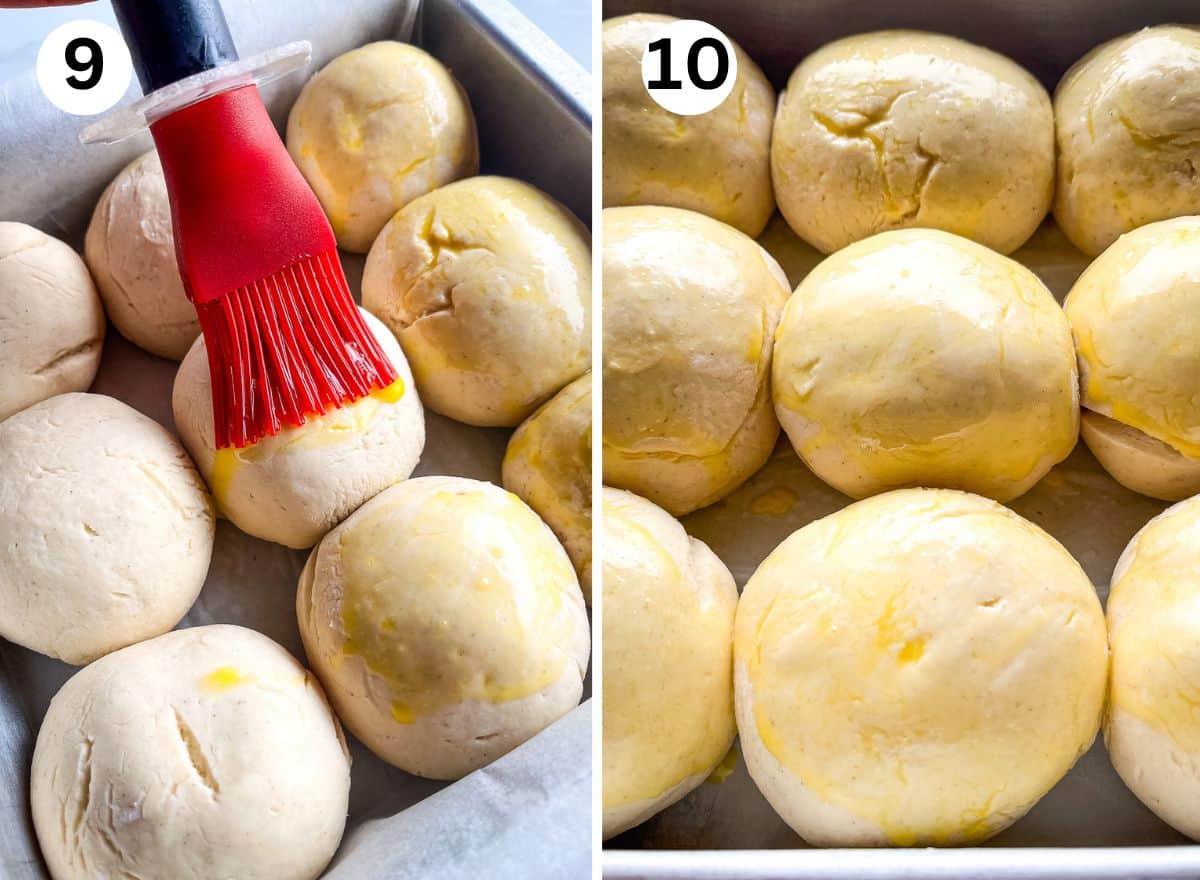
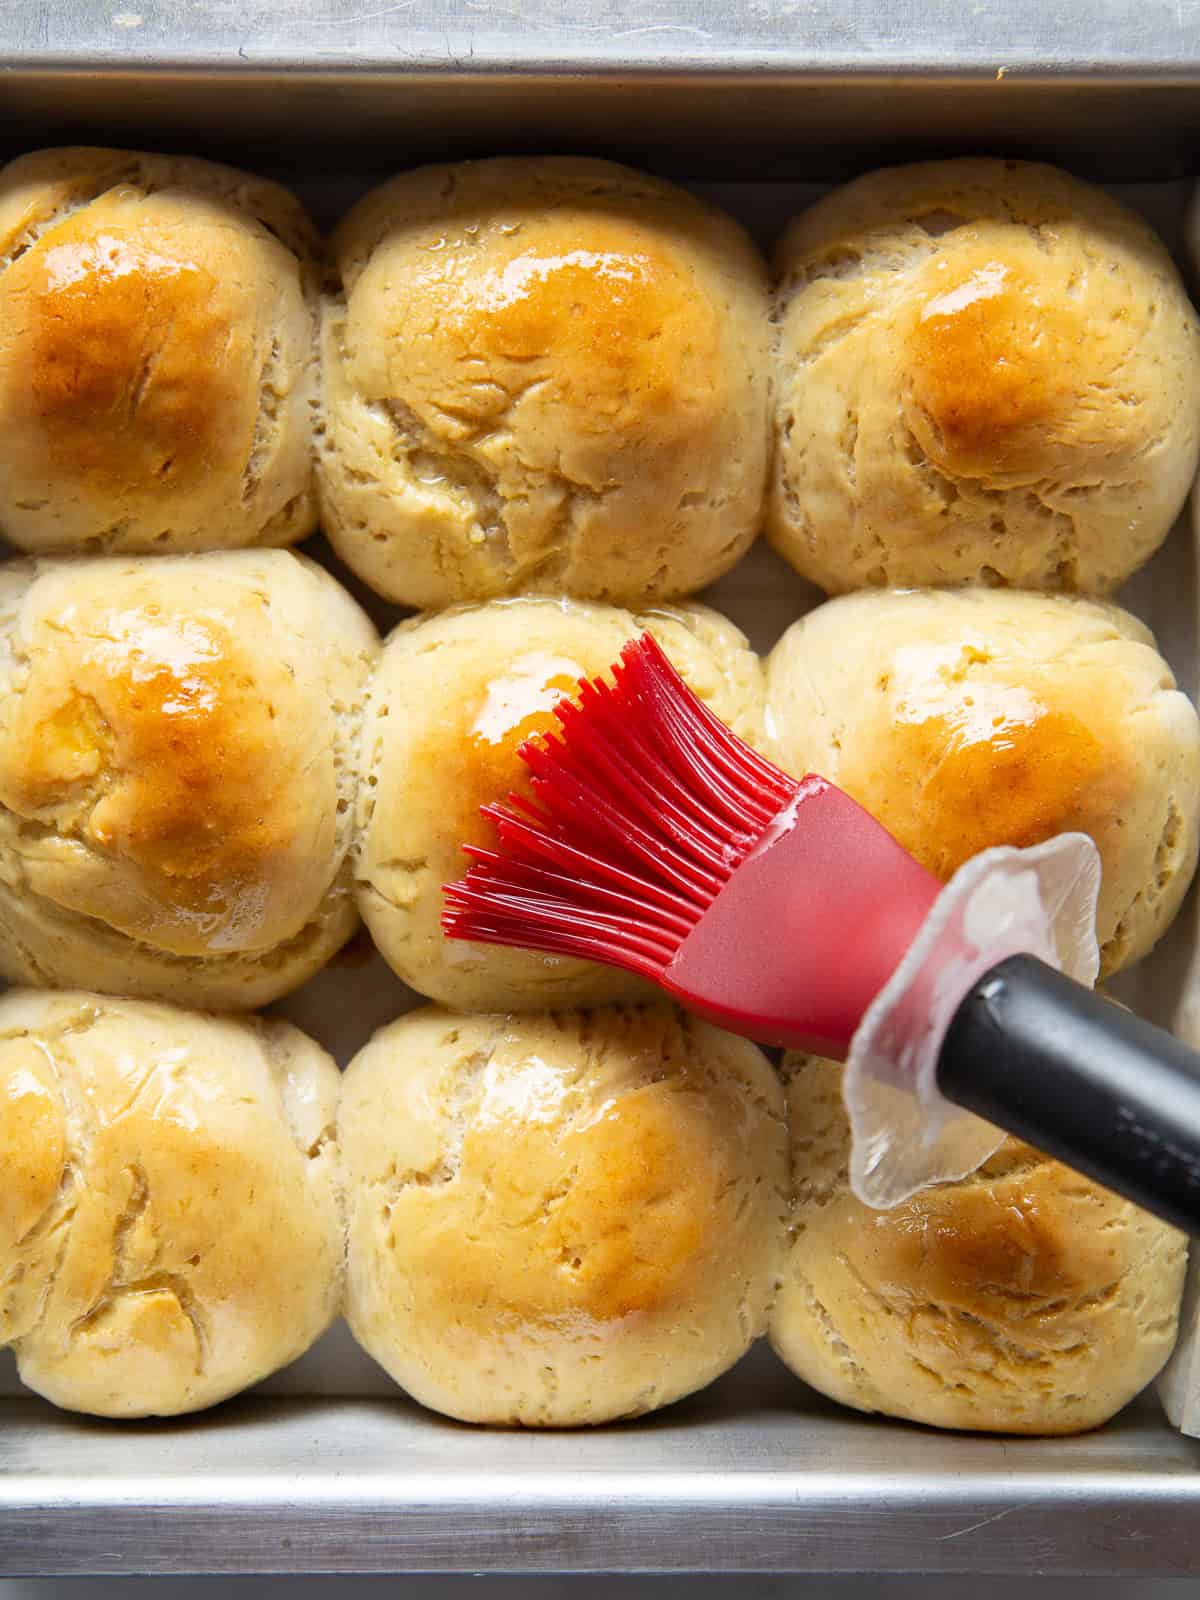
- Brush with egg. Once the rolls have risen, brush them with a whisked egg right before baking. This helps them to brown nicely as they bake.
- Gently coat each roll with egg to cover the entire top. I usually go back and coat them twice.
- A pan takes about 35 minutes to bake in a preheated 375℉ oven. To ensure the rolls are fully baked, I like to take the temperature. The center of the roll should reach 205℉.
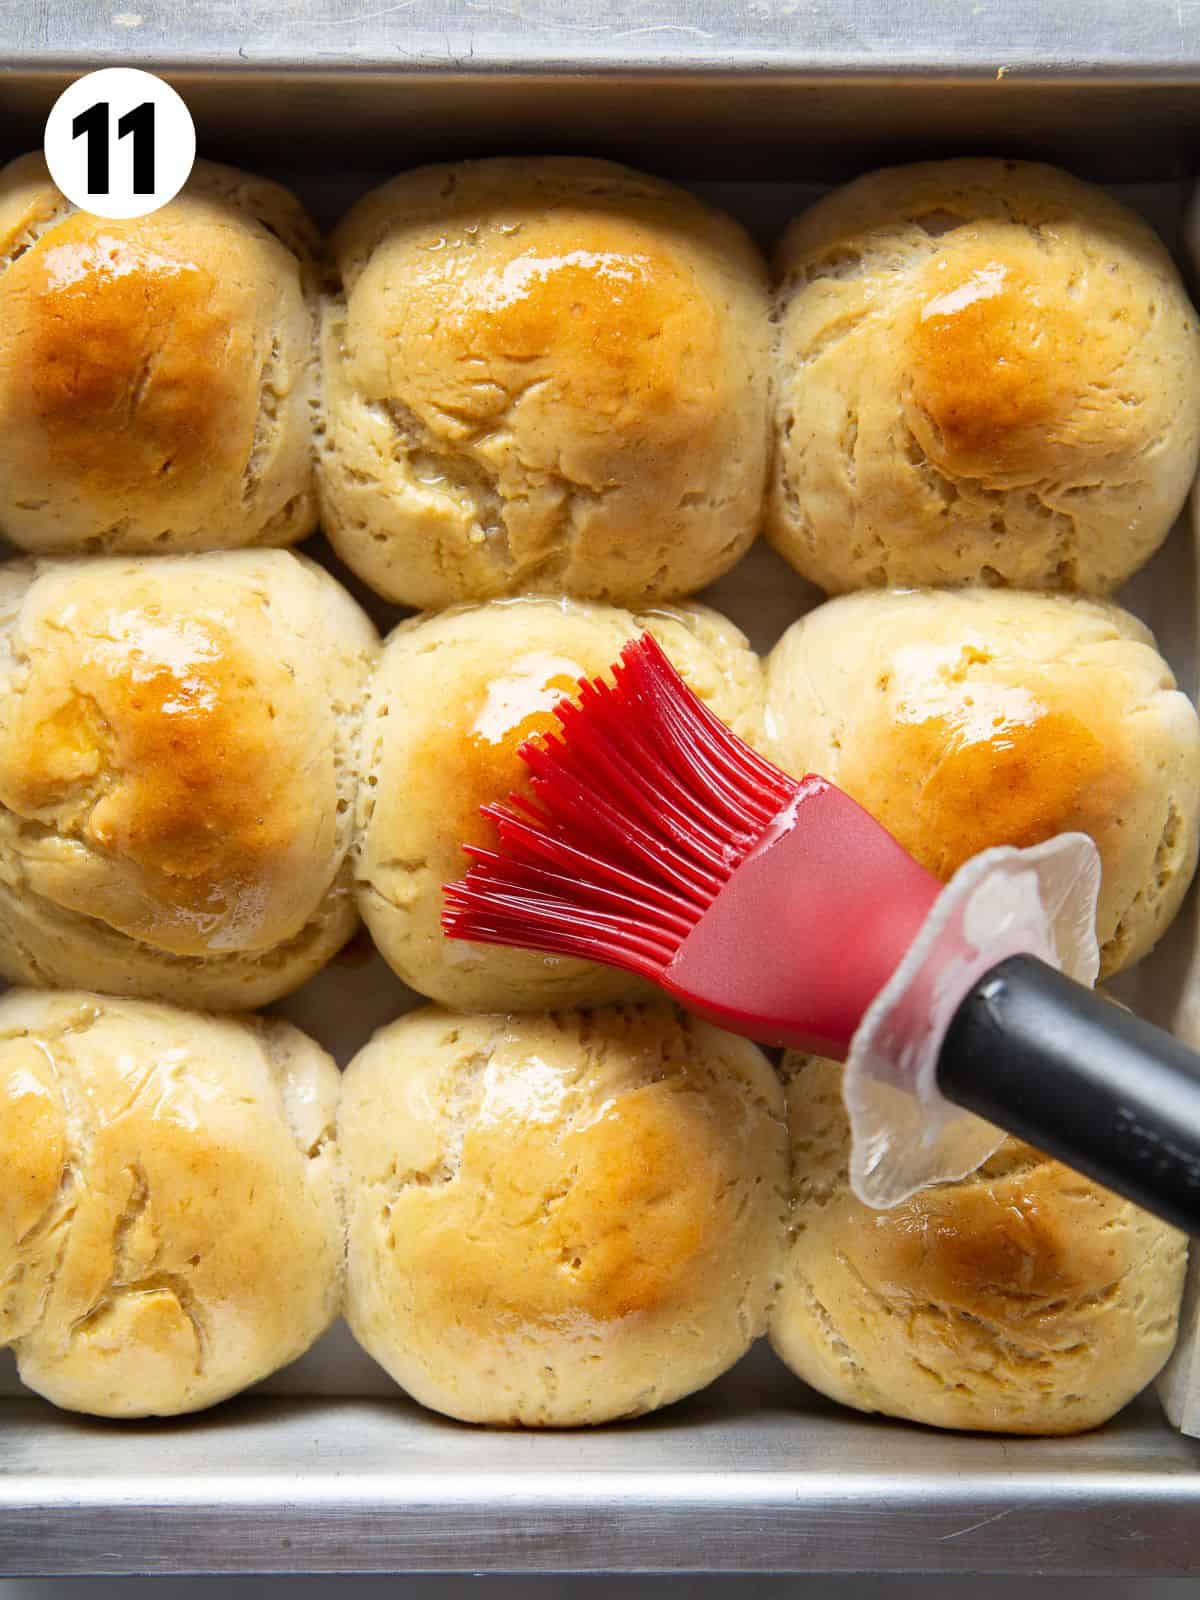
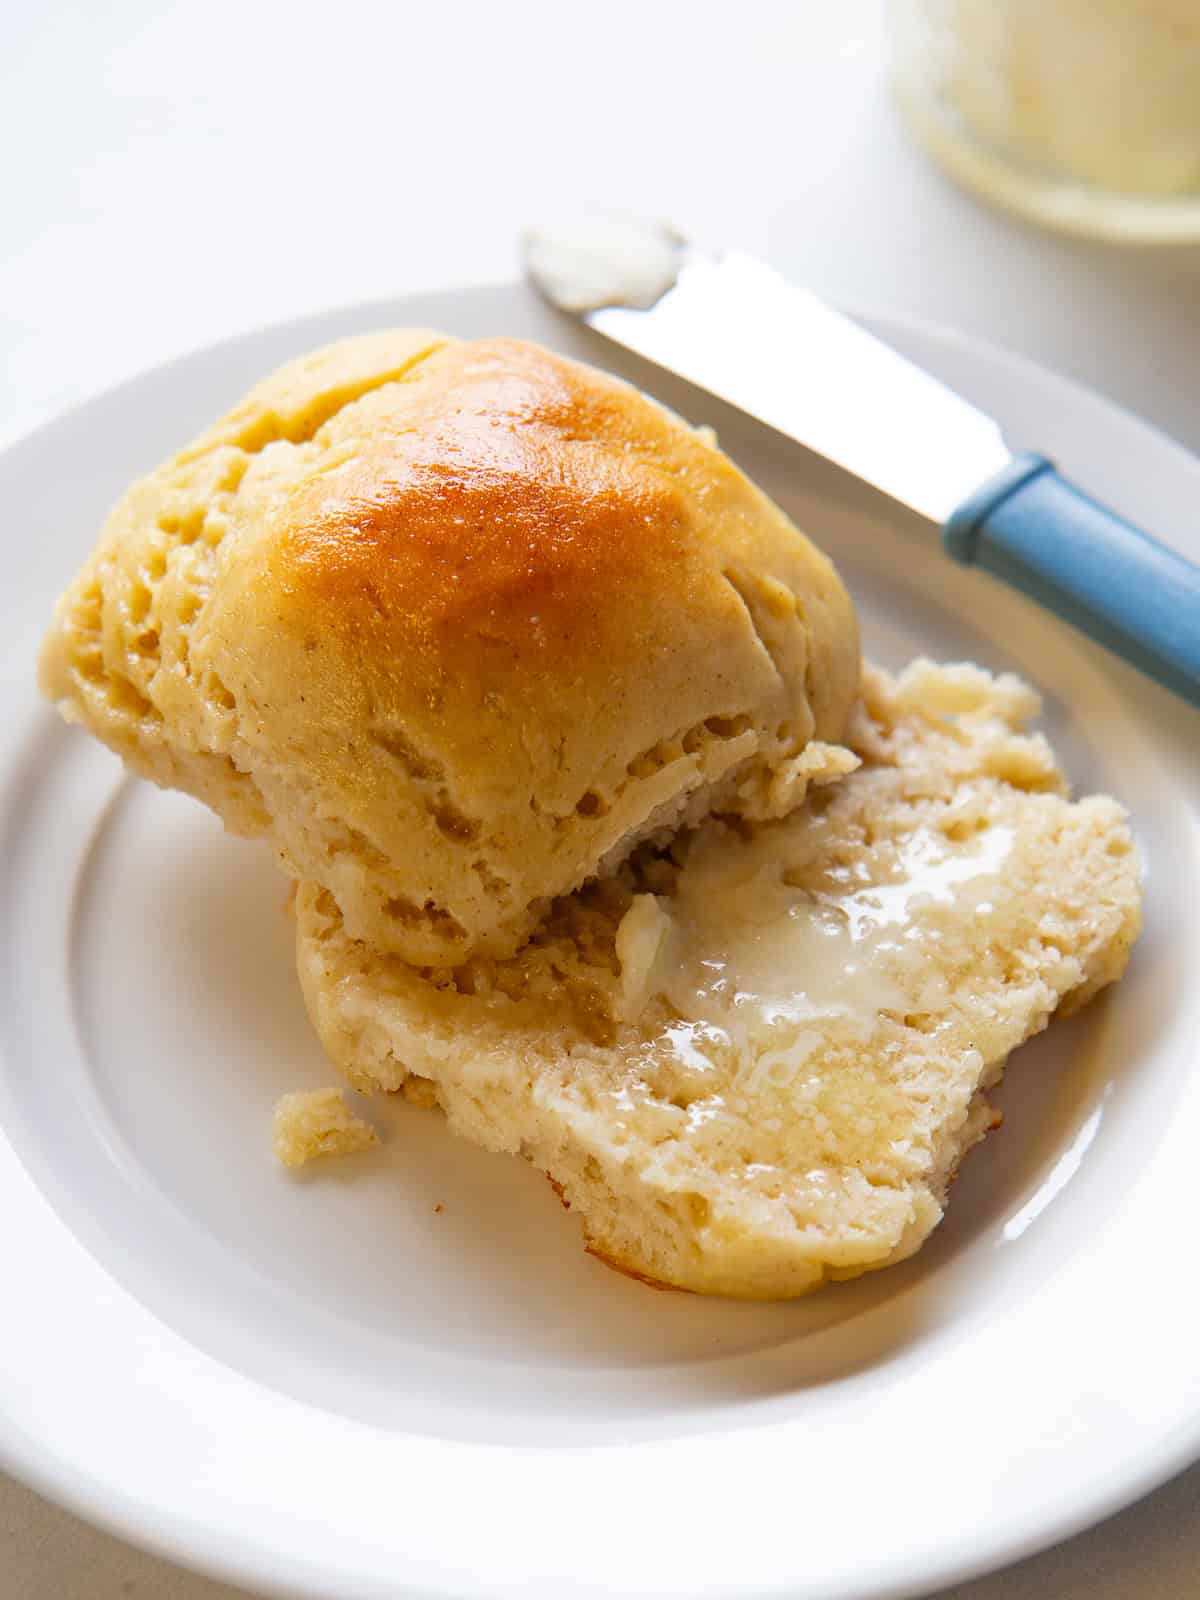
Right after baking, I brush the rolls with a little melted butter. Not only does this add a nice shine, it also helps keeps them soft and tender.
Baker’s Tip: For a lightly sweet finish, mix equal parts melted butter with honey and brush it over each baked roll.
How to Store Leftovers
Gluten-free bread tastes best the day it’s baked. Wrap the leftover rolls in plastic wrap and store them at room temperature. Reheat the rolls lightly before serving for the best flavor and texture.
To freeze, let them cool completely, wrap in plastic wrap or place in a freeze container. Freeze for up to three months.

Gluten-Free Soft Dinner Rolls
These gluten-free dinner rolls are soft and tender. They’re the perfect addition to the holiday bread basket- or whenever the bread craving hits.
Ingredients
For the Dough
- ⅓ cup warm water, about 110℉ (2 ¾ ounces; 75 grams)
- 2 ¼ teaspoons instant dry yeast (1 packet; 7 grams)
- 3 cups Bob's Red Mill 1:1 Gluten-Free Baking Flour, plus extra for dusting counter (15 ounces; 425 grams)
- 2 tablespoons granulated sugar (1 ounce; 28 grams)
- 1 teaspoon baking powder
- 1 teaspoon xanthan gum
- 1 teaspoon salt
- 1 cup warm whole milk, about 110℉ (8 ounces; 226 grams)
- 1 large egg
- 2 tablespoons butter, melted (1 ounce; 28 grams)
For Brushing on the Dough
- 1 large egg
- 1 teaspoon water
For Finishing
- 2 tablespoons butter, melted (1 ounce; 28 grams)
Instructions
-
Combine warm water and yeast in the bowl of a stand mixer. Stir to combine. Allow to sit for five minutes.
-
While the yeast dissolves, whisk together the gluten-free flour, granulated sugar, baking powder, xanthan gum, and salt in a small bowl.
-
Add the gluten-free flour mixture, milk, egg, and melted butter to the yeast mixture. Mix on medium speed until thick and smooth, about three minutes. The dough will be very thick.
-
Dust counter with a generous amount of gluten-free flour. Transfer the dough from the mixing bowl to the counter. Dust the top with gluten-free flour. Gently pat the dough into a rectangle, about 8×8 inches.
-
Cut the dough into 9 equal pieces. (Three rows of three)
-
Roll the dough into rounds. If the dough sticks to your hands, coat it lightly with gluten-free flour before rolling.
-
Line an 8-inch square pan with parchment paper and lightly grease with gluten-free cooking spray.
-
Place the rolls into the pan in three rows. Cover with plastic wrap. This keeps the dough from drying out.
-
When rolls have almost doubled in size, preheat the oven to 375℉ (190℃)
-
Whisk together the egg and teaspoon of water together in a small bowl. Brush the egg wash gently on top of each roll.
-
Bake rolls until golden brown, 30 to 35 minutes. The middle of the rolls should reach 205℉ (96℃)
-
Remove the pan from oven. Let them cool for about 5 minutes and then brush the warm rolls with melted butter.
-
Cool for about 15 minutes before serving.
-
Rolls are best enjoyed the day they are made. Store leftover rolls wrapped on the counter or place cooled rolls in a freezer bag and freeze for up to two months. Thaw rolls at room temperature overnight.
Recipe Notes
Gluten-Free Flour Variation
Flour may be replaced with 2 cups brown rice flour or millet flour, ¾ cup tapioca starch, and 1 teaspoon xanthan gum. (If using this blend, the recipe will include a total of 2 teaspoons xanthan gum.)
Dairy-Free Variation
Replace the milk with an equal amount of dairy-free milk.
Replace the butter in the dough with an equal amount of dairy-free butter or canola oil.
Brush the baked rolls with melted dairy-free butter or olive oil.
Dori Panagis says
if my mix, America’s Test Kitchen DOESNT include Xanthum Gum, how much should I add in addition to the teaspoon in the recipe?
Elizabeth says
I’d use 2 teaspoons total xanthan gum. I haven’t tested the recipe with this blend; so I can’t say for sure it will work the same. Let us know how it goes! If the dough seems dry, add a splash more water. If it seems too wet, add a bit more flour–a tablespoon or so. Have fun!
Lilian says
Just use the recipe
Very happy with the result
Total success
Thank you very much
Kathleen Cooper, says
What if I can’t get brown rice flour for my own blend what is a good substitute
Elizabeth says
You can replace brown rice flour with sorghum flour, millet flour, or even white rice flour.
Lauren says
These were so good! I’m from the UK and used Doves Farm GF White Bread Flour (going to try the brown bread flour later this week), and they came up really nice. I’ve been trying to find a good and reliable recipe for some time now for bread rolls, and I think that I’ve found it!
Elizabeth says
These were so delicious! Made exactly as directed, but they took almost 35 minutes on convection to get nice and golden brown. Worth the extra time though. My hubby and I made ham and cheese sliders with them! Thank you for such a yummy recipe! I’ve been scared to try baking bread since going gf almost 3 years ago, but your recipe was so easy!
Kerri Edwards says
Can you make these ahead to refrigerate or freeze the dough to then rise and bake later?
Elizabeth says
You can make the dough the night before, pop it in the fridge, and then shape them the next day and bake. I haven’t tried to freeze the dough; so I can’t say for sure how that would work.
Katerine McMurry says
I love your recipes. But not have a “jump to recipe” option on this one is driving me nutty.
Elizabeth says
Glad you enjoy my recipes! Sorry you need to scroll. I’m not sure if we’ll be offering a “jump to recipe” button in 2020 but it will be considered.
Whitney Creath says
In this recipe, I have discovered a gluten-free roll recipe that actually makes me close my eyes like the smell of cooking pretzels. Thank you for sharing this recipe with the world.
Elizabeth says
Aw. I’m so glad!
Julie says
Maybe I’m missing this- what size pan? Greased? Thanks!
Elizabeth says
Hi Julie,
Any size baking sheet works for this one. You can use a 9×13 or a standard 13×18. Space the rolls a few inches apart and you’ll be fine.
Edited to add: the pan should be parchment-lined (step 4) or, if you don’t have parchment, you can grease the pan.
Julie says
Yup, I’m an idiot. Right in the recipe. Happy Thanksgiving!
Elizabeth says
Not an idiot an *all*! Have a happy Thanksgiving!
Kathy says
Is 1/4 cup water correct? My dough was really dry and so were my rolls.
Elizabeth says
Yes. That’s correct. There’s a 1 1/4 cups of total liquid plus the egg in the recipe. (1/4 cup of water and 1 cup of milk.) If the dough seemed dry, you could add a splash (tablespoon or so) more water or milk.
I made the rolls yesterday for Fb. Here’s a link to the video: https://www.facebook.com/GlutenFreeBaking/videos/997245013958128/?
What flour blend did you use?
Alison says
I made this recipe and my buns were still really dense and had only risen a slight amount after 2 and a half hours. Could the altitude be a factor because of where I live, I am from Calgary, AB, Canada. I used my own 1:1 flour blend that for all my other recipes works out well instead of Bob’s Red Mill 1:1, otherwise I followed the recipe exactly. Any tips for what I can do?
Elizabeth says
Hi Allison,
It’s hard to say because I’m not sure what’s in your flour blend. They should have risen and gotten soft and puffy, especially after 2 1/2 hours. I will say that homemade gluten-free rolls, even these soft ones, tend to be denser than their wheat-counterparts. However, I don’t think this is the issue you’re dealing with. I’m wondering if, perhaps, your yeast was old? That’s the first thing I’d tinker with. Because they should have risen, even at your altitude after that amount of time.
cathy says
If I pop it in the fridge, do I need to let it come to room temp before baking or bake right out of the fridge?
Elizabeth says
Here’s the best way to handle this: mix the dough. Transfer it to an oiled bowl. Cover and refrigerate overnight. The next day, stir the dough (this is important). Shape. Cover and allow to rise for an hour or so. Then bake as directed.
OR
You can shape the dough into rolls, cover, and chill overnight. The rolls will rise and you can bake right away. This usually works well. However, sometimes the dough rises too much and collapses. Which is why I prefer the first method, even though it takes a bit longer.
Hope this helps!
Julie says
I posted a comment earlier today asking a dumb question. Now I can say that I have made the rolls and they were fantastic! We’re new to GF and I haven’t made many baked goods from scratch. My thoughts on this recipe from a newbie- definitely brush with butter and dust with salt. I used coarse salt on a few and Himalayan sea salt on others. Both were tasty. I used King Arthur measure for measure flour and included the extra xanthan gum as directed in the recipe. As you can see from my earlier post/panicked question, I was unsure about the pan and, in my panic, I used the “wrong” pan. I fit 7 rolls in a 9 Inch Springform (don’t judge, I was completely confused by mixing up directions for this recipe and the one other rolls recipe I have ever attempted) and the remaining 3 went into a 7 inch pie plate. The group of 7 melded together in the pan, which ended up working out ok. My rolls seemed to spread a bit more than pictured and rose (is that right- “rose”? As in didn’t rise) less. I’m not into appearances so the delicious taste trumped any concerns about the shape. Thank you for this recipe! I’m sure it will be a staple around our house. Happy Thanksgiving!
Christine McBride says
The rolls are very good; however, I can’t get them to brown like the photos. I use the brown rice mix. I even tried brushing them with melted butter before baking. Otherwise, I would give them a 5 star rating.
Elizabeth says
Sorry to hear the tops of your buns aren’t browning! It could be your pan, if the sides are high, it might be “protecting” the buns from browning.
Stefanie says
Love love love this recipe!
I used Namaste perfect flour blend from Costco. I read the comments above that mentioned Namaste didn’t work. I did it anyway! I only measure by weight, so 2¾ cups equaled to 385 grams of flour. I also used almond milk instead.
The only difficulty I had was my scoop broke, so my daughter and I had fun figuring out another way.
Cooked for 30 mins for us. Not golden brown like your picture, but I didn’t care about that.
My kids all LOVED it! It was a hit! Thank you!
Emily says
I love this recipe , I’ve been making it most weeks since discovering it. As a uni student I find it cheaper to make my gluten free bread. I’ve found that rather than adding egg and Xanthan gum I instead use 2 tablespoons off chia seeds with 6 tablespoons of water and they come just as well. I use the doves farm white bread flour which I believe already has a small amount of Xanthan in it though.
Sylvia Hodson says
As the yeast I have is in 125g packets, how much is in the packet in your Ingredients list?
Elizabeth says
Update: One yeast packet in the United States is 0.25 ounces or about 2 1/2 teaspoons.
Linda M says
Actually, the 0.75oz is for 3 packets that are attached. I think it’s more likely to be 0.25 oz for this recipe, or 2 1/4 teaspoons. At least, that’s what I’m going to try!
Elizabeth says
You are correct! I’ve updated my comment. Thanks for catching this!
Katie says
What changes would you suggest for using dry instant yeast instead of quick rise yeast?
Elizabeth says
If you only have instant yeast on hand, allow the dough to rise for a little longer. No other changes are needed. Enjoy!
Steena Brown says
Delicious recipe. Turned out slightly more like a biscuit, maybe due to my slight alterations. I only had Krusteaz GF flour mix which already has some guar gum in it. I think they needed to bake for 3-4 more minutes, but they were still tasty.
carole says
Can you use active dry yeast?
Elizabeth says
Yes! The rise time will just take a bit longer.
Maryke says
Quick question. We do not eat sugar and normally I use honey as a replacement as I like to use the most natural products. So can I replace the sugar with honey? Or just not include sugar? Thanks
Elizabeth says
Usually swapping honey for sugar takes a bit of tweaking because honey contains water. In this recipe, however, it’s such a small amount that it doesn’t cause a problem. So go ahead and use honey! Enjoy!
Manpreet says
Turned out good. I think i’ll add a little bit more salt next time, or perhaps a little more sweetness just lacked a little bit in flavor. I used cup4cup flour. I liked the trick with using fingers dipped in cool water to smooth the tops. Thanks!