
This gluten-free biscuit recipe makes light and tender biscuits! The addition of yogurt makes a dough that’s easy to work with and gives the biscuits a great flavor. Dairy-free and egg-free variations included.
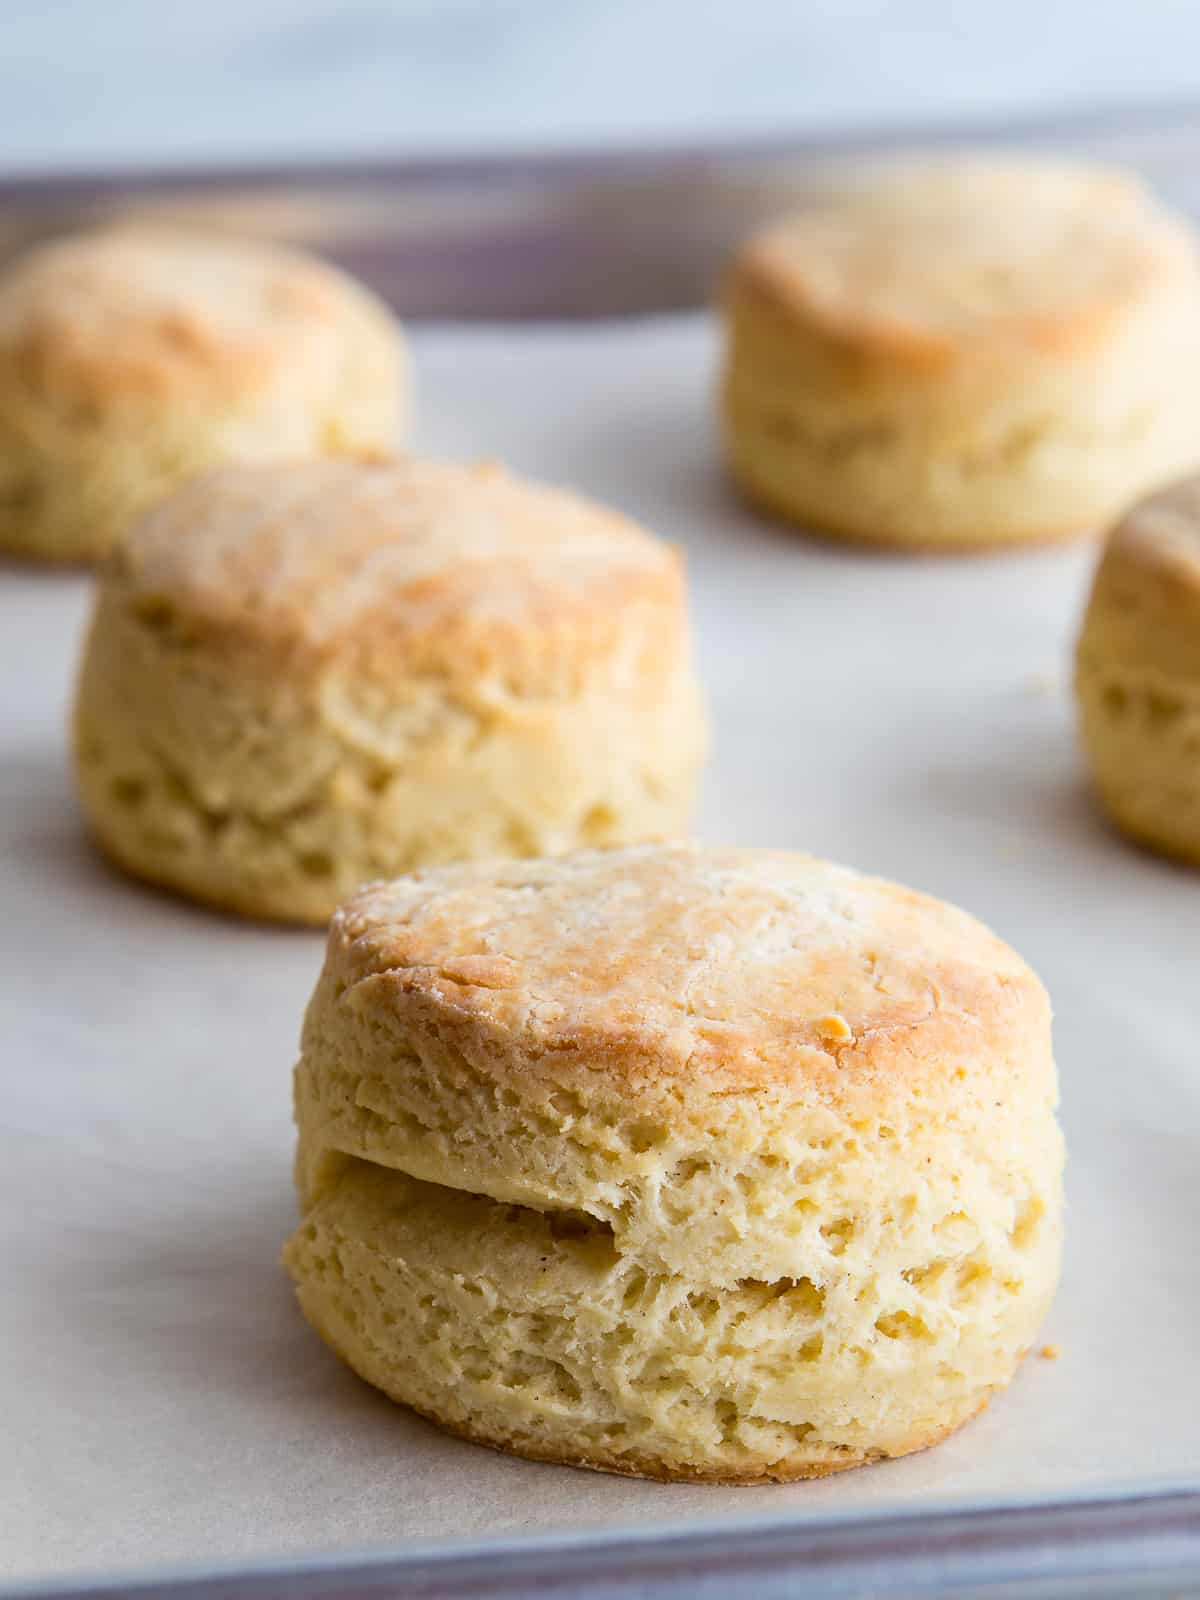
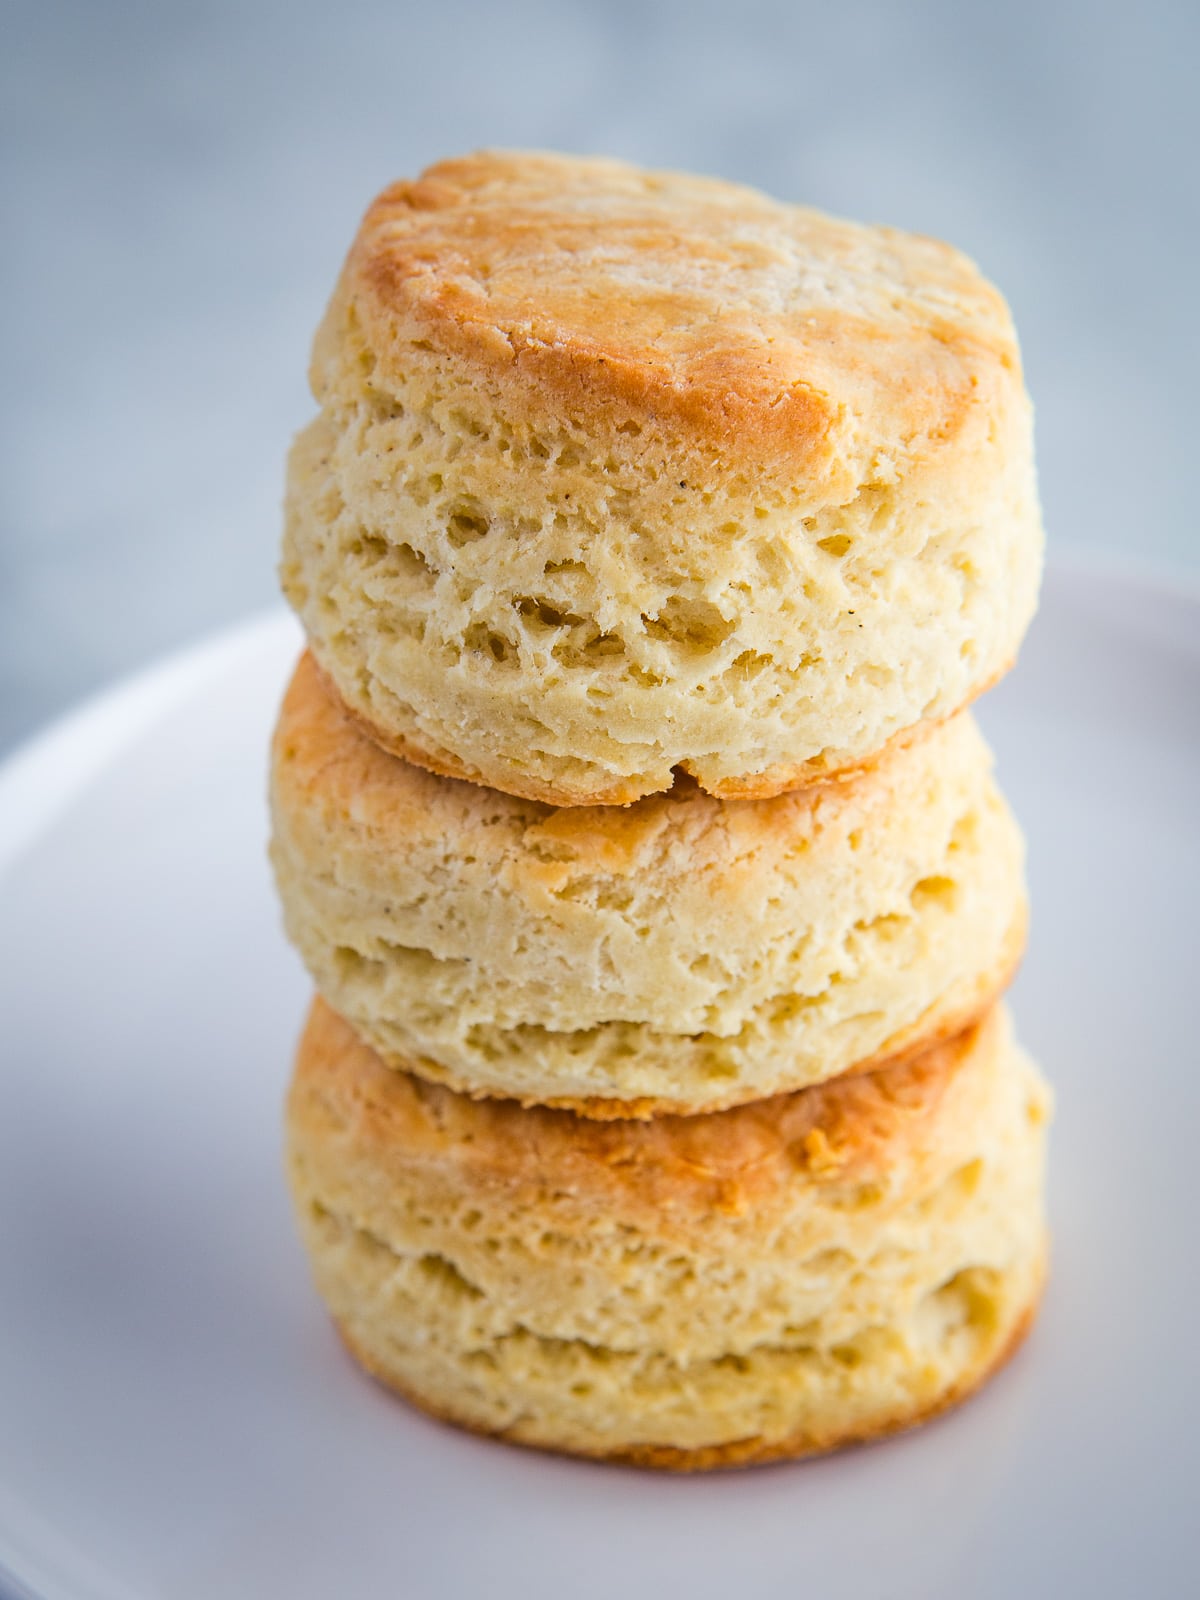
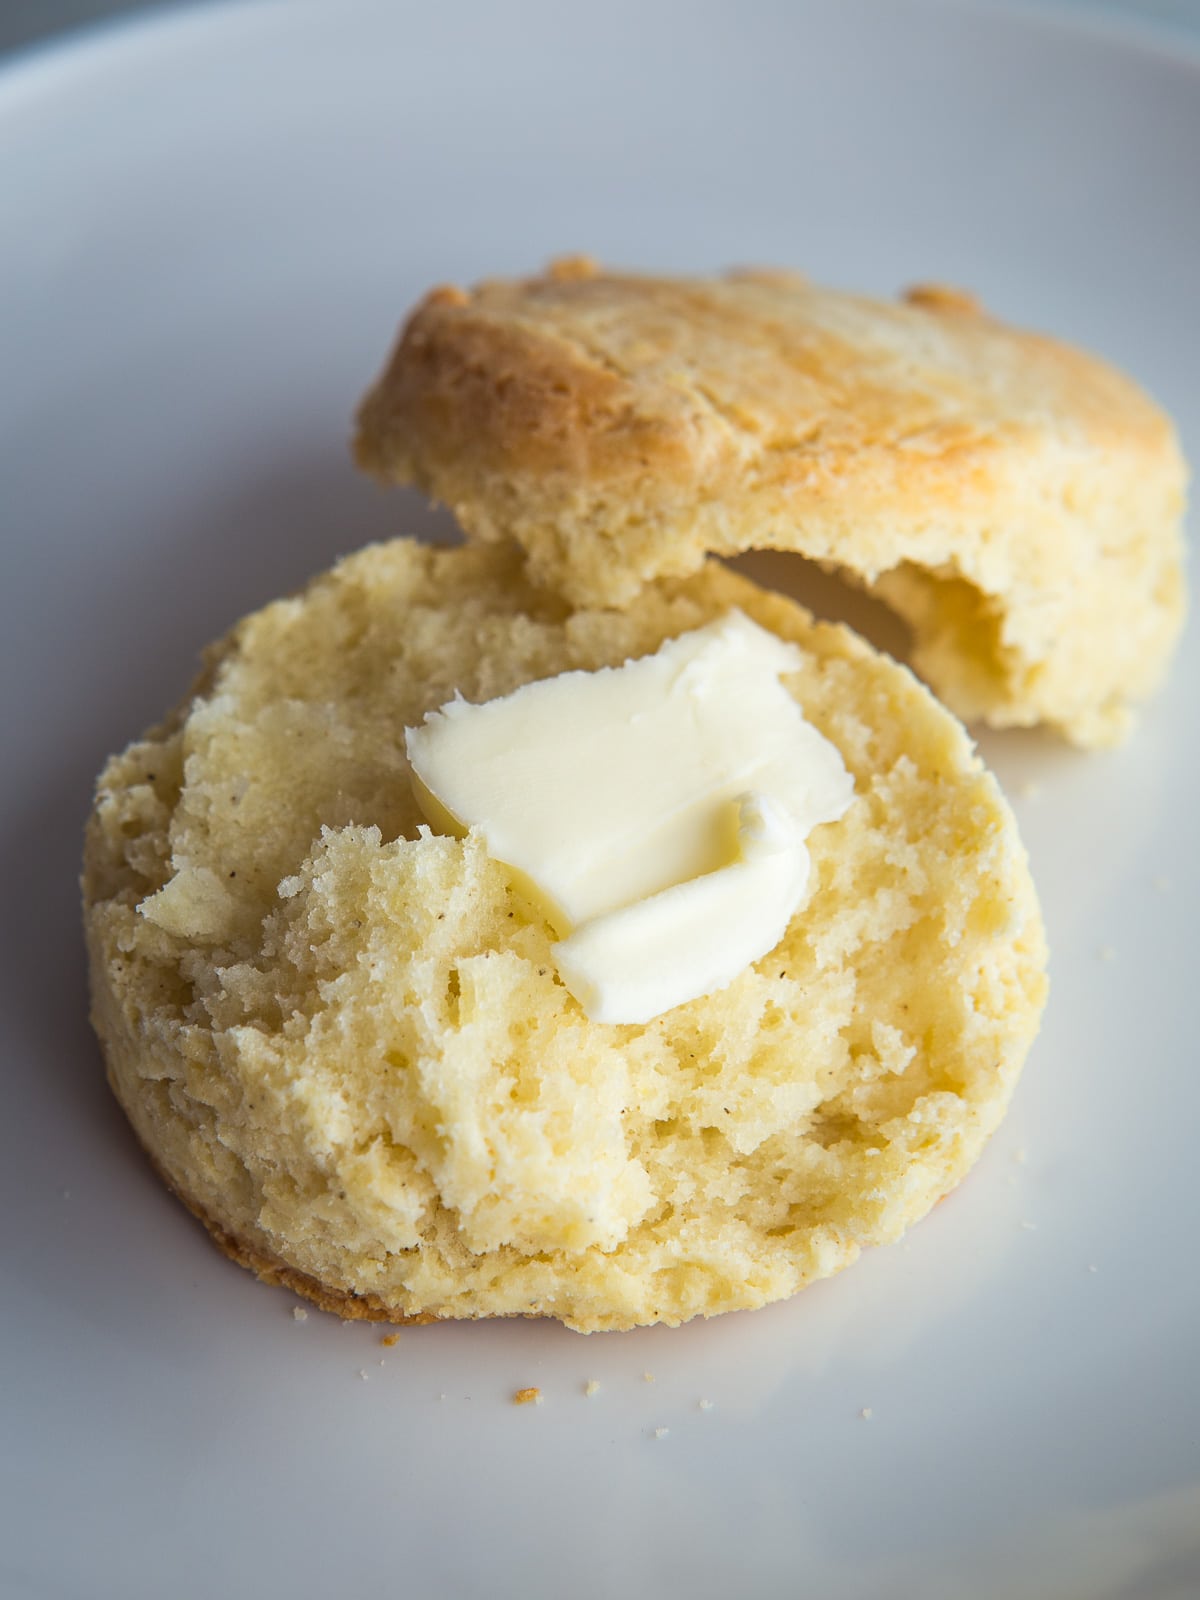
Terrific biscuits without gluten are possible. This recipe makes light and fluffy biscuits that you can shape with a cutter or drop from a spoon. Enjoy them with butter, jam, or served as part of biscuits and gravy.
Why This Recipe Works
- A gluten-free flour blend makes the biscuits tender and moist.
- Cold butter helps the biscuits rise.
- Yogurt provides a tangy flavor and makes a thick, easy-to-work-with dough.
- Resting the dough lets the gluten-free absorb the liquids. This makes for soft and tender biscuits.
Ingredients
Here’s what you need to make a batch of these biscuits and what the ingredients do in the recipe. The list is pretty simple! You might already have them on hand.
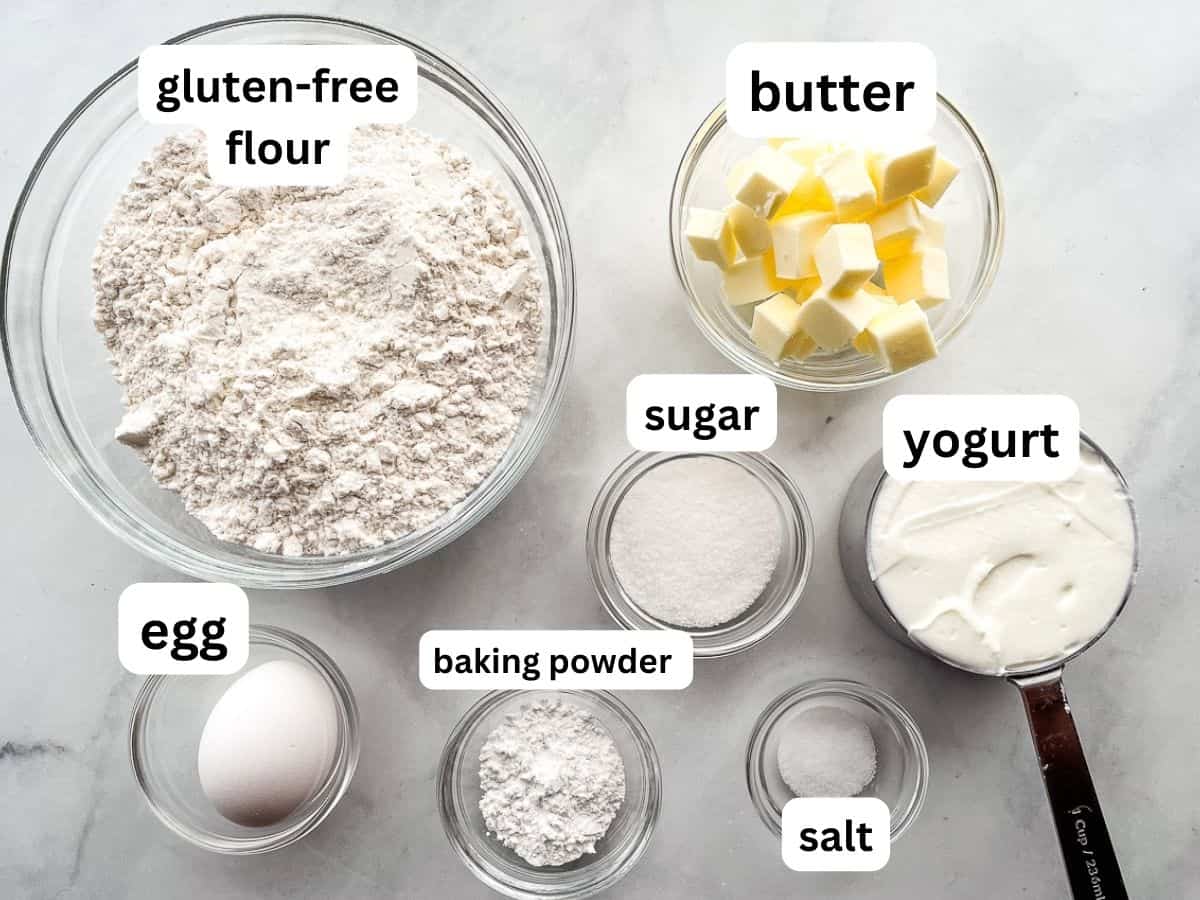
- Gluten-Free Flour. I tested this recipe with Bob’s Red Mill Gluten-Free Baking Flour. Since gluten-free flour blends vary by brand, each blend produces different results. Use a blend that contains xanthan gum. If it doesn’t, add one teaspoon xanthan gum to the flour blend. Without it, the biscuits spread.
- Butter. You need cold butter for this recipe. It’s what gives the biscuits their tender texture. You want the butter to feel cool to the touch but somewhat pliable. Cold, hard butter is difficult to work into the gluten-free flour.
- Yogurt. Plain yogurt brings the dough together and brings a tangy flavor. Both Greek yogurt and plain yogurt work. For the best flavor, use a full-fat (whole milk) yogurt.
- Egg. One egg adds flavor and richness. (This recipe can be made egg-free. See note below.)
- Baking Powder. Gives the biscuits a beautiful rise.
- Sugar. A little sugar encourages browning and keeps the biscuits moist.
- Salt. Enhances the flavor. Use table salt, not flaky or Kosher salt for this recipe. Table salt mixes easily and evenly into the dough.
Dairy and Egg-Free Variations
This recipe is pretty flexible! If you need to replace the dairy or egg, here’s what you do and what to expect.
Dairy-Free
Replace the butter and yogurt with a dairy-free alternative. Be sure to use a dairy-free butter that’s suitable for baking. Dairy and gluten-free biscuits don’t brown as dark as those made with dairy. They’ll remain light brown when done.
Egg-Free
Omit the egg and increase the yogurt by two tablespoons. If the dough seems dry after mixing, add an additional tablespoon of yogurt. Egg and gluten-free biscuits are a little denser than those made with an egg.
How to Make Gluten-Free Biscuits. Step-by-Step.
Let’s take a look at how to make gluten-free biscuits. The recipe isn’t hard but here are the steps you want to pay close attention to when mixing the dough. The full recipe with ingredients and directions is shared below.
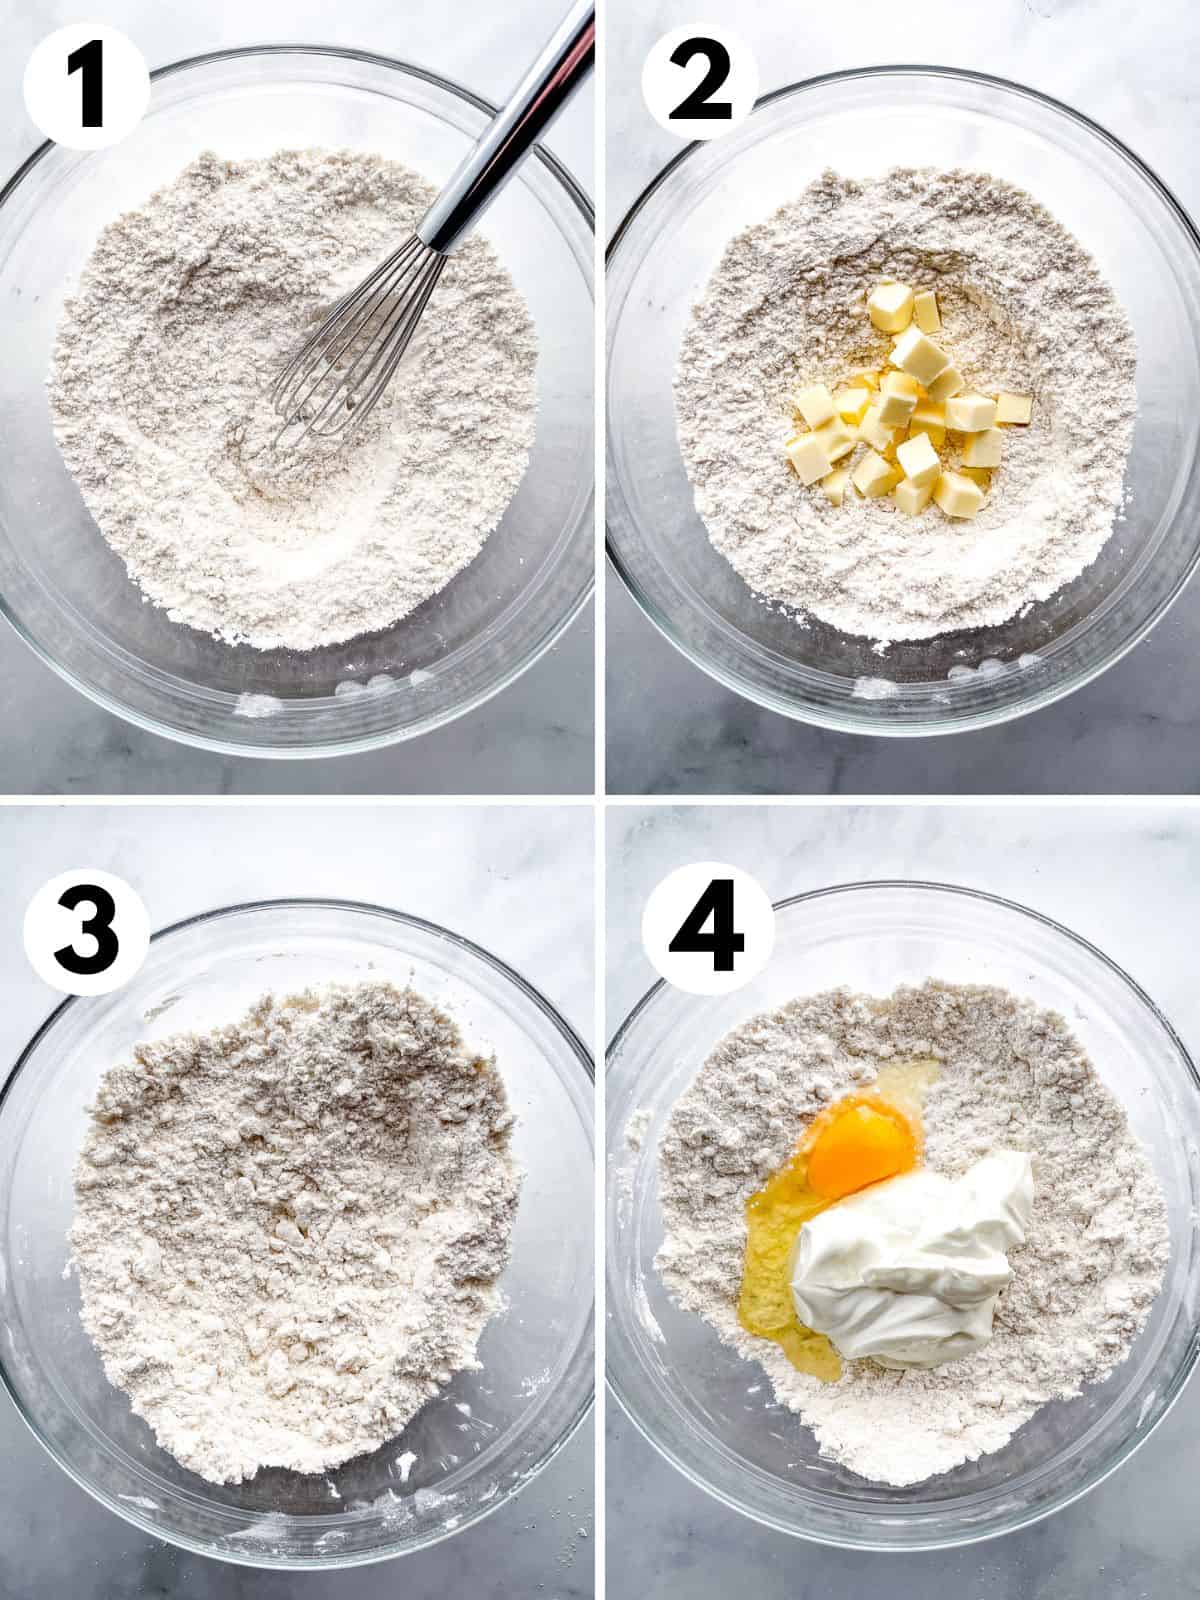
- Whisk together the dry ingredients in a large bowl.
- Add the cold butter. Cut it into cubes or grate it before adding it to the dry ingredients.
- Mix in the cold butter. You can do this with your fingers or a pastry cutter. Mix until no large pieces of butter remain.
- Add the yogurt and egg.
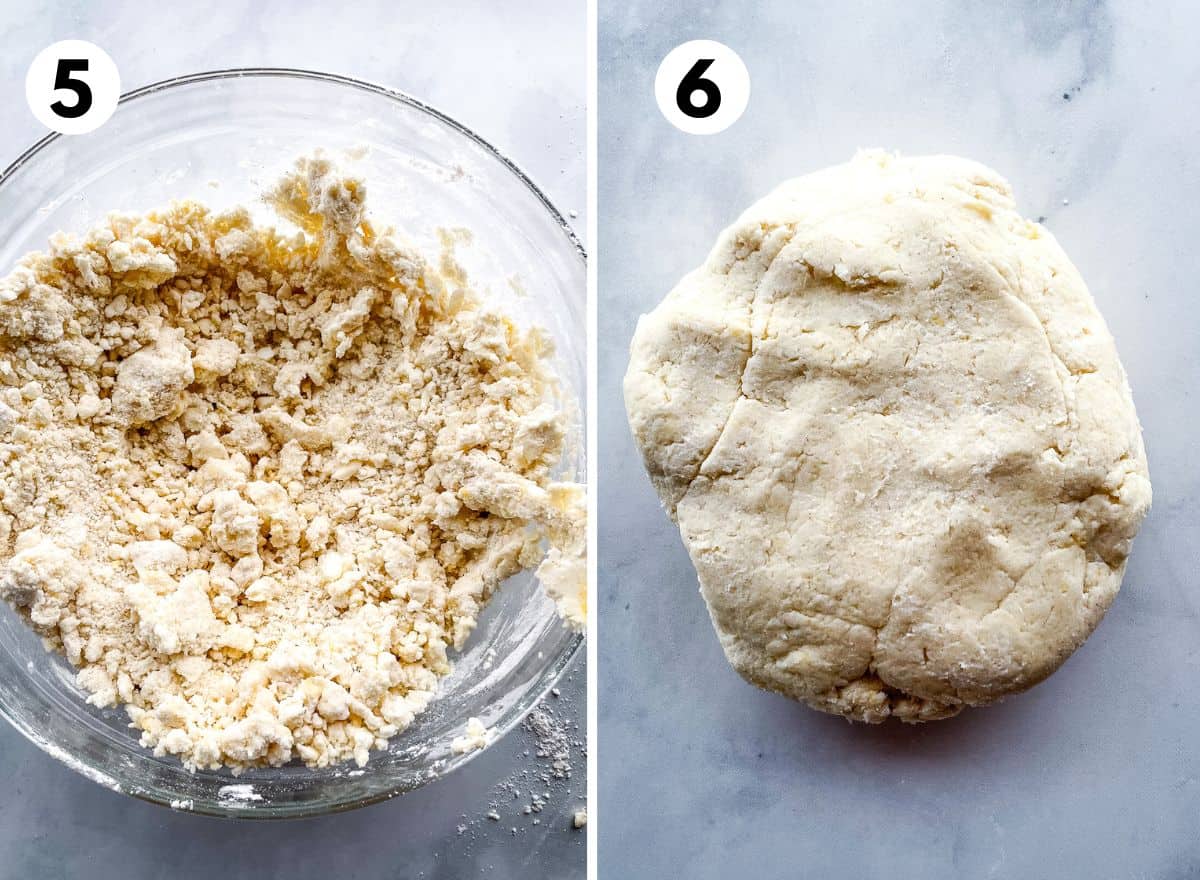
- Stir until a dough begins to form. If the ingredients look dry, add a little more yogurt. Cover the dough and let it rest (sit in the bowl) for about 20 minutes. Resting the dough allows the gluten-free flour to absorb the liquid. This makes the dough easier to cut and gives it a nice soft texture when baked.
- Dust your counter lightly with gluten-free flour. Turn the dough out onto the counter. and knead until smooth. If it starts to stick to your hands, dust your hands with gluten-free flour. Then pat the dough into a round. You want the dough to be about 1-inch thick.
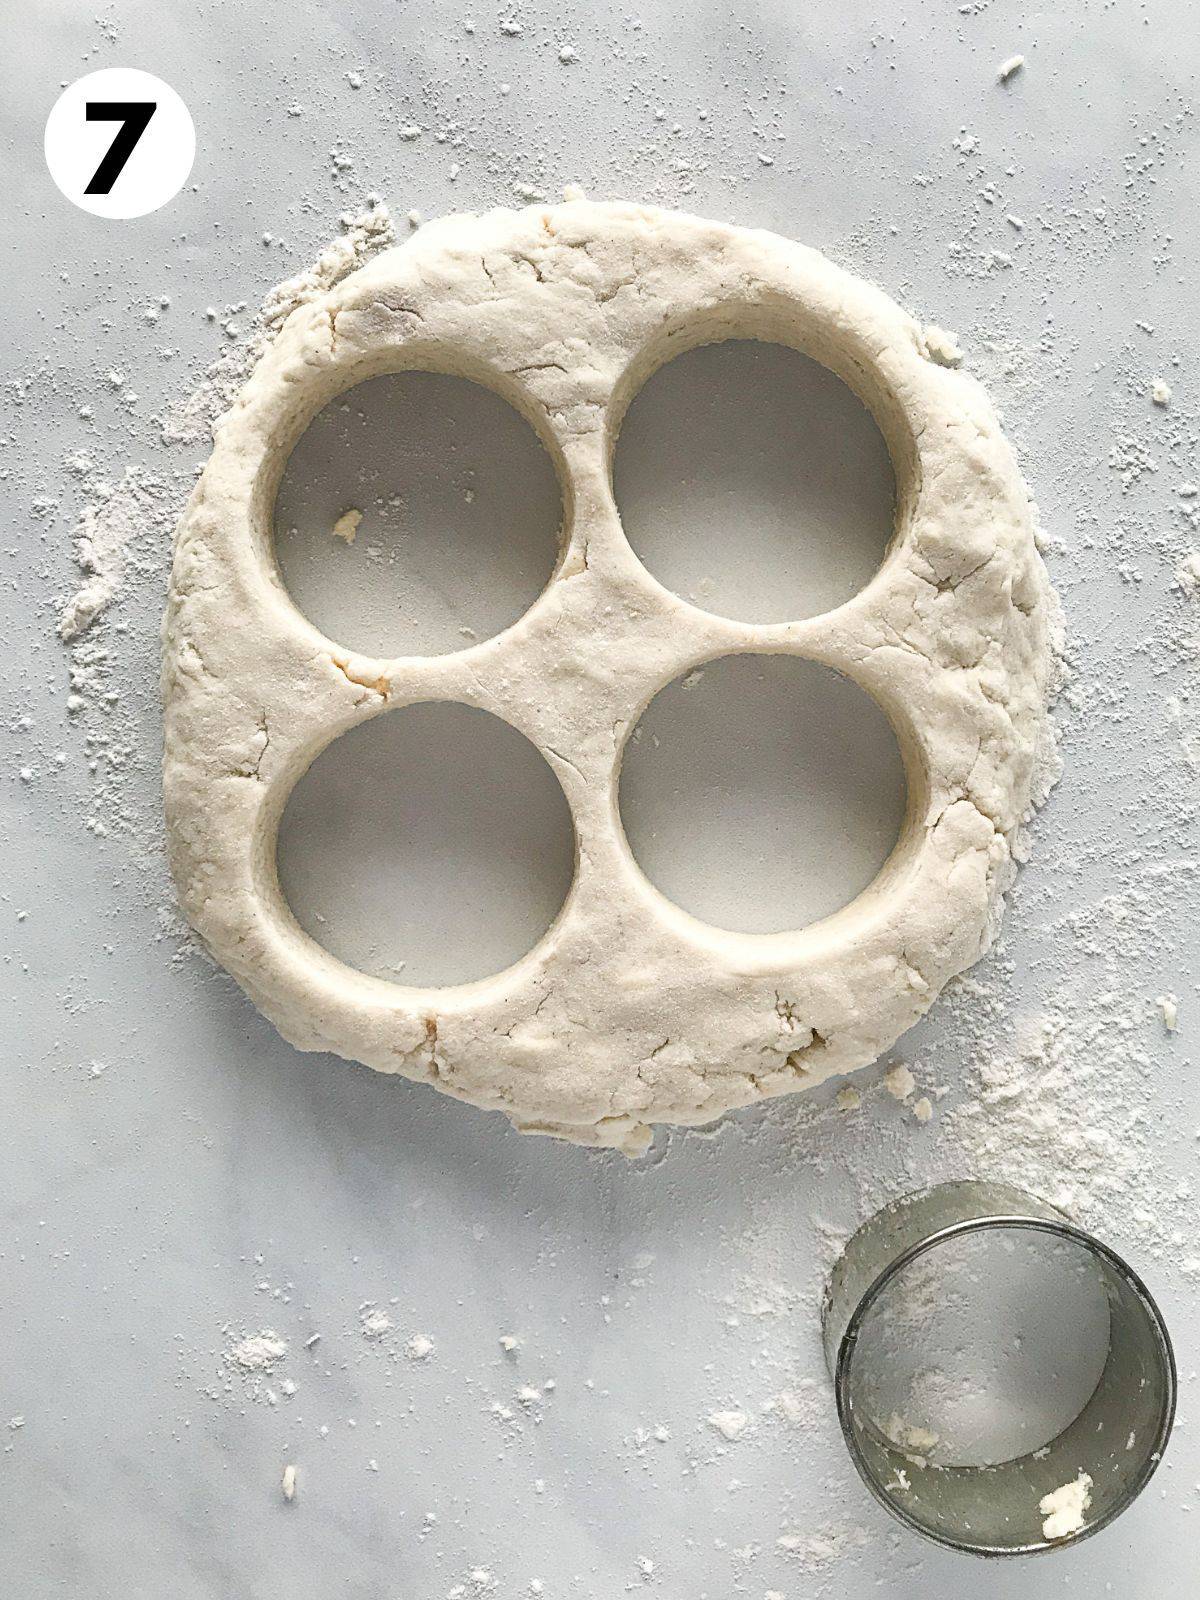
- Cut the dough into rounds with a lightly floured 2-inch round biscuit cutter. Re-roll the remaining dough and cut into rounds.
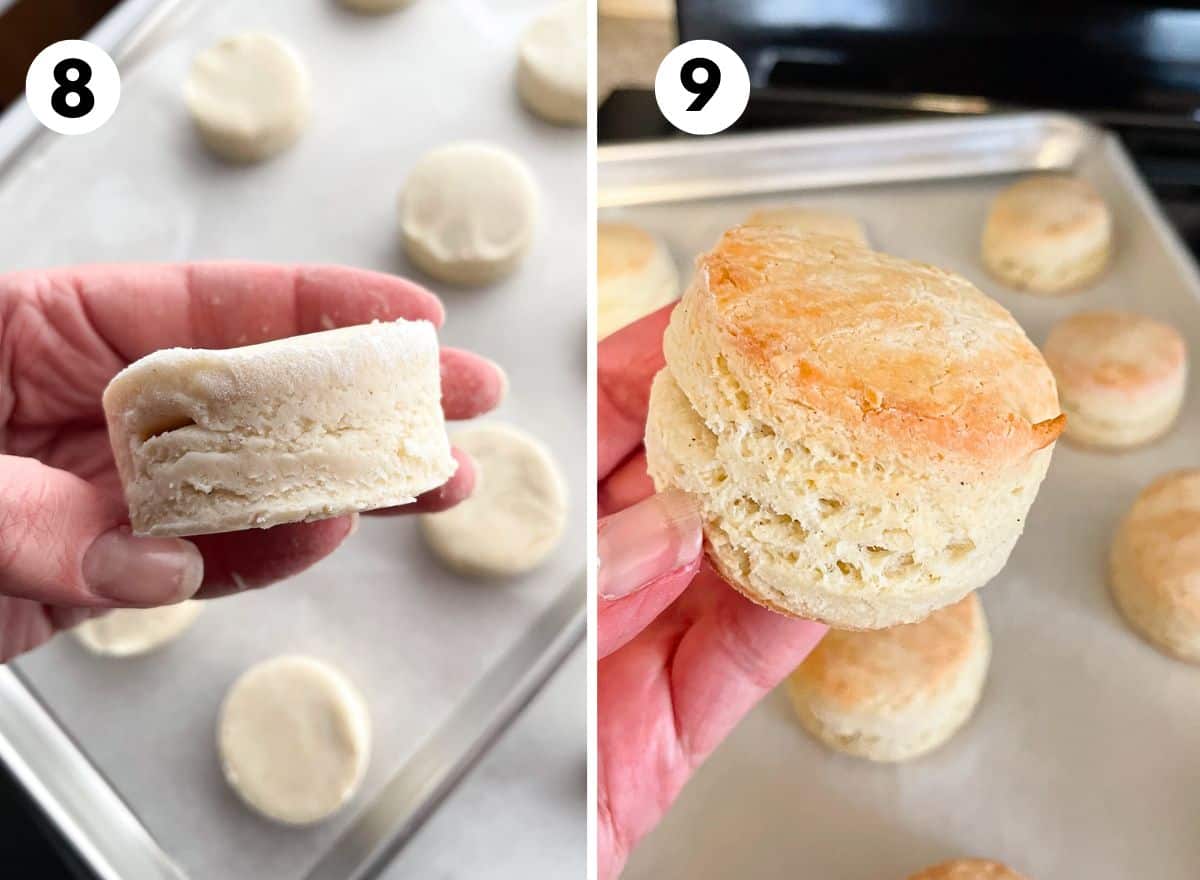
- Place the biscuits on a parchment-lined baking sheet. It’s important not to press the dough down after cutting it. Simply cut the dough and pace the rounds onto the baking sheet. If you see layers in the biscuits, that’s great.
- Bake the biscuits until they’re golden brown. A pan takes about 15 minutes to bake.
Tips for the Best Gluten-Free Biscuits.
Want perfect gluten-free biscuits? Follow these tips!
- Use cold butter. As the biscuits bake, the water in the butter evaporates. This creates steam which helps lighten the biscuits. If the butter is warm, the flour absorbs it. This makes the biscuits dense and heavy.
- Check the consistency of the dough. After mixing, feel the dough. If it seems dry, add a little more yogurt. If it seems too wet and sticky, add a little more gluten-free flour.
- Let the dough rest. Don’t skip resting the dough. The 20 minute rest makes for wonderfully light biscuits.
- Cut the dough with a sharp cutter. If your cutter is dull, the dough presses together and won’t rise as nicely.
How to Store and Freeze
Biscuits taste best the day they are made. If you have biscuits left over, cover and store at room temperature. Warm them slightly before eating, either in a toaster oven, air fryer, or microwave.
Freezer Tips
Bake the biscuits as directed. Let them cool on a wire rack and then place them in a freezer container. Freeze the biscuits for up to three months. When ready to eat, remove the biscuits from the freezer and thaw at room temperature.
Recipe originally shared March 2020. Last updated to include new photos and information March 2024.

Gluten-Free Biscuit Recipe
For the best gluten-free biscuits, follow these simple steps: use cold butter, let the dough rest, and bake the biscuits in a hot oven.
Ingredients
- 2 ¼ cups gluten-free baking flour (11 ¼ ounces; 320 grams)
- 2 tablespoons granulated sugar (1 ounce; 28 grams)
- 1 tablespoon baking powder
- ½ teaspoon salt
- 6 tablespoons cold butter, cut into small pieces (3 ounces; 85 grams)
- 1 cup plain yogurt, Greek or traditional, plus additional as needed (about 8 ounces; 226 grams)
- 1 large egg
Instructions
-
Whisk gluten-free flour, sugar, baking powder, and salt in a large bowl.
-
Mix the cold butter into the dry ingredients with your fingers or a pastry cutter until the butter is the size of peas.
-
Add the yogurt and egg. Mix until absorbed. If dry gluten-free flour remains in the bottom of the bowl, add more yogurt, one tablespoon at a time. The dough should easily hold together. It shouldn't be dry or too soft and squishy.
Cover the bowl and let the dough rest for 20 minutes.
-
Adjust oven rack to middle position and heat oven to 400°F. Line a rimmed baking sheet with parchment paper.
-
Dust your countertop with gluten-free flour. Turn dough out onto the counter and knead until smooth. Pat the dough into a round, about 1-inch thick. Cut into rounds using a 2-inch round biscuit cutter.
Place dough onto the prepared baking sheet.
Gather the remaining dough together, kneading and patting it into a round and cut out additional biscuits. Repeat. You should have 12 biscuits at the end.
-
Bake until the biscuits are golden brown, about 15 minutes.
-
Allow the biscuits to cool for 10 minutes before serving.
-
Store leftover biscuits wrapped on the counter for up to two days. Or cool and freeze in a freezer container for up to three months.
Recipe Notes
Gluten-free flour. This recipe was tested with Bob’s Red Mill 1:1 Gluten-Free Baking Flour. Using a different flour might change the results.
Dairy-free. Replace the butter with an equal amount of cold dairy-free butter or shortening and the yogurt with a plain dairy-free yogurt. Some dairy-free yogurts contain sugar and starches which can change the texture of the final biscuits.
Egg-free. Leave the egg out of the recipe and replace it with two tablespoons of additional yogurt.
Elisabeth says
Hi Elizabeth, you might want to correct this sentence:
“Pat. Cut. Repeat. Once the dough is at the correct consistency, dust your counter with ***gluten-flour flour*** and pat the dough into a small rectangle.”
Elizabeth says
Oh jeez. Thanks! Sorry for the typo! It’s been corrected. You might need to refresh to see the update.
Peg says
My daughter loved this recipe! I didn’t have yogurt on hand so I used sour cream and they turned out great. I also used the Nameste brand of all purpose gluten free flour. I would think if you over mix these, they wouldn’t turn out as well. The butter like you said, needs to be pea size so the proper reaction takes place in the baking process.
Geoff says
For the rich biscuits, the instructions say to reduce the yogurt to 1/4 cup. That, plus the egg, makes only a 1/2 cup of liquid instead of the 1 cup of yogurt in the base recipe. Following directions left the dough really dry. When I put in the other 1/2 cup of yogurt, the dough came together and came out beautifully. Maybe you meant reduce yogurt BY 1/4 cup instead of TO 1/4 cup
Elizabeth says
Geoff,
You are 100% right. I’ve updated the note. Thank you so much for pointing this out in such a kind way. I *really* appreciate it!
Rick says
Wow! Knocked it out of the park! Added shredded cheddar at the end, next time garlic as well. I’ve struggled to get GF biscuits “light and fluffy”. These turned out great!
Donna Dilitkanich says
I have done a lot of gluten free baking and this biscuit recipe is definitely my favorite. Excellent texture, moist and delicious! Thanks so much for the great recipe!
Angela says
I must confess I am a terrible cook but I saw this recipe and decided to give it a go!! Wow!! Took me back to my pre-gluten free days! These were delicious! Thank you for this recipe! Oh, I had to leave it in for an extra 6 mins before they were done.
Elizabeth says
This comment delighted me! Glad you enjoyed them!
Karen says
Best GF biscuits by far! Huge hit with my GF clients that I cook for!
MamaG says
Great GF biscuit recipe! Thanks! My GF granddaughter has been asking for biscuits and sausage gravy. I tried another recipe and they were ok. Used this today and it’s a grand slam! She loves them and I do too! I didn’t have the yogurt so I made my own buttermilk! I pulsed the mixture in the food processor and then added a step and brushed them with melted butter about 3 minutes before they were done baking! Mmmm!???
CWendt says
These biscuits are so good. It’s really hard to find good gluten free baking recipes. These biscuits were soft and fluffy. I even used part sour cream and part yogurt and they were fantastic. Thank you for sharing!
Amber says
Yes yes yes. I’ve missed biscuits so much. We make these all the time now. Thank you so much
T says
Hi! I have not tried this recipe yet, but do you or others know if this gluten free dough can be made ahead and refrigerated overnight?
Elizabeth says
I haven’t tested it but making biscuit dough the night before and letting it chill in the fridge should work really well!
Lynn says
I’m new to gluten free/dairy free cooking. I made these for a friend who came for dinner and he loved them! Even those of us who are not gf enjoyed the flavor and texture. I had to add quite a bit of soy milk to bring the dough to “normal” biscuit consistency, but overall, this is an excellent recipe with delicious flavor.
Symone says
Good to know that soy milk helps! I was considering using milk kefir as the yogurt replacement. 🙂
Ladonne Bourbeau says
So excited! I finally found a recipe that works well to make those party favorite “Sausage Cheese Biscuit Balls” without splurging on that super expensive gluten free Bisquick! I took this recipe of yours, and just before adding the yogurt and milk, I tossed in a cup of cheese and a pound roll of browned and crumbled breakfast sausage, dropped the goodness in small heaps, and then baked at 375 for 15 minutes, then switched to broil for just a couple of minutes to get the tops more done. PERFECTION! Wish I could show you a picture!
Catherine says
Loved this recipe. I’m always looking for something for my husband and a good friend we often visit for morning tea. This recipe was perfect so I have added it to my folder for frequent use. Thank you so much.
Catherine says
Loved this recipe. Moist and full of flavour. My husband is gluten intolerant and it’s always great to find a treat that he can enjoy. Absolutely recommended.
Erin says
Thank you for this game changing recipe!!!
Biscuits & gravy are a family tradition, but once several members needed to transition to a gluten free diet the meal fell flat. This recipe revived the family tradition and is a hit at all multigenerational family visits! When friends visit from out of town, these biscuits are on the menu.
* We have been relying on this recipe for years and neglected to leave a comment. Rectifying that now. Also wanted to note that we use an earlier version that calls for Greek Yogurt, baking soda, but no egg. We were wondering why you made the change and if you had a stash of archived recipes so we could share that older version? (… once friends have eaten these, they usually ask 😉
Janine says
Any suggestion on replacing the sugar? Trying to not consume processed sugar. Thanks