
This gluten-free blondies recipe is made with gluten-free flour, brown sugar, butter, and vanilla. Simply make the batter, spread it into a pan, and bake. And since it’s so easy to make, it’s a great recipe for beginner gluten-free bakers.
What are Blondies Anyway?
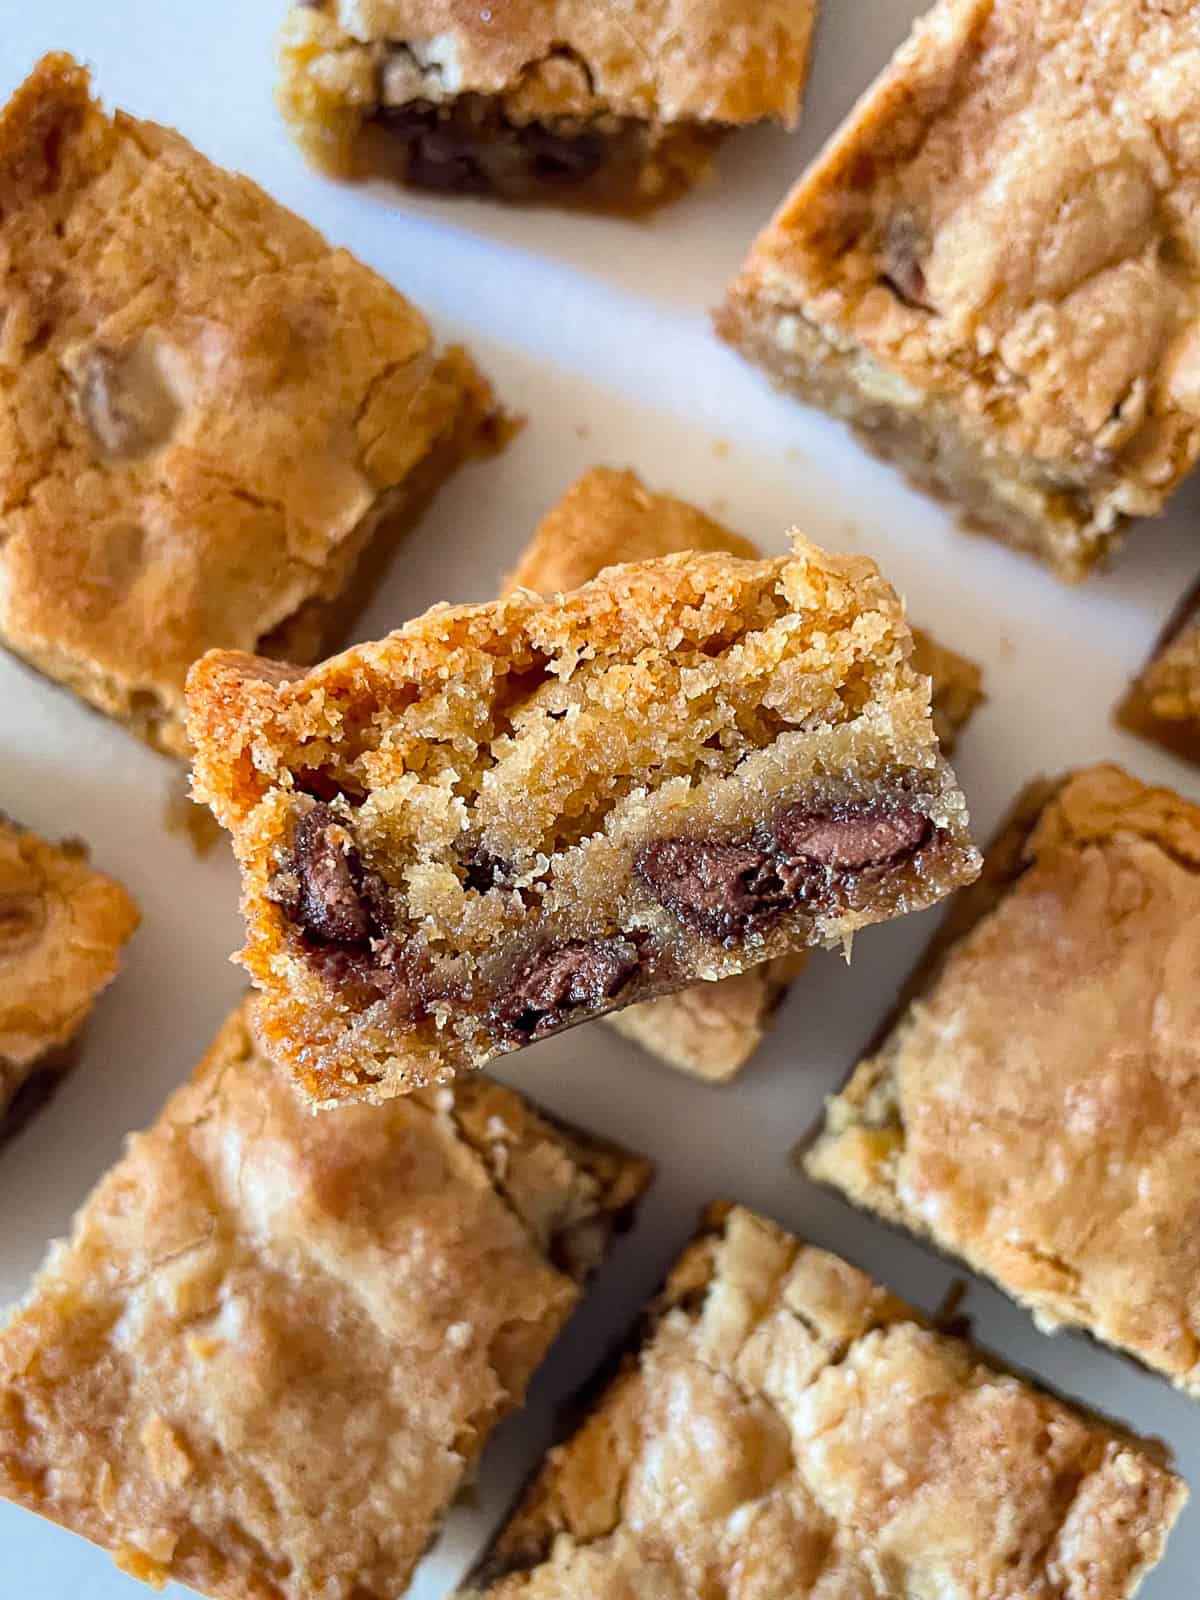
Most folks think of blondies as a “vanilla brownie” or a “blonde brownie”. Since it’s impossible for me to think about brownies without chocolate, that definition never worked for me. Instead, I think of them as a cross between a chocolate chip cookie bar and brown sugar fudge.
If you want something a little less rich and buttery, try my gluten-free chocolate chip bars. The flavors are similar but the texture is more cake-like.
Gluten-Free Blondies: Ingredients and Substitutions.
Let’s take a look at what you’ll need to make a pan of these blondies. The full recipe with amounts is listed below.
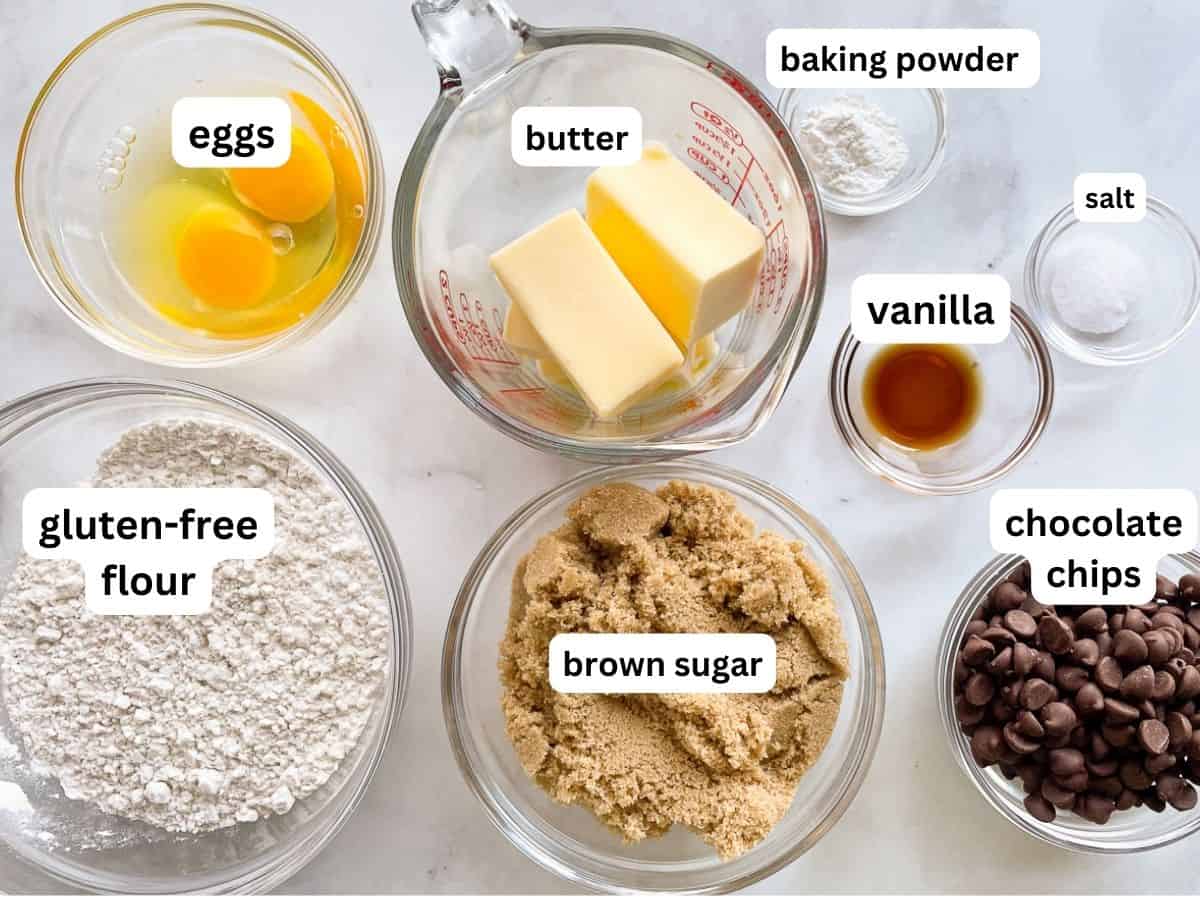
- Gluten-Free Flour. The soft and delicate texture for these bars comes from a gluten-free flour blend. I tested the recipe with Bob’s Red Mill’s 1:1 Gluten-Free Baking flour. It contains xanthan gum. If your flour blend doesn’t add ¼ teaspoon.
- Brown Sugar. For a caramel-like flavor, use light brown sugar. For pronounced molasses flavor, use dark brown sugar. (Blondies pictured were made with light brown sugar.)
- Butter. Melted butter ensures the blondes stay thick and dense. It also adds a lot of flavor.
- Eggs. Provide structure, richness, and flavor. Use large eggs for the best results.
- Vanilla Extract. Three things make blondies taste like blondies: brown sugar, butter, and vanilla. While you can omit vanilla extract in many baking recipes, I suggest including it in these blondies for the best flavor.
- Baking Powder. A teaspoon of baking powder gives the bars a little lift without making them too cakey.
- Salt. Since blondies are sweet, salt helps balance the flavor. For the batter, use table (fine) salt. If you want to sprinkle salt over the top, use Kosher or a flaky-style salt.
- Nuts. (optional) Some folks wouldn’t dream of making blondies without nuts. And some folks wouldn’t dream of including them. I’ll leave it up to you! Add up to one cup of toasted, chopped pecans or walnuts.
- Chocolate Chips. (optional) Add up to one cup of dark, milk, or white chocolate chips. If you want to use butterscotch chips, those are also great in blondies. As always make sure any baking chip you use is gluten-free.
Dairy-Free Ingredient Swaps.
- Butter. Replace the butter with your favorite dairy-free butter spread. I don’t recommend shortening or oil because they don’t add flavor to the bars.
- Chocolate Chips. Use dairy-free chocolate chips. As with all ingredients, check the label to ensure the chips are gluten-free and dairy-free.
How to Make Perfect Gluten-Free Blondies.
This is a simple, one-bowl recipe—making it great for beginner gluten-free bakers.
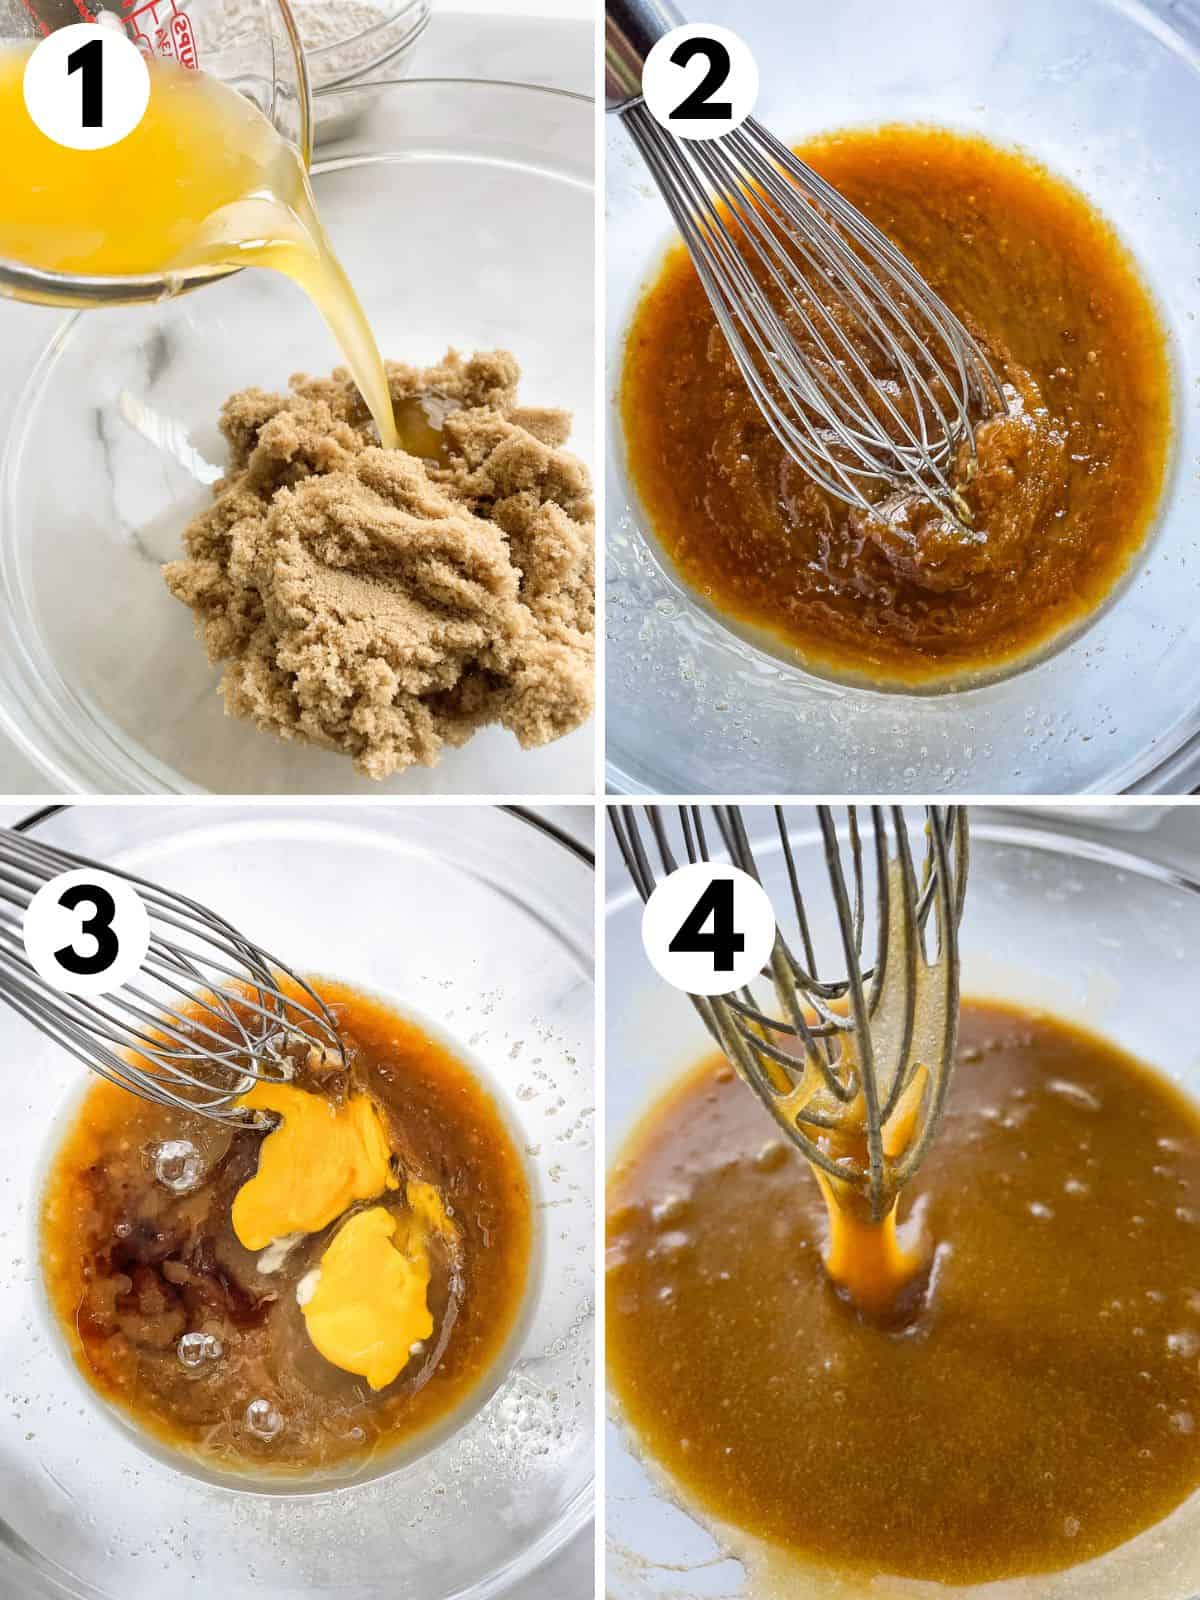
Mix the brown sugar with the melted butter and eggs. First, combine the brown sugar and melted butter. Whisk until it’s smooth. Then add the eggs and vanilla extract. Blend until it’s creamy and looks like a thick caramel sauce.
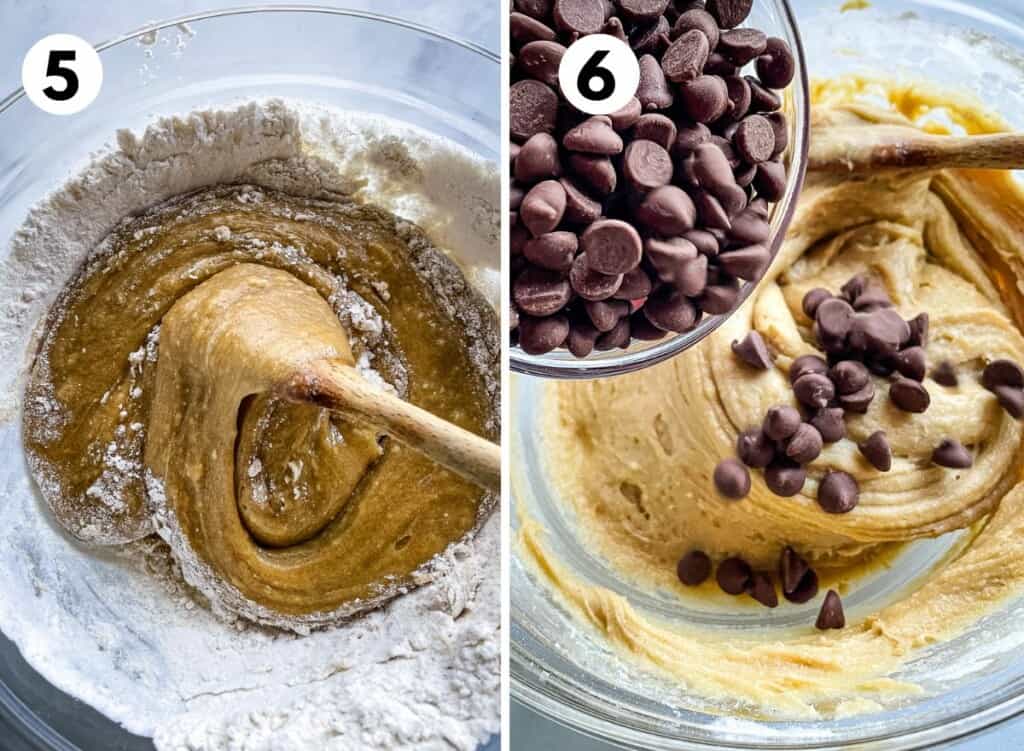
Add the gluten-free flour. Stir in the gluten-free flour, baking powder, and salt. You can mix the batter with a wooden spoon, sturdy flexible spatula, or an electric mixer. Whichever you prefer.
Stir in the chocolate chips and nuts. If you’re adding anything to these blondies, stir them in now.
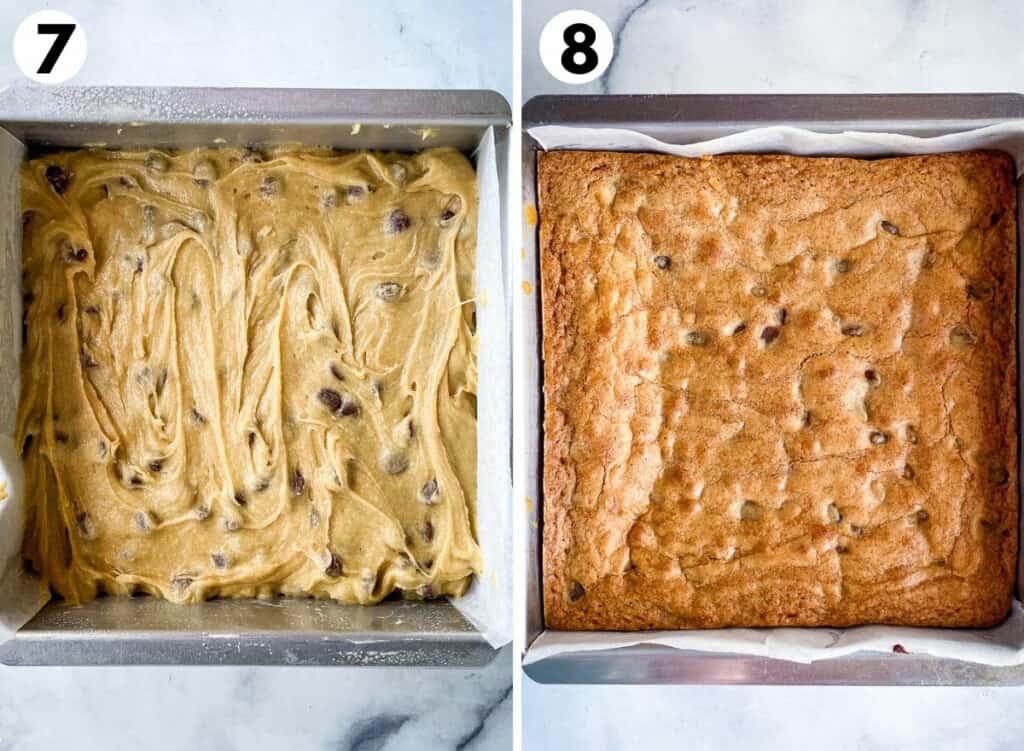
Spread into a pan. Line a 8×8-inch square pan with parchment paper. To keep them from sticking, lightly spray the pan with nonstick cooking spray.
Spread the batter into the pan.
Cool the bars in the pan. Let these bars cool right in the pan. Then cut into squares.
How to Store and Freeze.

Gluten-free blondies keep at room temperature for about three days. To store them, let them cool. Then place them in an airtight container or place them on a plate and cover with plastic wrap.
To freeze them, bake as directed. Let the blondies cool and cut into squares. Place them into a freezer container. If you need to layer the bars, place a piece of waxed paper or parchment paper between the layers. Freeze for up to two months. Thaw the blondies at room temperature.
The recipe was originally posted in May 2018. Photos and information updated March 2024.
Gluten-Free Blondies
One-bowl gluten-free blondie recipe. These are buttery, soft, and irresistible thanks to the brown sugar and butter.
Ingredients
- 1 ½ sticks butter, melted (6 ounces; 170 grams)
- 1 ¼ cups packed brown sugar, light or dark, see note (9 ounces; 255 grams)
- 2 large eggs
- 1 teaspoon vanilla extract
- 1 ½ cups gluten-free flour. (Bob's Red Mill 1:1 Gluten-free Baking Flour recommended.) (7½ ounces; 212 grams)
- 1 teaspoon baking powder
- ½ teaspoon salt
- 1 cup chocolate chips, optional (dark, milk, or white) (6 ounces; 170 grams)
- 1 cup chopped pecans or walnuts, optional (3½ ounces; 100 grams)
Instructions
-
Preheat oven to 350°F. Line a 8×8-inch square pan with parchment paper. Let the parchment overhang the pan by about two inches. Lightly grease the pan with nonstick cooking spray.
-
Stir together the brown sugar and melted butter until smooth in a large bowl. Add the eggs and vanilla extract. Mix until creamy and smooth.
-
Add gluten-free flour, baking powder, and salt. Mix until the batter is thick and smooth. If using chocolate chips and/or nuts, stir them in now.
Spread the batter into the prepared pan.
-
Bake until the bars are golden brown and the top is shiny and slightly cracked, about 30 minutes.
-
Let the blondies cool in the pan. They might sink in the middle as they cool.
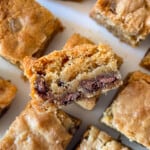
When cool, lift the bars out of the pan with the overhanging parchment paper. Cut into squares with a sharp knife. When cut, the bars might look underbaked. That's normal. They are very moist and buttery.
-
Store in an airtight container at room temperature for up to four days. Freeze cooled bars in a freezer container for up to two months. If you need to stack the bars, place a piece of parchmene paper or waxed paper between the layers.
Recipe Notes
Gluten-Free Flour. Use a gluten-free flour blend that contains xanthan gum. If yours doesn’t whisk ¼ teaspoon into the flour before using.
Brown Sugar. The terrific butterscotch flavor comes from brown sugar. For a caramel-like flavor, use light brown sugar. For pronounced molasses flour, use dark brown sugar.
Butter. Cool the butter slightly before adding it to the brown sugar.
Nuts. Toast nuts on a baking sheet in a 350°F oven for about 10 minutes. Remove nuts from the oven when they are golden brown and aromatic. Allow nuts to cool before chopping.
Dairy-Free Variation. For dairy-free bars, use a dairy-free butter and dairy-free chocolate chips.
Julie says
Is this baking soda or baking powder? The ingredients list calls for powder, but the directions call for soda.
Elizabeth says
Powder. I’ve updated the recipe. Sorry about the confusion. 🙂
Elise says
Is this recipe supposed to use baking powder or baking soda? The ingredient list conflicts with the instructions. Thanks!
Elizabeth says
Baking powder! Sorry for the confusion. I’ve updated the recipe. 🙂
Ginger says
Love, love, love this recipe without anything added to it!
Rob says
Self-raising or plain flour?
Thanks
Elizabeth says
Regular gluten-free flour.
Robert Chamberlin says
What do you mean by “regular” GF flour? Are you using a blend like King Arthur??
Elizabeth says
Hi Robert,
My comment about “regular” gluten-free flour was in response to a question about self-rising or plain gluten-free flour. I tested the recipe with Bob’s Red Mill 1:1 Gluten-Free Baking flour. Using a different gluten-free flour blend, like King Arthur’s, should work in this recipe but the texture of the blondies might be a little different. Hope this helps!
Jules says
I made these with King Arthur’s GF Measure for Measure Flour and they were delicious. Moist, chewy, cakey texture – what’s not to like!
Celeste says
The whole family enjoyed them. I did not have brown sugar but used 3/4 cane sugar and 1/3 cup maple syrup. Added some chick chips to half of it for those who can eat chocolate. All had seconds:)
Thanks
Melonie Sullivan says
Thanks for this recipe. I made with King Arthur GF flour. They were “softer” than those I’ve made in the past with regular flour; not as dense or chewy. I wonder if banging the pan partway through would solve that issue. Anyway, cooking from what I had on hand, I used light brown sugar, browned the butter, added toasted unsweetened coconut flakes. chopped cashews, and Maldon salt on top. Pretty tasty!
hazel says
made with carmel chunks instead of chocolate.Rich and dense.
Roseanne says
This recipe works well with Better Batter’s all purpose gluten-free flour (cup for cup). Thank you!
Pamela says
At 4,000 ft. above sea level, this took 55 minutes to bake! Patience prevailed, and it was DELICIOUS! The lady who wrote this knew what she was talking about, and she achieved gluten-free blondie excellence!
Alyssa says
Love this recipe, no one would guess it’s GF! My only issue is the baking time. I always feel like mine are underdone even when I add cook time. Are they supposed to be quite gooey? I just don’t want to make anyone sick!
Vicki says
Can u freeze these?
Elizabeth says
Yes. Let them cool first and then wrap. They keep for about two months.
Karen says
What a great recipe! These taste delicious and have a wonderful texture. I wanted to make a 13×9 pan, but didn’t want them to be too thin. I made 1 1/2 the recipe and it resulted in a perfectly thick 13×9 pan of sweet, buttery goodness!
Barbara says
Tried making them this morning. Rather disappointing. Color darker than photo. They stuck to pan even with parchment, fell apart when I tried to remove them. Taste good but mostly crumbs. ?
Only difference was I used Bobs Red Mill gf 1 for 1 flour.
Elizabeth says
This is an odd result. The recipe was created with Bob’s 1:1 Gluten-Free Flour, which it sounds like you used? It’s hard to get anything to stick to parchment paper. But you’re saying that they stuck and then crumbled? (Just trying to troubleshoot.)
I’m not sure what would have caused them to stick. As for crumbling, I have two guesses. Something might have been mismeasured or your oven temp might be off.
Betsy says
Followed the recipe exactly except 1 cup sugar instead of 1.25. Quite tasty but it came out as cake not gooey blondies. Next time I will cut the flour down quite a bit bc I prefer the gooey kind and see if it works
Elizabeth says
Reducing the sugar would have changed the texture a bit to cakey. Glad you liked the flavor!
Marilyn Sturgeon says
This is delicious & will be on my repeat baking for my church family!
Thank you..
Brenda H says
These are hands down the best blonde brownies that I have made since going gluten free. Absolutely mouth watering! 🤤 Thank you so much for the recipe!!
Lauren says
Made these tonight and they were SO good!! We added white chocolate chips and caramel chips and they were amazing!
Em says
What about xanthan gum?
Elizabeth says
Hi Em,
Here’s the note about xanthan gum: Use a gluten-free flour blend that contains xanthan gum. If yours doesn’t whisk ¼ teaspoon into the flour before using.
If you have another question, just let me know!
Erin B says
I was looking for a GF blondie recipe that was as similar as possible to my regular one. This one looked like it could do the trick, but with a few minor modifications: doubled the recipe to fit a 9 x 13″ pan, used salted butter and browned the butter instead of just melting it, added 2 teaspoons of good quality bourbon instead of vanilla extract, but also scraped 2 vanilla beans into the batter, used high quality butterscotch chips in place of chocolate. All other proportions and methods kept identical to your recipe. They came out perfect – they’re an exact dupe for my regular brown-butter butterscotch blondies. I don’t think anyone will realize they’re GF unless I tell them (which I will!) Thanks for a great recipe!
Sandra says
Dit is werkelijk het meest heerlijk glutenvrije stukje gebak wat ik ooit op heb.
Translation from Dutch, provided by Google Translate: This is truly the most delicious gluten-free piece of cake I have ever tasted.