
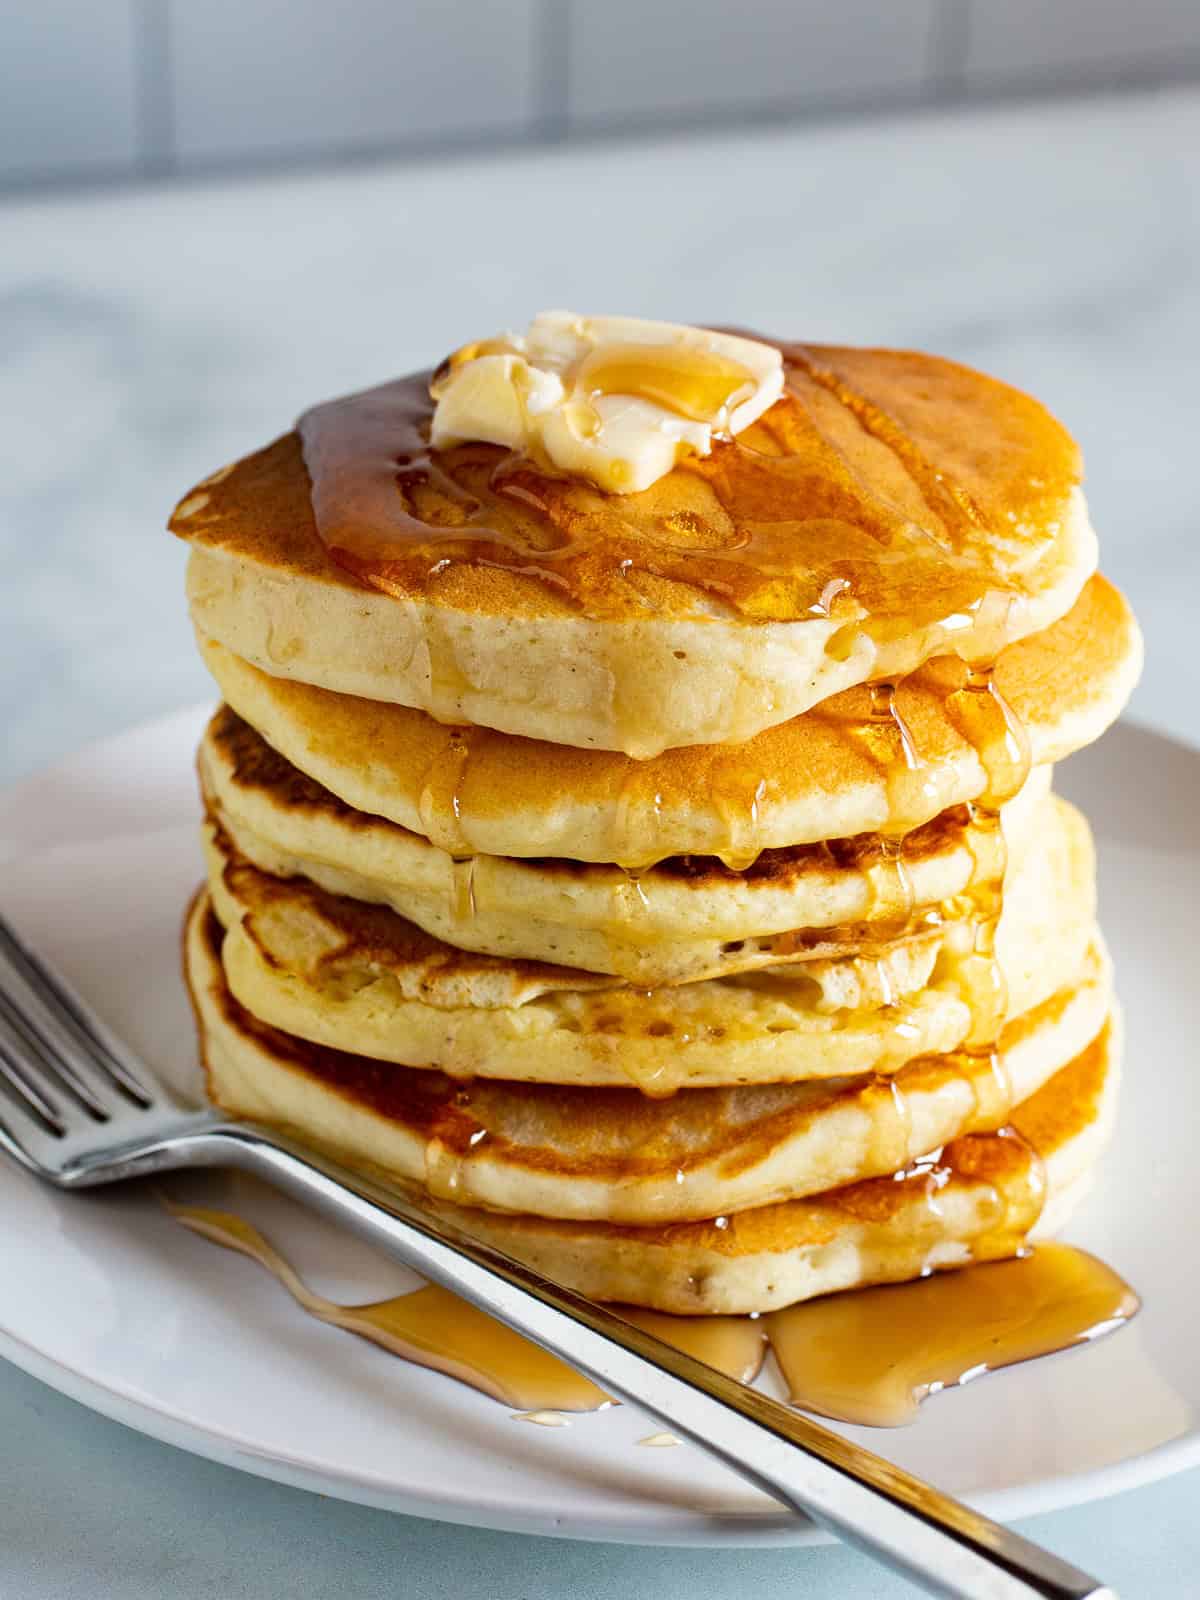
This is my go-to recipe for the best gluten-free pancakes. They come out light and fluffy—with hardly any work required. It’s a simple one bowl recipe. Stir the batter together, let it rest for a few minutes, and then cook them on a hot griddle. That’s it!
Looking for a gluten-free and grain-free pancake recipe? Try these fluffy almond flour pancakes or these cute coconut flour pancakes.
Ingredients Explained
Here’s what you need to make a batch of these pancakes.
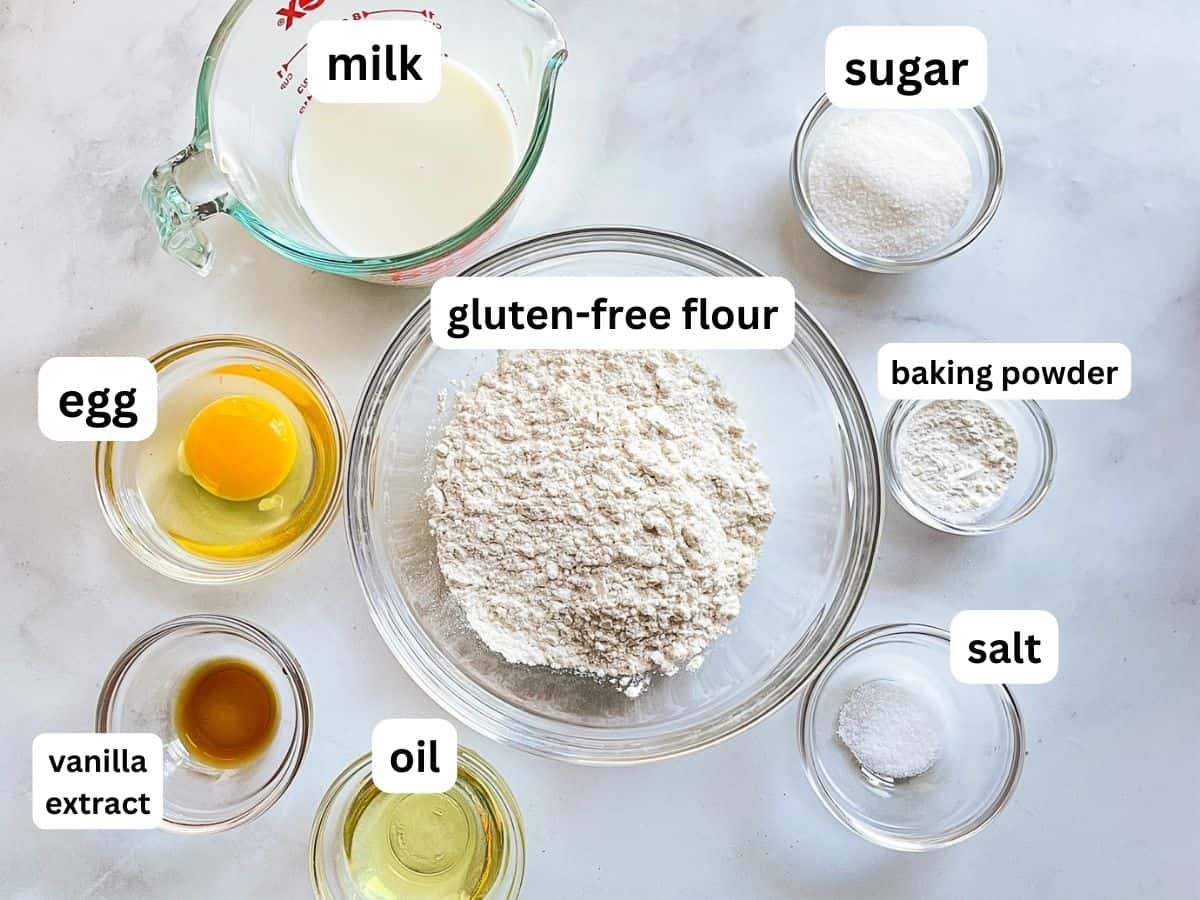
- Gluten-Free Flour. Gluten-free flour blends vary from brand to brand. This recipe was developed with Bob’s Red Mill 1:1 Gluten-Free Flour blend. Using a different blend might change the results.
- Sugar. A little granulated sugar adds a touch of sweetness and helps with browning.
- Egg. One egg does a lot! It adds structure, flavor, and helps with the rise.
- Milk. Use your favorite milk. Both traditional and dairy-free milk work.
- Oil. Oil works great and it’s what I usually use. If you prefer a buttery flavor, use melted butter. Just remember to let it cool a little before adding it to the batter.
- Vanilla Extract. The vanilla adds a nice flavor. Almond or lemon extract can be used too.
- Baking Powder. Makes the pancakes nice and fluffy.
- Salt. Use table salt. It blends easily into the batter.
Variations
If you love blueberry or chocolate chip pancakes, you can use this recipe to make them! For an extra pop of flavor, make a batch of blueberry-chocolate chip pancakes. The two flavors go great together.
- Blueberry Pancakes: Stir ½ cup of fresh or thawed blueberries into the batter.
- Chocolate Chip Pancakes: Replace the granulated sugar with light brown sugar and sprinkle a few chocolate chips onto the batter immediately after you spoon the batter onto the griddle. Serve with a dollop of whipped cream.
How to Make Gluten-Free Pancakes
This recipe is so easy you can make a batch while still half asleep. Grab a bowl, whisk everything together, and cook. That’s it! No whipping egg whites. Just light and fluffy pancakes that gluten-free eaters will gobble up.

Step One: Make the Batter.
First whisk the dry ingredients together. This evenly distributes the sugar, baking powder, and salt within the gluten-free flour, ensuring that each pancake rises and browns uniformly.
Then add the wet ingredients. Mix until the batter is smooth. You might see a lump here and there. That’s fine.
Run a spatula along the bottom and sides of the bowl. If you see any dry flour, stir it gently into the batter.
Step Two: Let the Batter Rest.
After you mix it, let the batter rest (sit on the counter) for between 5 and 15 minutes. This helps the gluten-free flours and starches fully absorb the liquid.
Since it thickens a little during the rest, give the batter a stir right before cooking. If it’s too thick to drop from a spoon, stir in a tablespoon or so of milk.
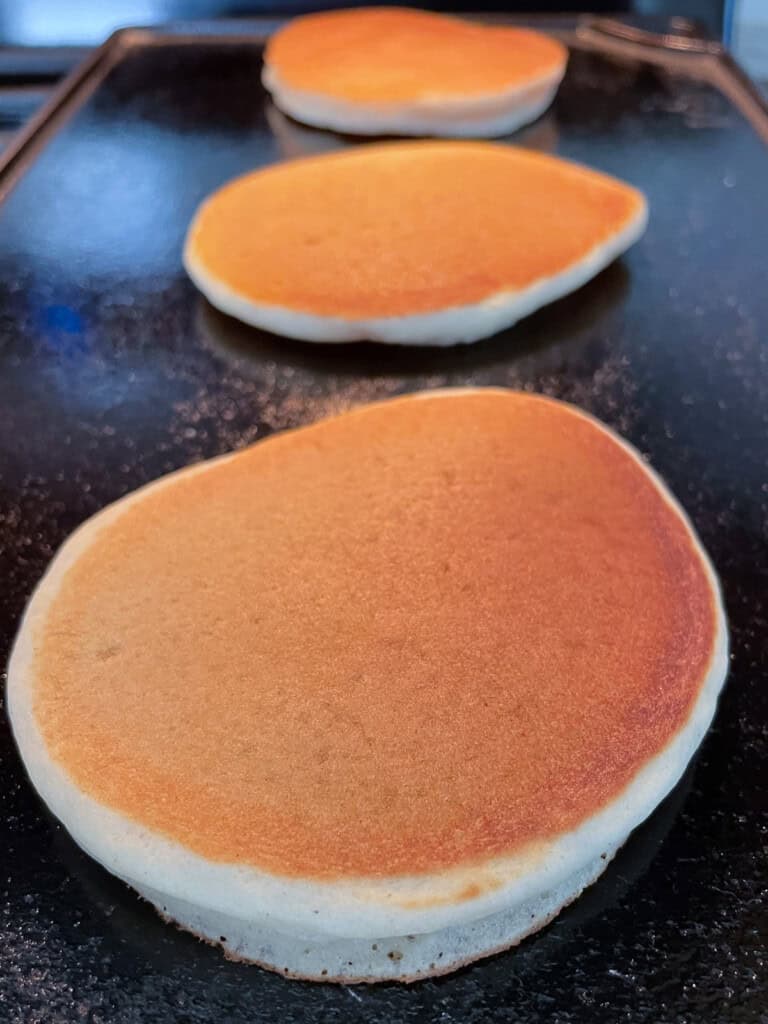
Step Three: Cook on a Hot Griddle.
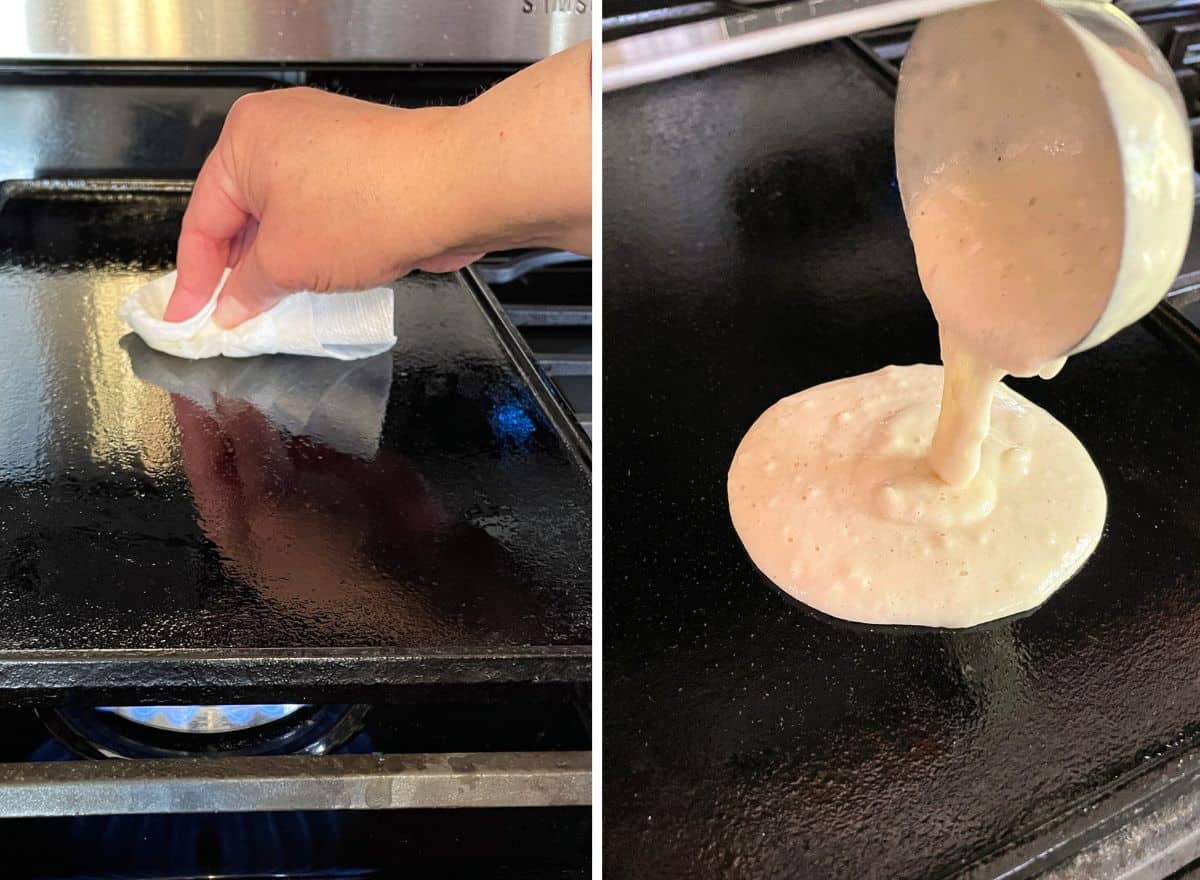
The key to great gluten-free pancakes is to cook them on a hot greased griddle. Oil your pan with a light brush of oil or a spray of nonstick cooking spray.
When your pan is hot-but not smoking-spoon about a ¼ cup of batter onto it.
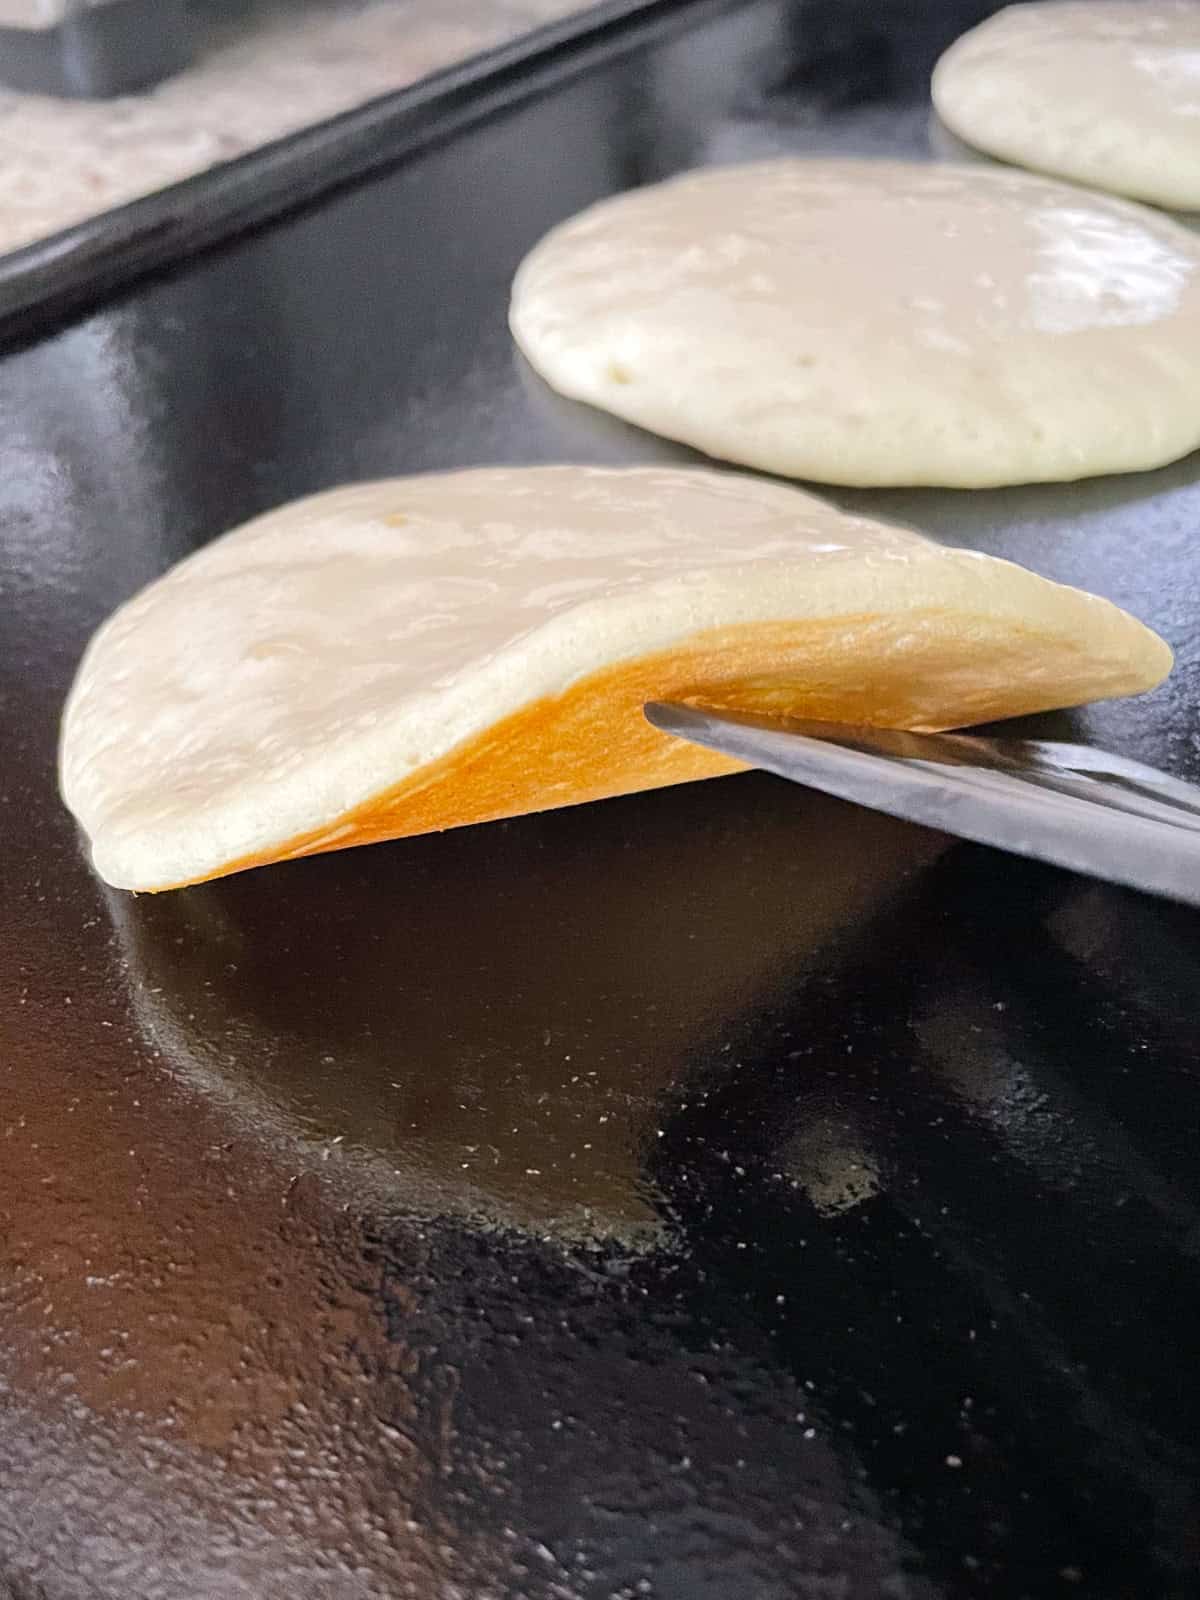
Cook the pancakes for about two minutes. When you see a few bubbles on the surface of the pancake, it’s time to flip them. Then cook for another minute or so.
How to Flip a Pancake
There’s a bit of an art to flipping a pancake. Here’s how to do it.
- Heat and grease the griddle. If you cook pancakes on a cold pan, they won’t brown or rise nicely. And if your pan isn’t nicely greased, they’ll stick. Nonstick and cast iron griddles are perfect for gluten-free pancakes! If you’re using an electric griddle, heat it to 350℉.
- Leave space. First, remember that it’s hard to flip a pancake on a crowded griddle! Leave about an inch between each pancake.
- Wait for bubbles. Look for the batter to lose a little of its shine and for bubbles to appear on the surface.
- Use a the right spatula. The best spatula for flipping a pancake is a large one with a thin edge. If the spatula is too small, it’s hard to get under the pancake to flip it.
- Take a peek! I like to gently slide the spatula under the pancake and carefully lift the edge. I give it a quick peek to see if it’s brown. If it’s still pale, I let it cook for another minute or so.
- Flip gently. Lift the pancake a little. There’s no need to lift it very high off the pan. Then, using your wrist, quickly flip the pancake. Think of it more like a turn, than a flip.
- Cook until brown. After you flip, the pancake only needs a minute or so more to cool. You can gently tap the top to make sure it’s set and not soft.
Keeping Pancakes Warm
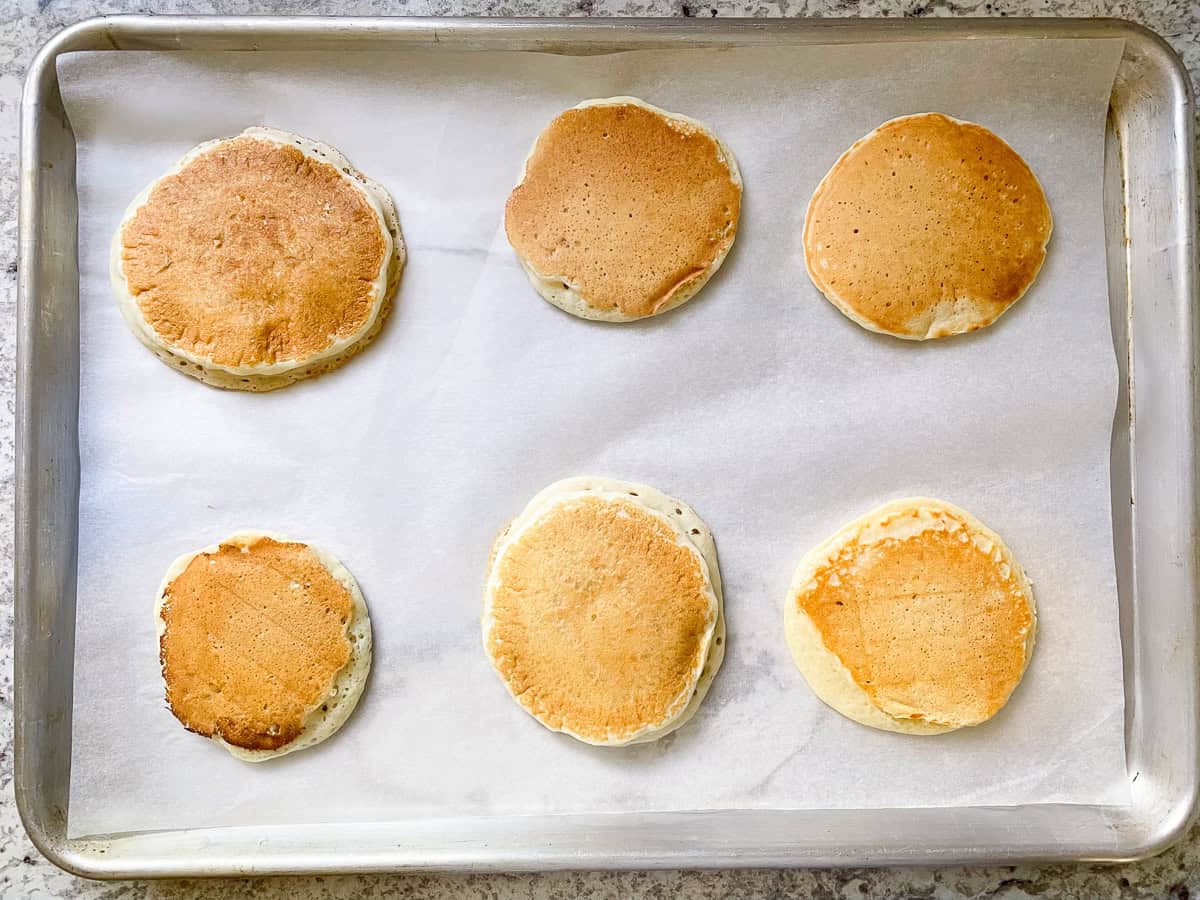
Place a parchment-lined baking sheet into the oven before you mix the pancake batter. Heat your oven to 225°F. As you make the pancakes, transfer them to the warm baking sheet. Pancakes keep for about 30 minutes in a warm oven. After that, they start to dry out.
Storing and Reheating Leftovers
If you’ve got leftover pancakes, lucky you! They’re great for a quick gluten-free breakfast.
Store the leftover pancakes covered at room temperature for a day. They tend to dry out. So I recommend freezing leftovers.
Freezing
Place cooled pancakes into a freezer bag or container. If you’re going to stack them, put a piece or waxed or parchment paper between them.
They keep for about two months in the freezer.
Reheating
When you’re ready to eat, you’ve got options!
- Microwave. Place frozen pancakes in a single layer on a microwave-safe plate. Heat on medium-high for one minute. Flip the pancakes and heat for another 30 seconds or until warm. The reheating time will vary depending on your microwave.
- Air Fryer. Place the frozen pancakes in a single layer on the tray of your air fryer.
- Oven. If you need to reheat a lot of pancakes, the oven is the best method. Heat the oven to 325℉. Place the frozen pancakes on a baking sheet. Heat until warm, this usually takes about 10 minutes.
Note: This recipe was originally published in 2017. It has been updated to use a gluten-free flour blend. Here is the link to the original gluten-free pancake recipe.
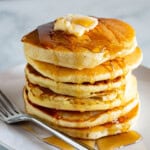
Fluffy Gluten-Free Pancakes
These gluten-free pancakes are incredibly light and fluffy. For the best texture and rise, let the batter rest for at least five minutes before cooking. A hot, greased skillet ensures the pancakes don’t stick.
Ingredients
- 1 cup gluten-free flour (Bob's Red Mill 1:1 Gluten-Free Baking Flour recommended) (5 ounces; 142 grams)
- 2 tablespoons granulated sugar (1 ounce; 28 grams)
- 1 ½ teaspoons baking powder
- ½ teaspoon salt
- ¾ cup milk (6 ounces; 170 grams)
- 1 large egg (2 ounces; 56 grams)
- 2 tablespoons oil or melted butter (1 ounce; 28 grams)
- ½ teaspoons vanilla extract
Instructions
-
Whisk the gluten-free flour, sugar, baking powder, and salt together in a medium bowl. Add the milk, egg, oil, and vanilla extract. Let the batter rest for 5 minutes. (Batter can rest up to 30 minutes.)
-
Heat a nonstick griddle or skillet over medium-high heat. Lightly grease the griddle with oil or butter.
-
Spoon about ¼ cup of batter onto the skillet. Cook until the edges look set and bubbles appear all over the surface of the pancake, about two minutes. To check for doneness, lift the edge of the pancake with a spatula. It should be golden brown.
-
Flip the pancake and cook until golden brown, about two additional minutes.
Repeat with the remaining batter. Serve with butter and syrup.
To Keep Pancakes Warm
-
Before making the batter, place a parchment-lined baking sheet in the oven. Heat oven to 225°F.
Transfer cooked pancakes to the baking sheet. Don't overlap the pancakes. Keep warm for up to 30 minutes.
Recipe Notes
Ingredients and Substitutions
Gluten-Free Flour. For best results, use a gluten-free flour blend that contains xanthan or guar gum. If your blend doesn’t, whisk in ¼ teaspoon. The recipe was tested with Bob’s Red Mill 1:1 Gluten-Free Flour Blend.
Milk. If you want to make gluten-free and dairy-free pancakes, use dairy-free milk.
Egg. Use a large egg. If you’d like gluten-free and egg-free pancakes, use an egg replacer and follow the directions on the package for replacing one egg. Please note: I tested the recipe using Bob’s Red Mill’s egg replacer and a flax egg. Both work. The pancakes made with Bob’s egg replacer turned out a bit lighter than those made with the flax egg. Both were a little heavier than pancakes made with an egg. Since egg-replacers vary from brand-to-brand, use your favorite.
Oil. Any neutral oil, like corn or canola oil, works. Melted butter may also be used. After melting the butter, let it cool for a few minutes before adding it to the batter.
Freezing and Reheating
Place pancakes in a freezer bag or container. To keep them from sticking, place a piece of waxed or parchment paper between each pancake.
To reheat in the microwave: heat on low power for one minute. Flip and heat an additional minute as needed.
To reheat in the oven: Preheat the oven to 325℉. Place frozen pancakes on a baking sheet. Heat for about 10 minutes.
For additional information, including air fryer and toaster directions, see above.
Katie Sadewasser says
Delicious!!
Way better than the box. I just added more milk bc it was way too thick.
Astrid says
they were great, but a little dry. and I wish the recipe was bigger. for a family of five, it’s just not enough.
Elizabeth says
The recipe doubles nicely!
Ben says
Then make more? How are you gonna complain about the amount the recipe makes
Sav Jane says
Celiac here, and this recipe is definitely a keeper!! I let the batter rest for about half an hour so it could soak up the moisture, and substituted milk for vegetal milk, and it turned out perfect. My boyfriend did not even realize this was gluten-free, which is always sign of a win ;P
Astrid says
it’s also WAY too runny.
Elizabeth says
The batter shouldn’t be runny at all. What gluten-free flour did you use?
Stephanie says
These are not light and fluffy. Extremely dense as if more liquid is needed than what the recipe calls for. Will not make again!
Elizabeth says
These shouldn’t be dense. What gluten-free flour did you use? And was your baking powder fresh?
Erin says
I made the recipe exactly as written and the batter was so thick that I could hold the bowl upside down. I had to add quite a bit more milk to make it usable.
Elizabeth says
That’s odd. What gluten-free flour did you use? The batter should be a nice creamy consistency.
Lily.Eve.💖 says
I’m 11 years old and made these pancakes pretty easily.I think these are the best ones I’ve ever tasted before and they don’t even taste gluten free. 🥞😋
Elizabeth says
Yay! I’m glad you liked them!
Des says
I used avocado oil, these turned out amazing!
Tricia B says
I brought two 4lb bags of Bob’s Red Mill gluten free flour and came across your website and so grateful i did!!! I doubled the recipe and these were delicious! The batter is thicker then the normal thin batter you get from a box. I was a little nervous, but saw on another review you said it should be creamy. So I trusted the process and so glad I did! These are the best pancakes I’ve made since being diagnosed with Celiac disease 3 years ago! I love your recipes! Thank you!
Keenya says
I made these gluten-free pancakes along with wheat flour pancakes for Christmas breakfast. I followed the recipe exactly as listed – using the recommended Bob’s Red Mill 1:1 Gluten-Free Baking Flour – they were absolutely delicious. They are definitely being added to my recipe collection.
Katie says
The people commenting negatively must not be making these correctly because I made them today with Gluten free King Arthur flour and they were so good!! I will no longer buy prepackaged gluten free pancake mix, thank you!
Daniel says
Extremely easy to make, and they turned out perfectly! My pregnant wife is very happy. She said she’d never have known they were gluten free.
jenn says
Made these today, used king Arthur 1:1. The batter was much too thick. Required 3/4 C additional milk.
Suzanne says
Wonderful gluten free pancakes. Remember to let the batter rest for better results! Thank you Elizabeth.
Diana says
I used Bob’s RM baking 1:1. The batter was thin but after resting, I could dip it out and pour it on the griddle. They cooked up light, fluffy and delicious
I know weighing ingredients is better but I just spooned the flour into my cup and was careful not to overfill, and they turned out perfect.
Emily says
Same as many other reviews, the batter was too thick. I followed the recipe exactly with the same brand of flour. Maybe because I scooped the flour instead of spooning it into the measuring cup? Either way, the consistency was annoying to work with and because they were so thick I had to adjust cooking temperature. The texture when eating was strange also, kinda gummy. Maybe because of the size and thickness difference.
It’s strange that reviewers either get exactly the result intended or it’s pretty bad. Not sure what’s going on but I’ll probably find a difference recipe next time.
Elizabeth says
Did you use the Bob’s Red Mill Baking Flour or their all-purpose gluten-free flour?
Crystal says
I made the recipe and it was great. I even put two of the scoops into my mini waffle maker and they came out perfect. I will be making again. For those saying the recipe was too runny or too thick, try using a kitchen scale to measure your flour. I followed the recipe with the weights and it was excellent
Avery says
I love these!! I made them dairy free with cashew milk and dairy free butter. I have already shared the recipe several times. Will be making again!
Eloise and Reagan says
Me and my neighbor are 12 and 8 years old and we made these pancakes really easily. They were a little thick at first, but ended up being super delicious and nice and fluffy in the end. Easily five stars.
Steph says
I don’t often leave reviews on recipes but this is the best pancake recipe I’ve ever made – gluten free or otherwise. I’ve had to add or adjust every single other recipe, this one I made as is, followed the recipe to a T and got the most perfect, fluffy pancakes. I finally achieve that perfect even golden brown – not spotted, no over or undercooked spots – that I’ve been trying to get for years. I’m an experienced baker and perfect pancakes have always eluded me. I wanted something both me and my 10 month old could enjoy and this fit the bill! My tips: griddle should be medium-hot, ideally around 350 and I prefer oil to butter for the skillet as butter has water content and it can prevent those perfect evenly golden pancakes! 10/10 and these also froze & reheated shockingly well!