• Skip to primary navigation
  • Skip to main content
  • Skip to primary sidebar
Gluten-Free Baking logo
  • Home
  • Recipes
  • About
    • About Me
    • Contact
    • My Cookbooks
    • Work with Me
menu icon
go to homepage
  • Home
  • About
  • Recipes
  • Contact
    • Facebook
    • Instagram
  • search icon
    Homepage link
    • Home
    • About
    • Recipes
    • Contact
    • Facebook
    • Instagram
  • ×
    Home

    Easy Gluten-Free Zucchini Bread

    Slices of gluten-free zucchini bread on a cutting board.

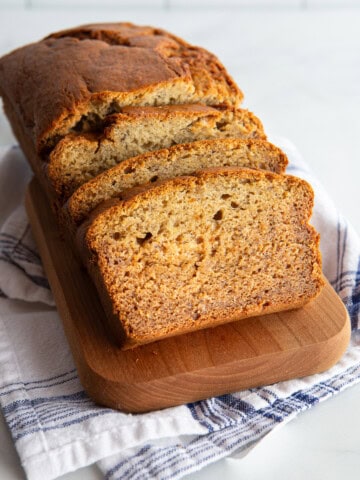
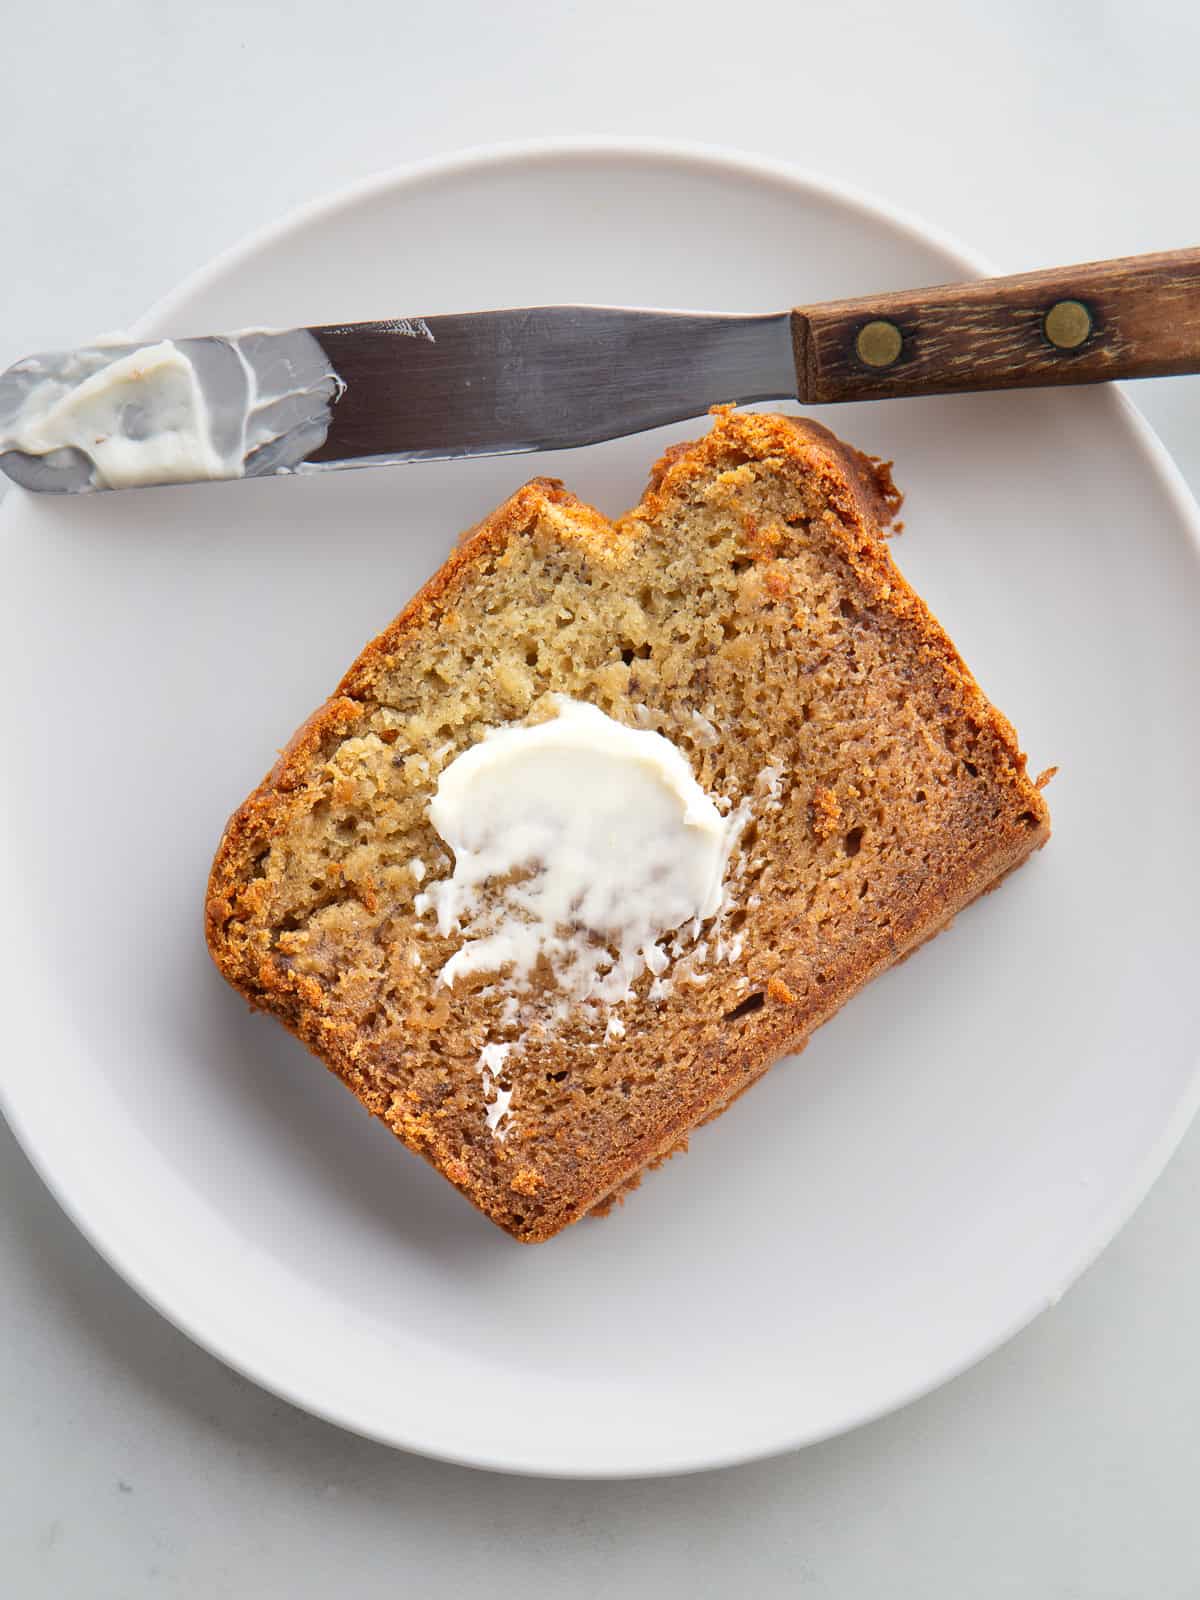
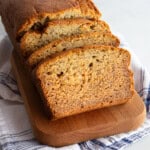
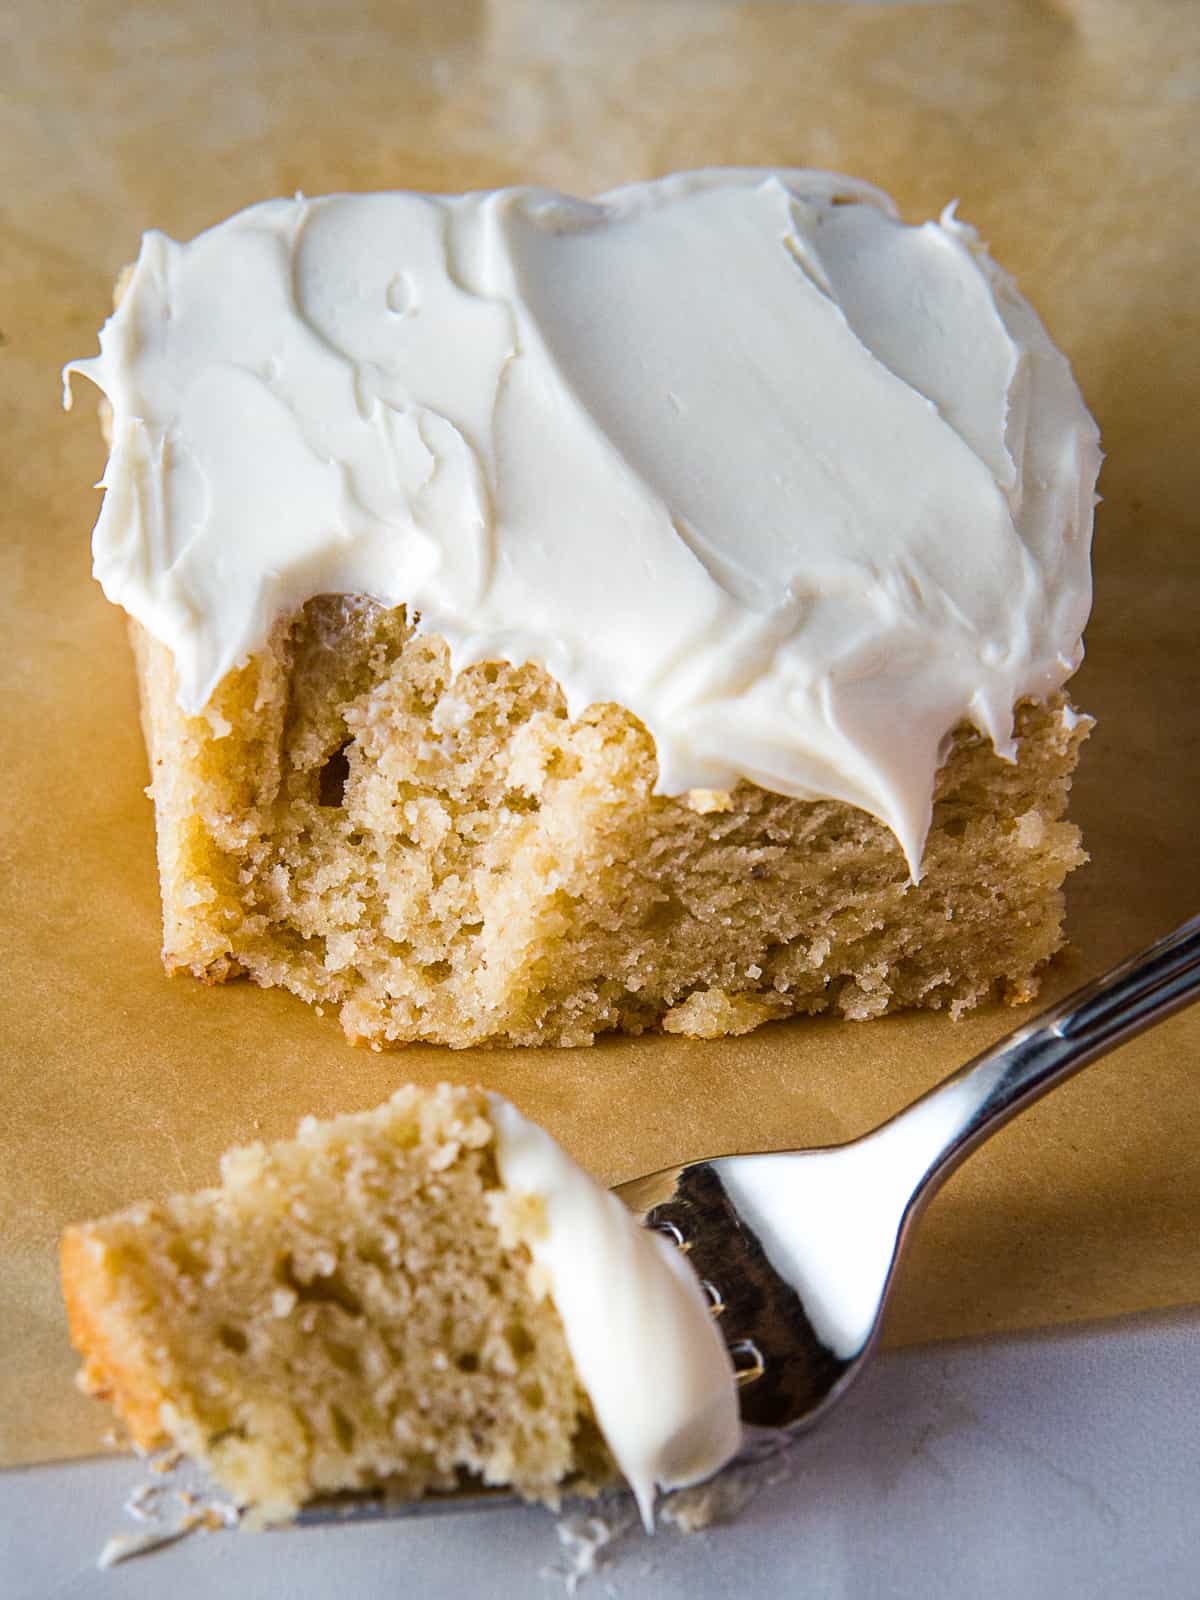
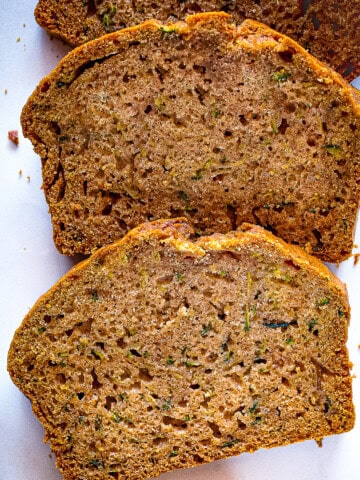
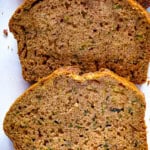
    Classic zucchini bread gets a gluten-free makeover. This easy recipe is tender, loaded with zucchini, and pleasantly sweet. Add your favorite mix of chocolate chips, nuts, or dried fruit. The recipe makes one loaf and doubles easily. 

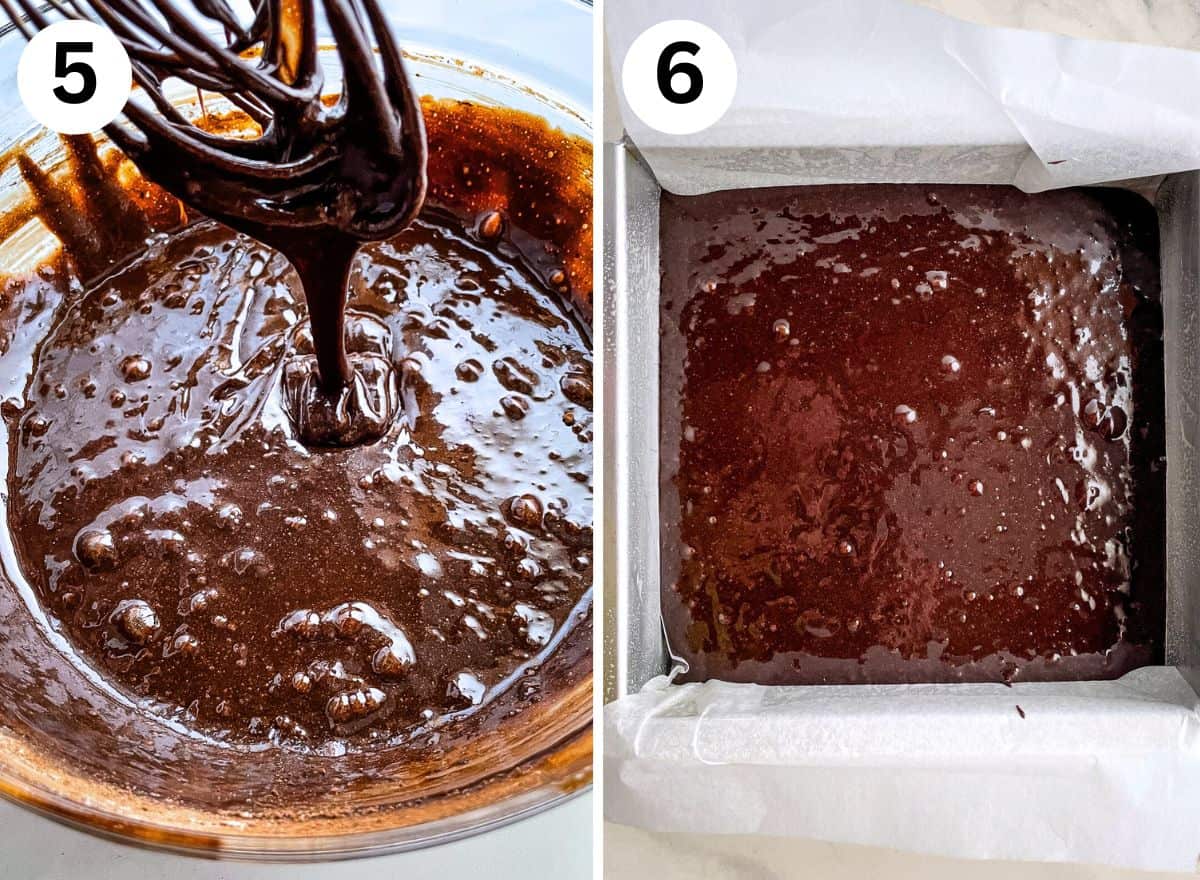
    If you have a lot of zucchini to use, try this recipe for gluten-free chocolate zucchini bread.

    Looking for other gluten-free quick bread recipes? Bake a loaf of gluten-free banana bread or gluten-free pumpkin bread.

    Slices of gluten-free zucchini bread on a cutting board.

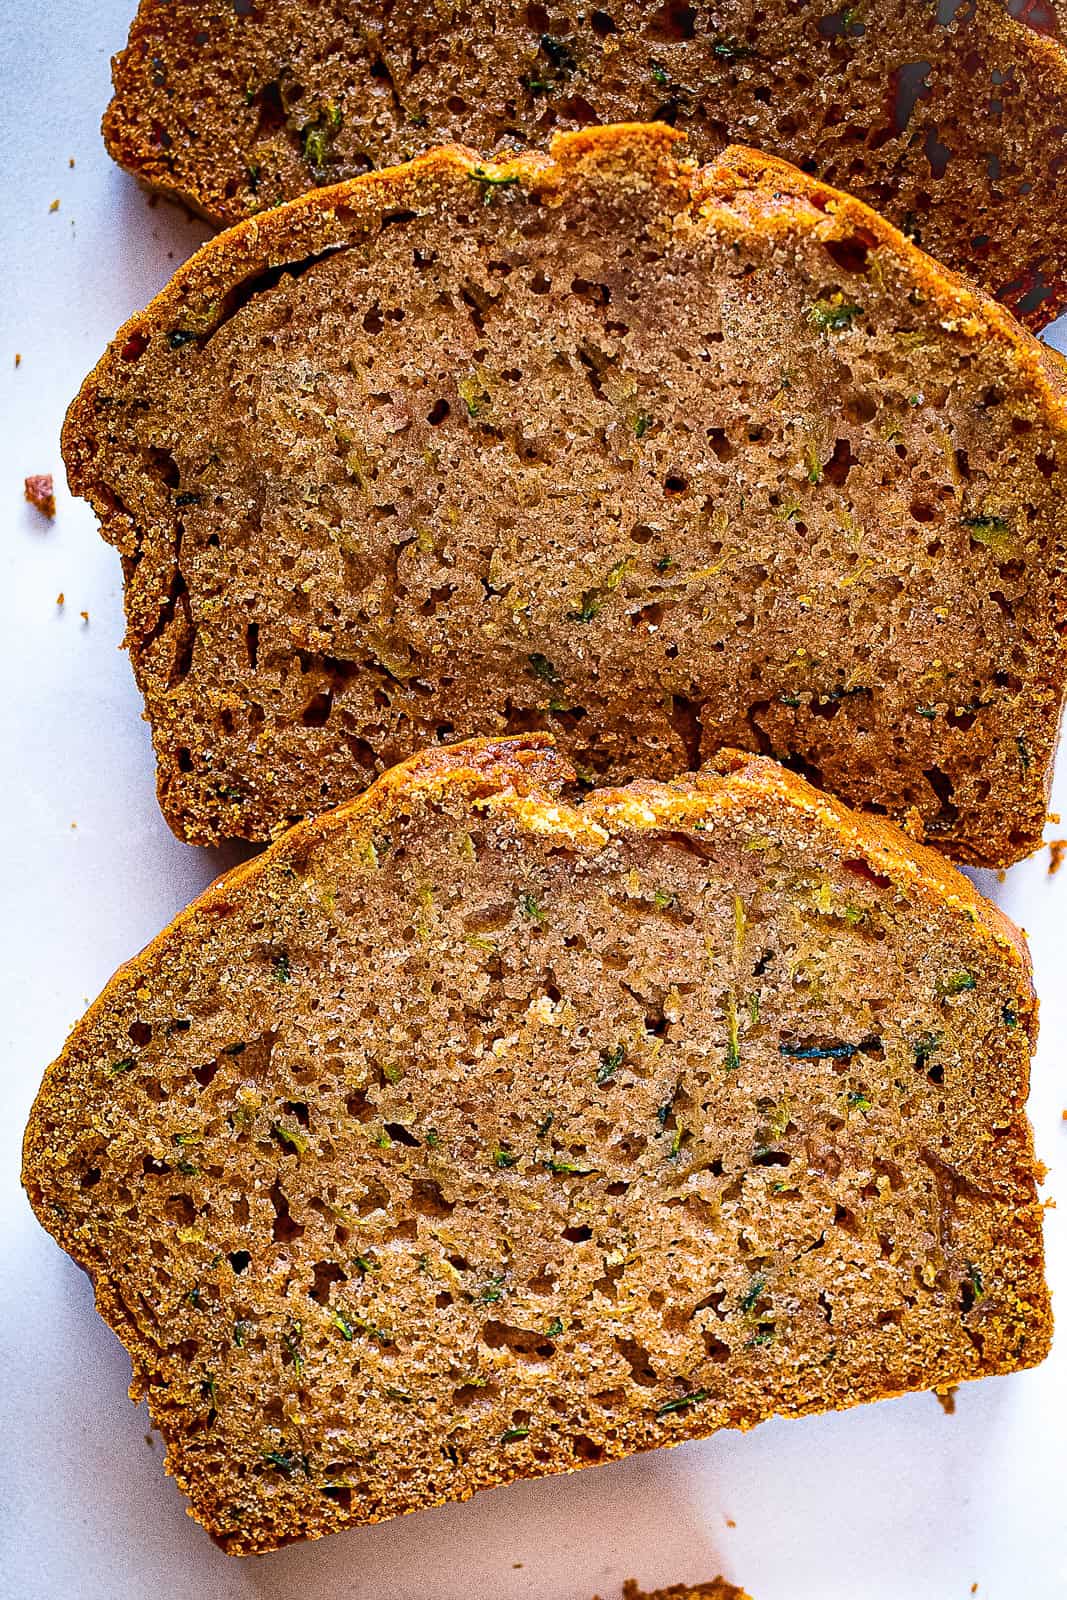
    Making a loaf of gluten-free zucchini bread is a fun summer ritual. This easy recipe makes a classic bread that’s pleasantly sweet with a little spice. It’s also really easy to make. 

    For the best flavor and texture, bake this bread when zucchini is fresh and abundant.
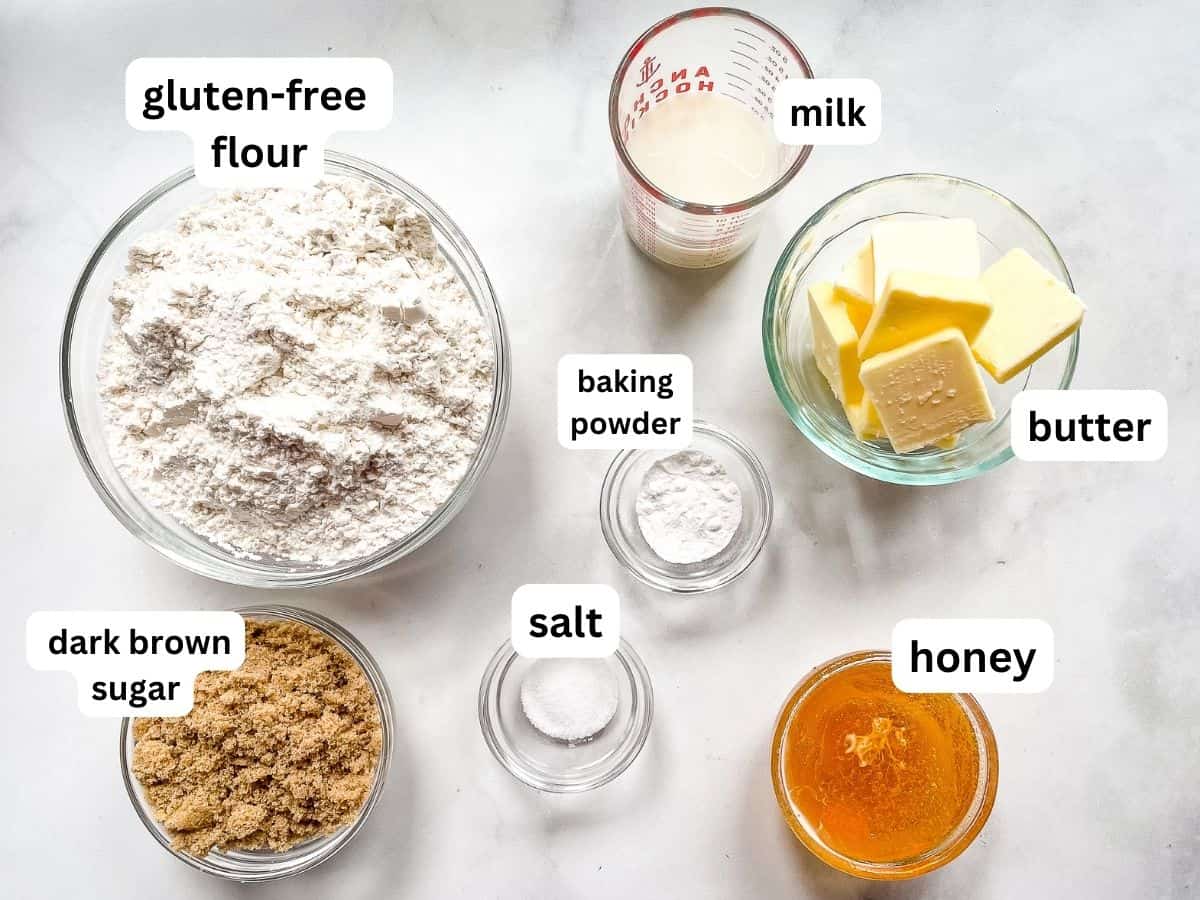
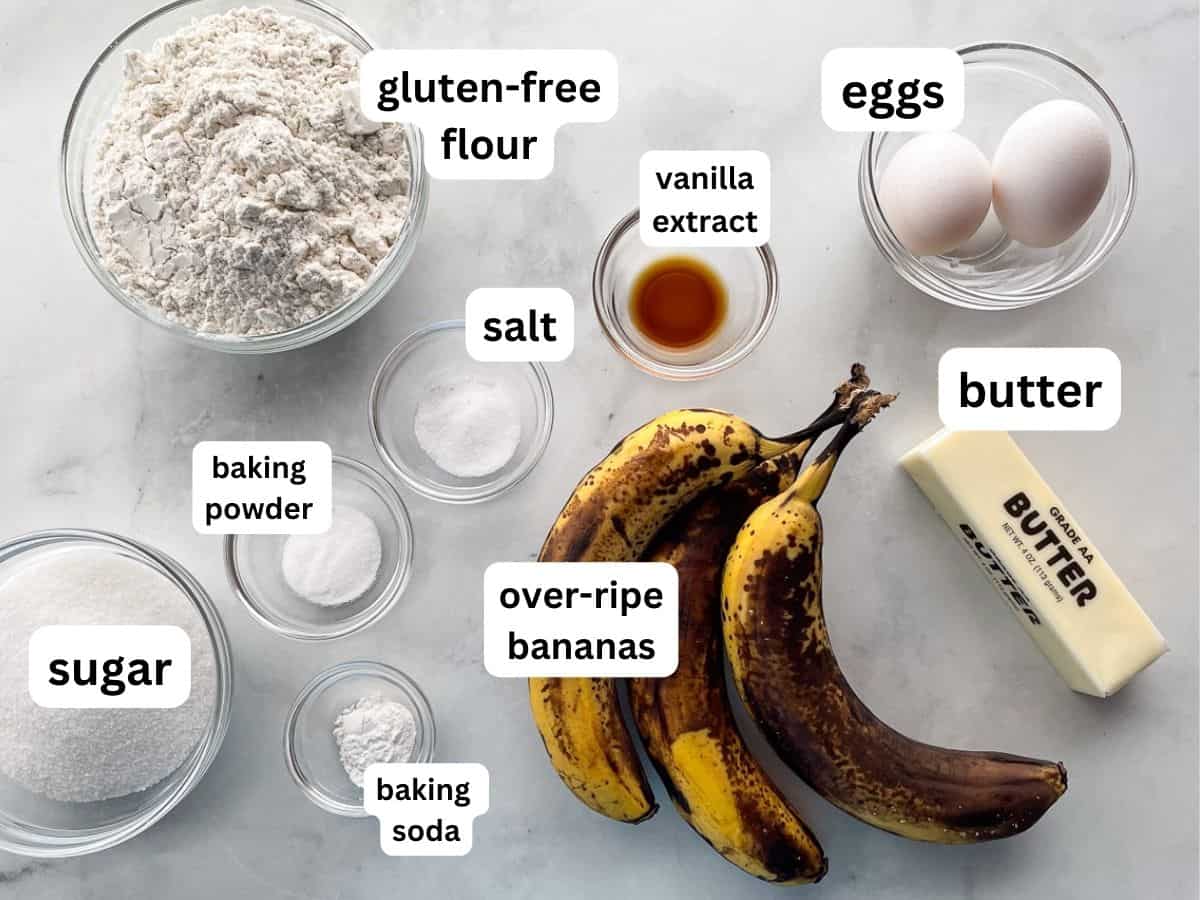
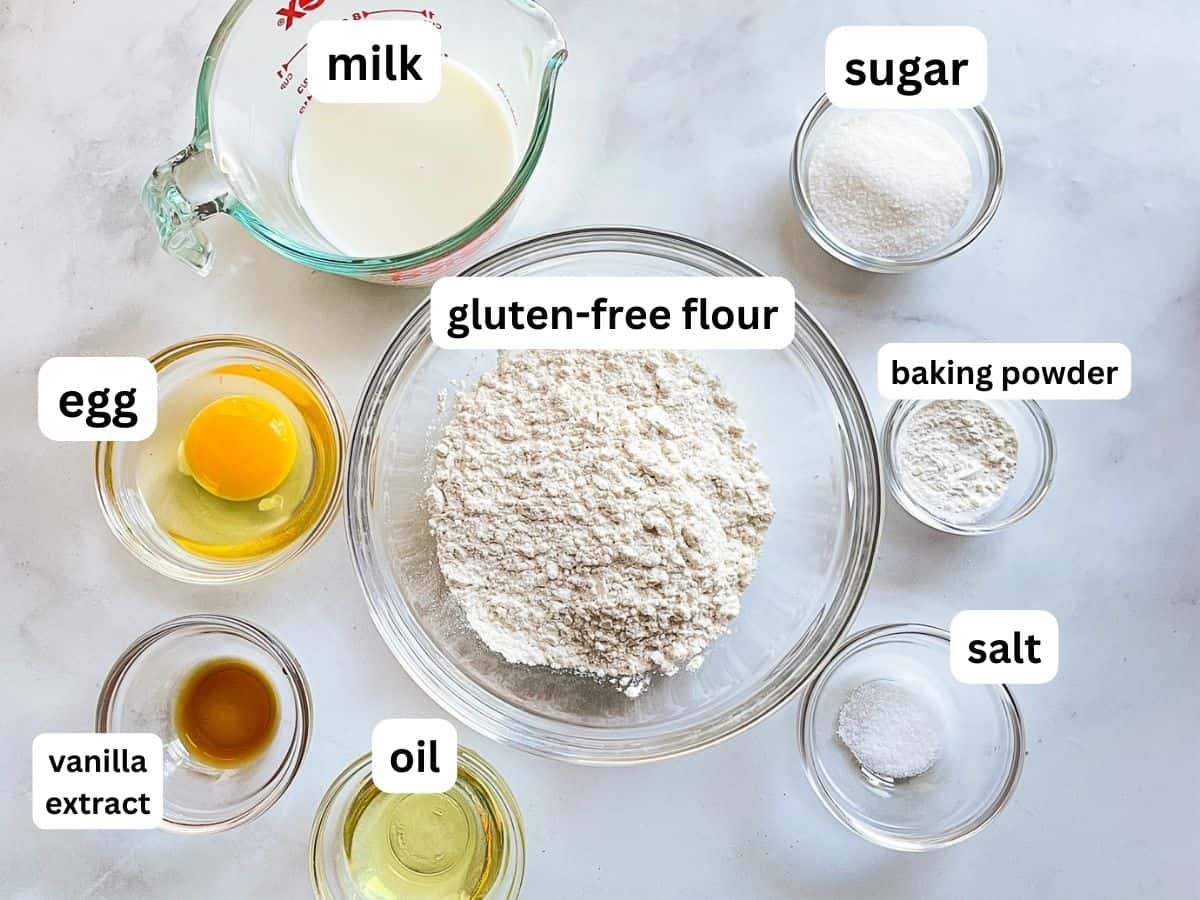
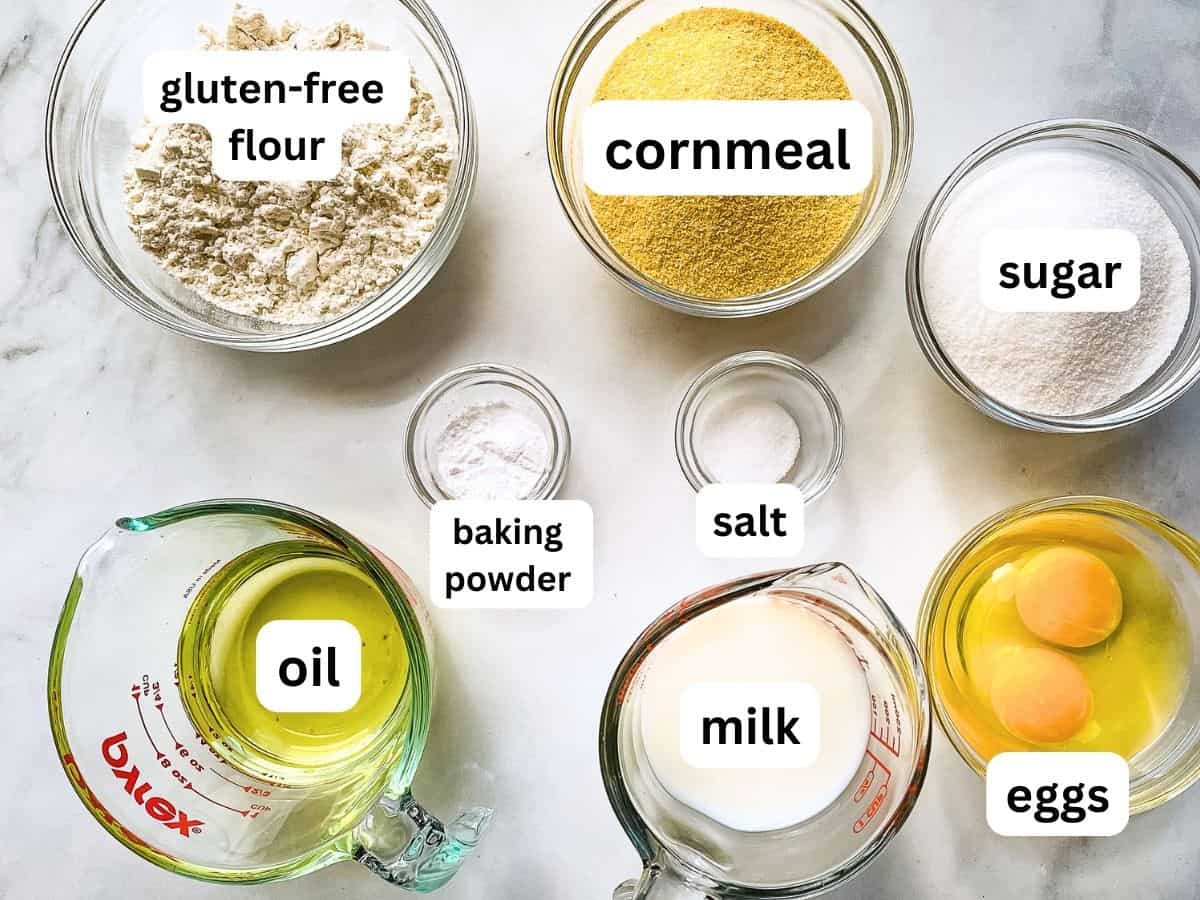
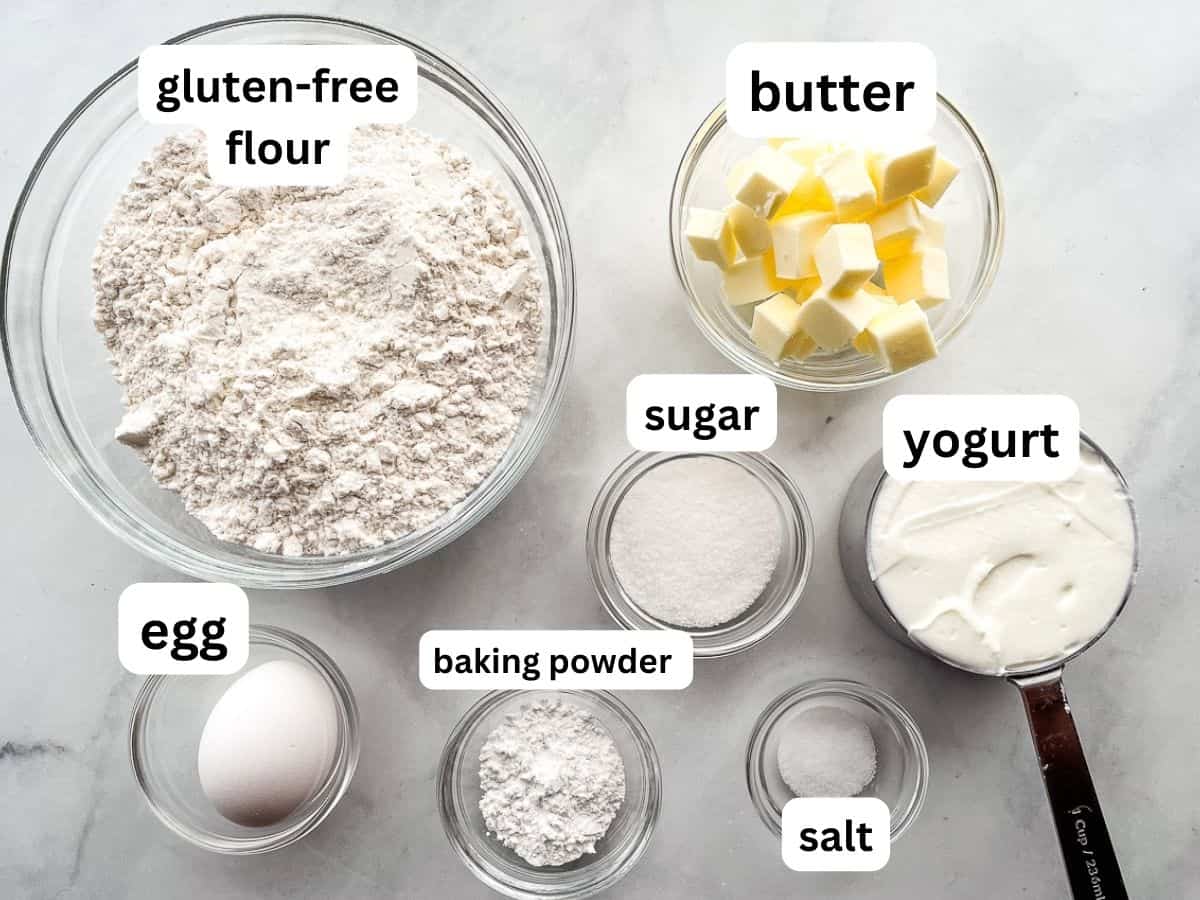
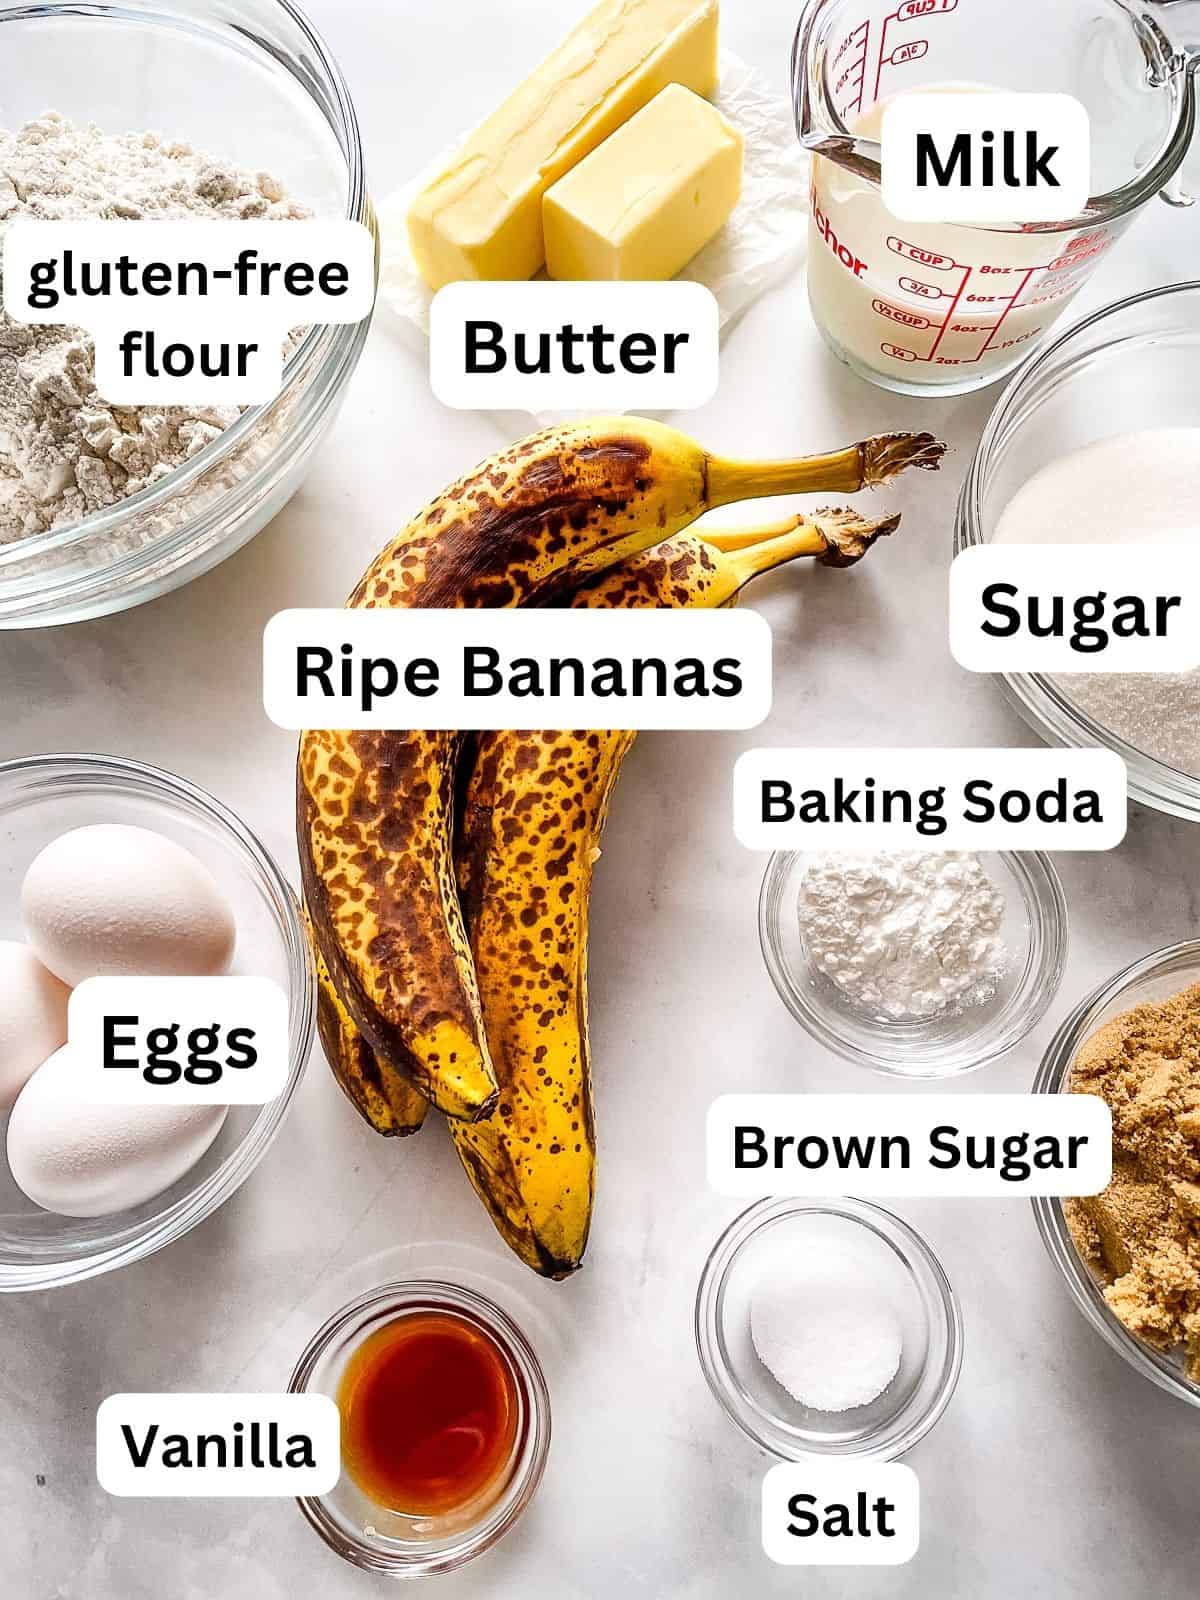
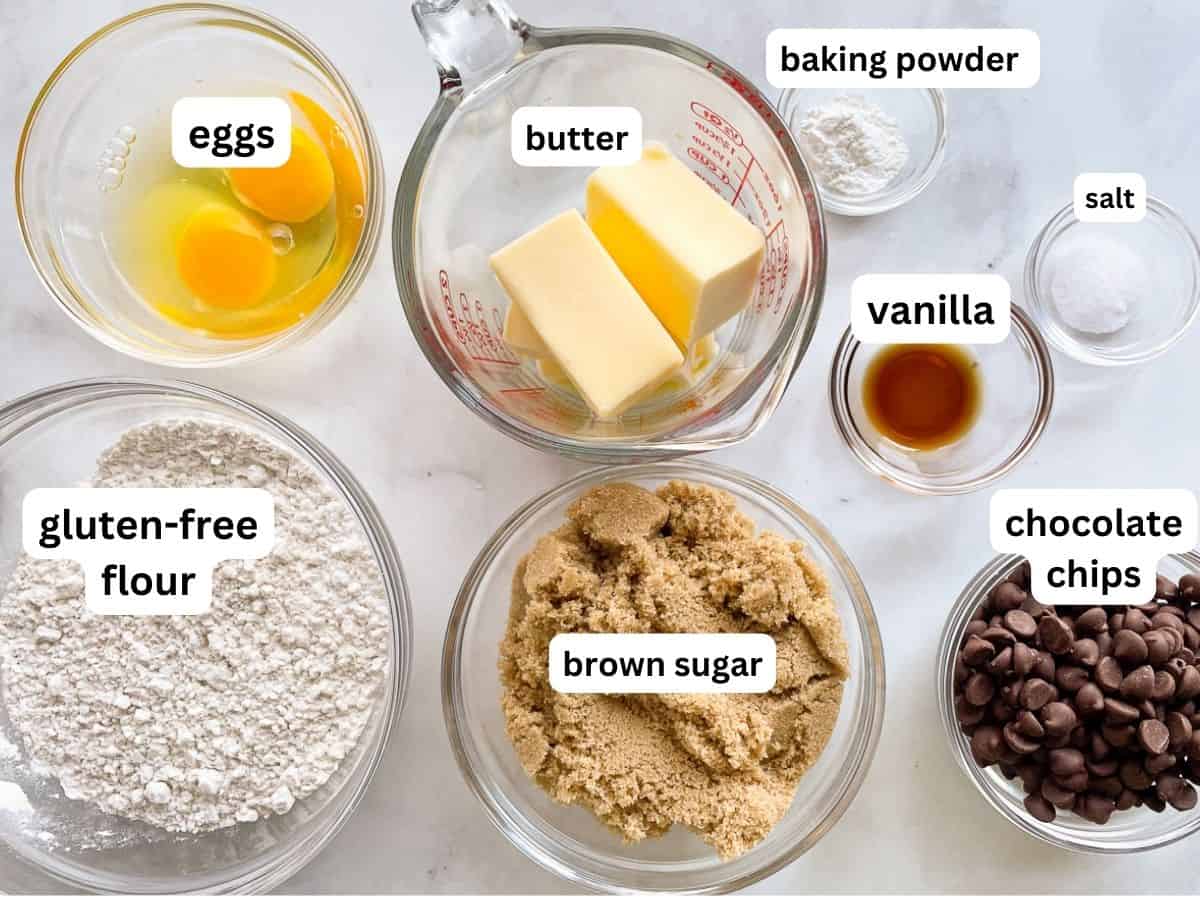
    Ingredients for gluten-free zucchini bread on a sheet pan.

    Ingredients

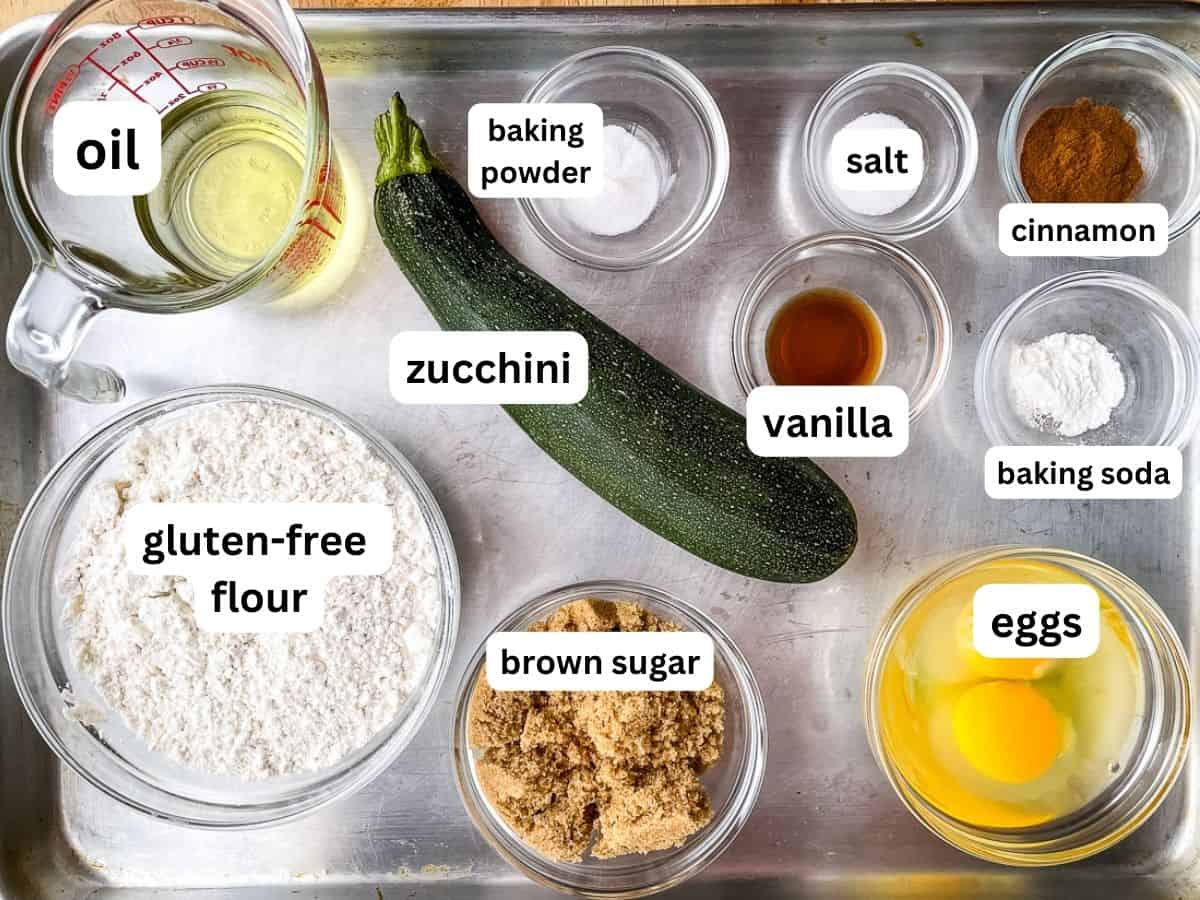
    Here’s what you need to make a loaf of this gluten-free zucchini bread. 

    • Zucchini. Two cups of shredded zucchini are the star of the show. Use zucchini that looks moist when you cut it, not dry. If you’re using overgrown zucchini from the garden, remove the seeds before grating.
    • Gluten-Free Flour. I tested this recipe with Bob’s Red Mill 1:1 gluten-free baking flour. It gives the bread a tender cake-like texture. 
    • Brown Sugar. Brown sugar, either light or dark, gives the bread a nice sweetness. If you don’t keep brown sugar in the house, replace it with an equal amount of granulated sugar. 
    • Cinnamon. Zucchini is rather bland. Adding cinnamon adds a lovely spice note. You can also use pie spice, pumpkin spice, or a blend of cinnamon, nutmeg, and clove. Use whatever baking spices you enjoy.
    • Eggs. Two large eggs provide structure and holds the batter together. 
    • Vegetable Oil or Melted Butter. Oil or butter brings richness to the loaf and makes it wonderfully tender. I don’t recommend coconut oil in this recipe. It makes the loaf unpleasantly heavy and slightly oily. 
    • Vanilla extract. A teaspoon of vanilla extract adds flavor.
    • Baking Soda and Baking Powder. Works with the eggs to help the loaf rise. 
    • Salt. Without salt, gluten-free zucchini bread tastes bland. Use table (fine) salt. It blends easily into the batter. 

    How to Make Gluten-Free Zucchini Bread

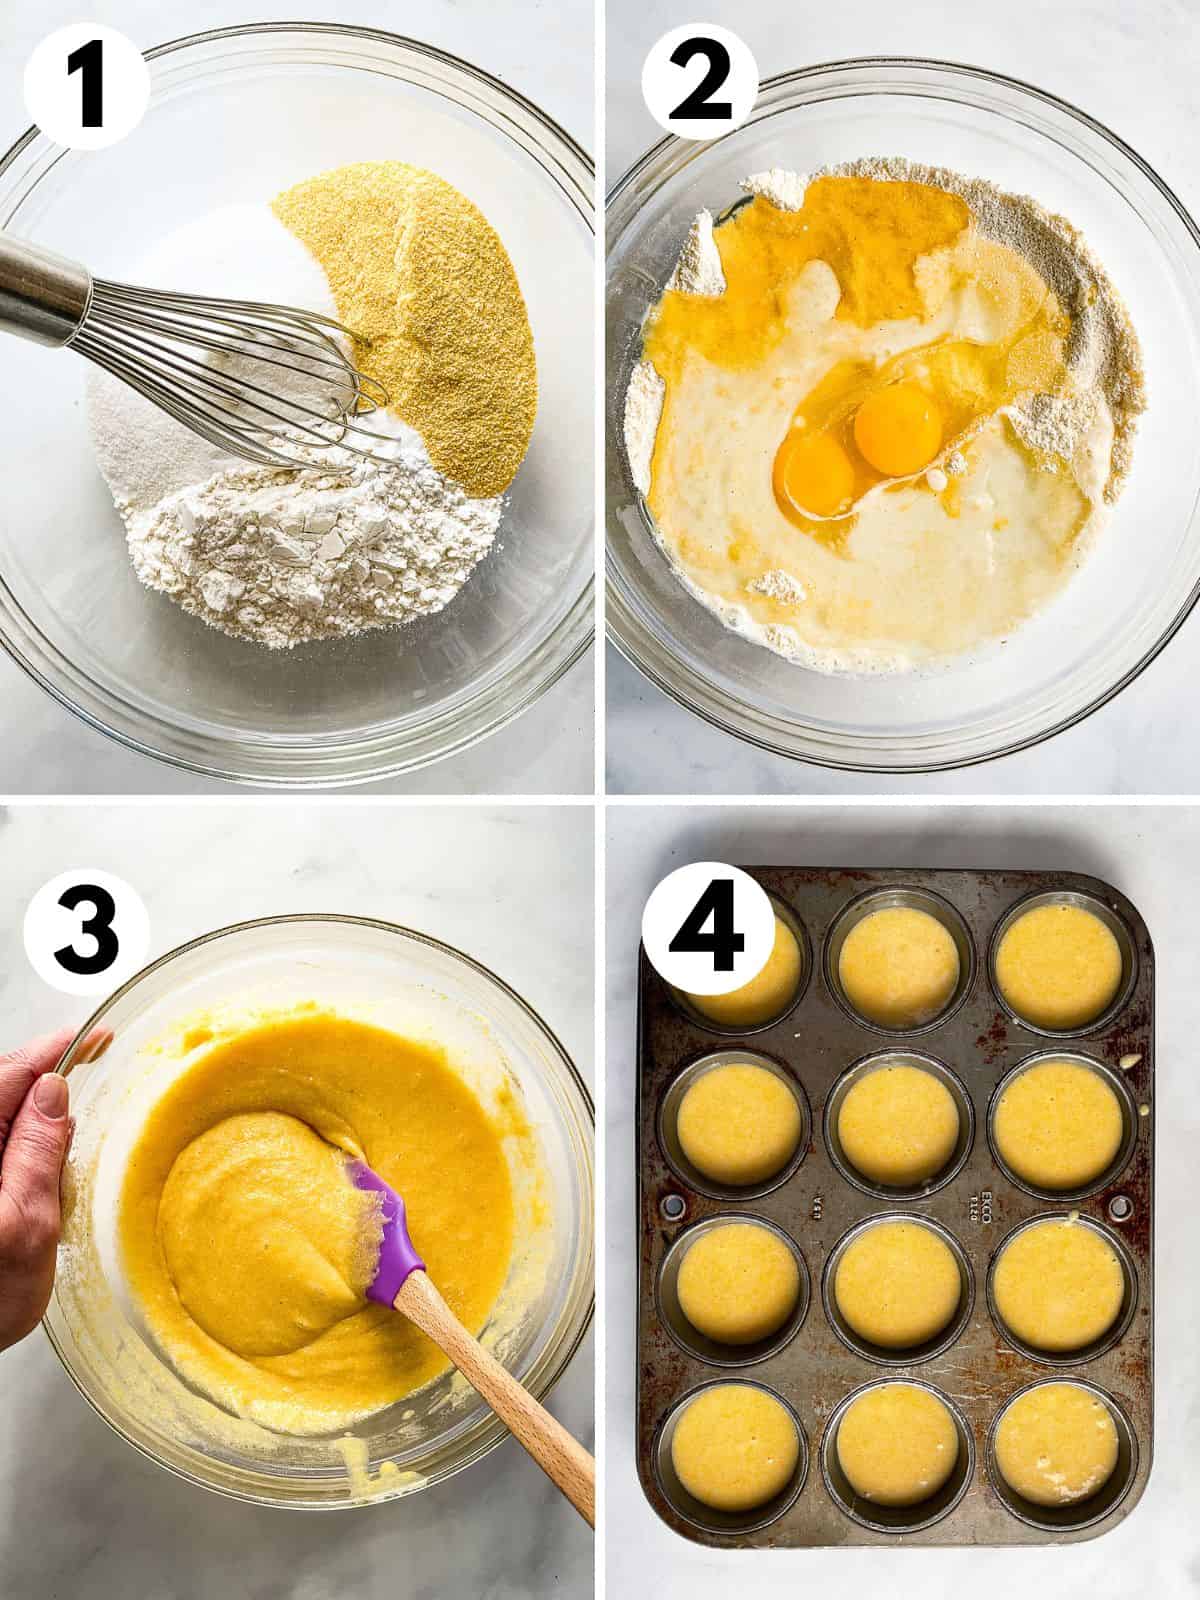
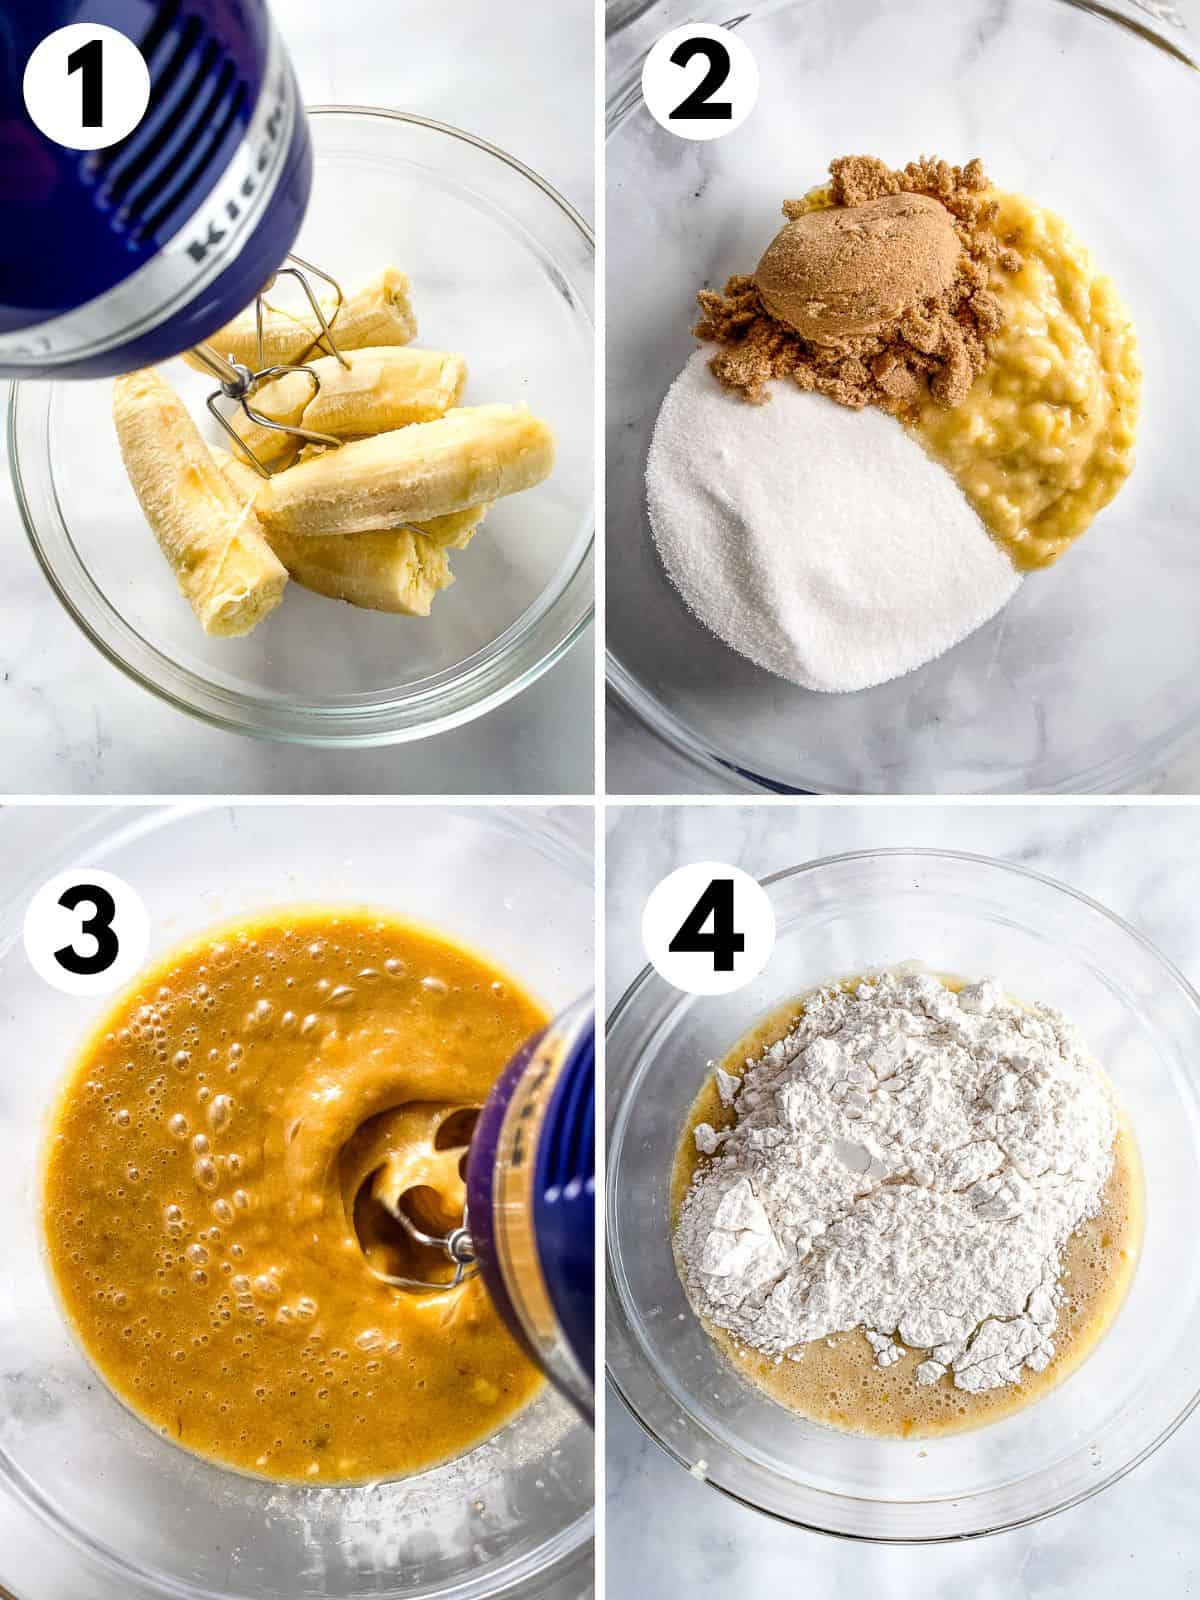
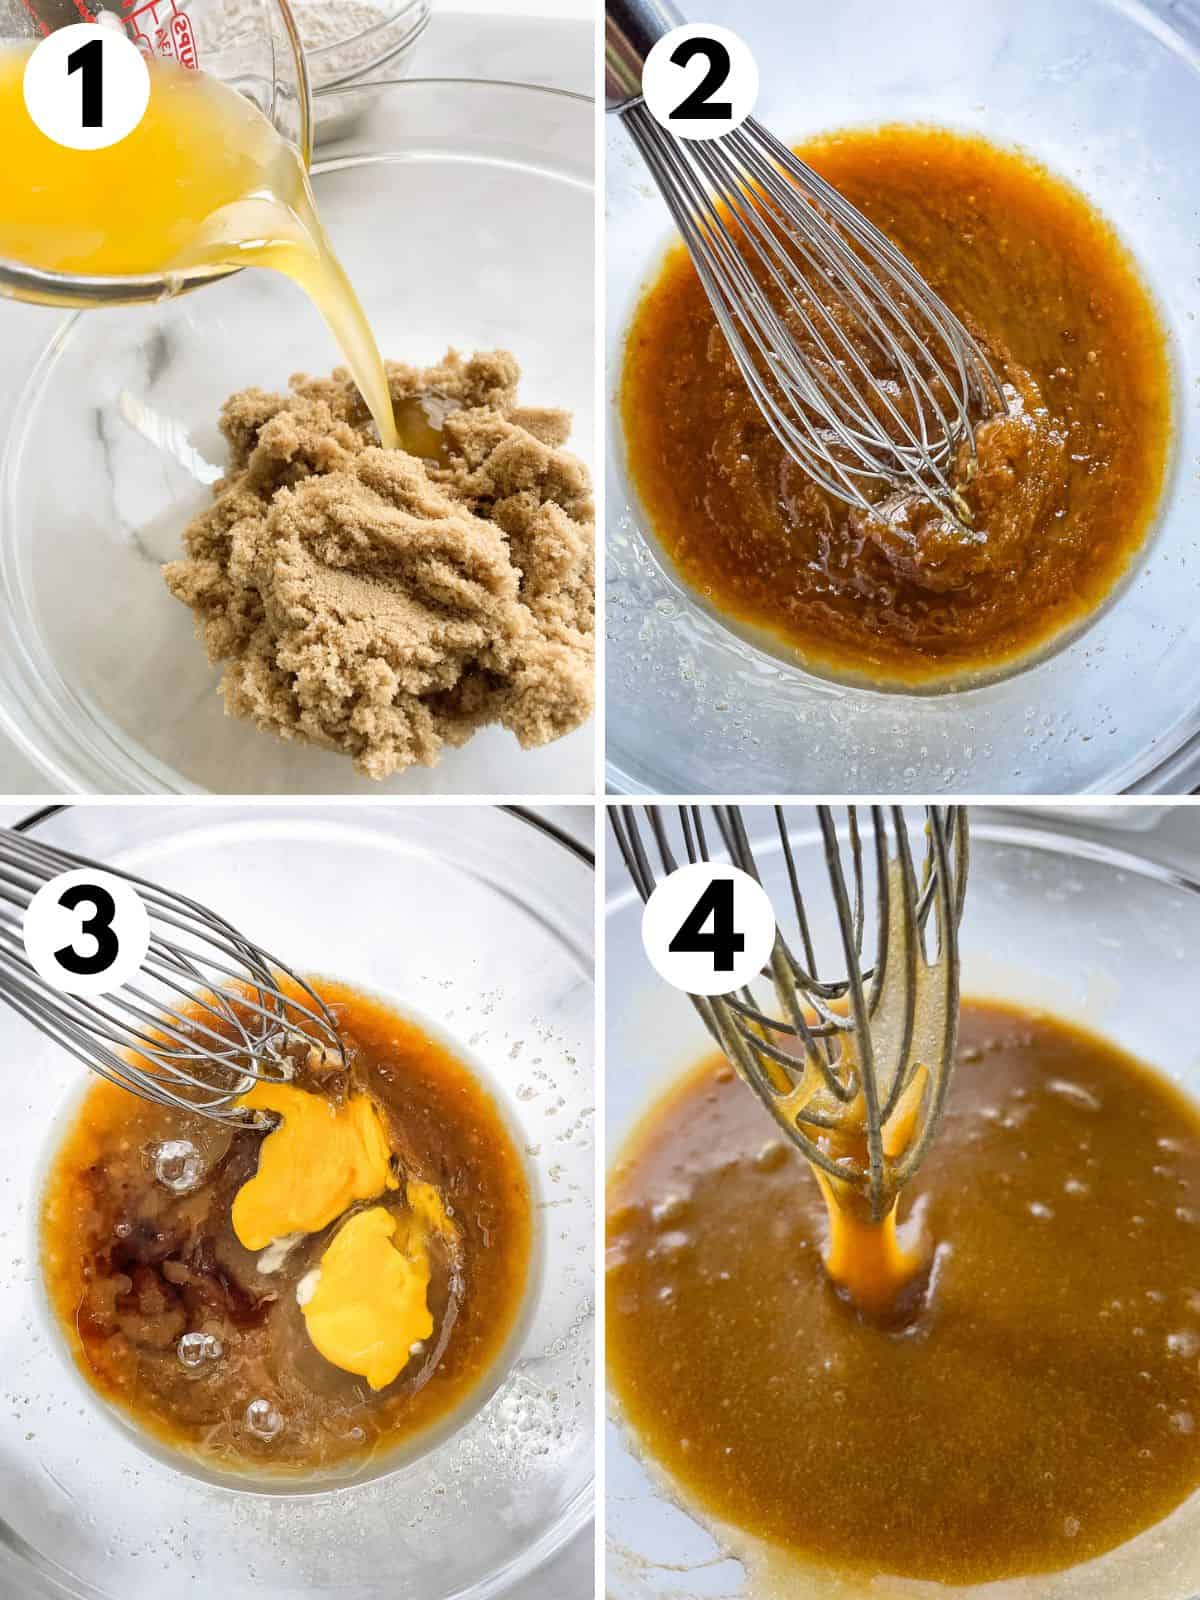
    This one-bowl bread is really easy to make. The most important step is letting the batter rest for five minutes. During this time, the gluten-free batter transforms from thick to silky smooth.

    Steps one through four of making gluten-free zucchini bread. 1. Shredding zucchini. 2. Wringing it dry in a towel over a bowl. 3. Dry ingredients in a bowl. 4. Whisking the dry ingredients together.
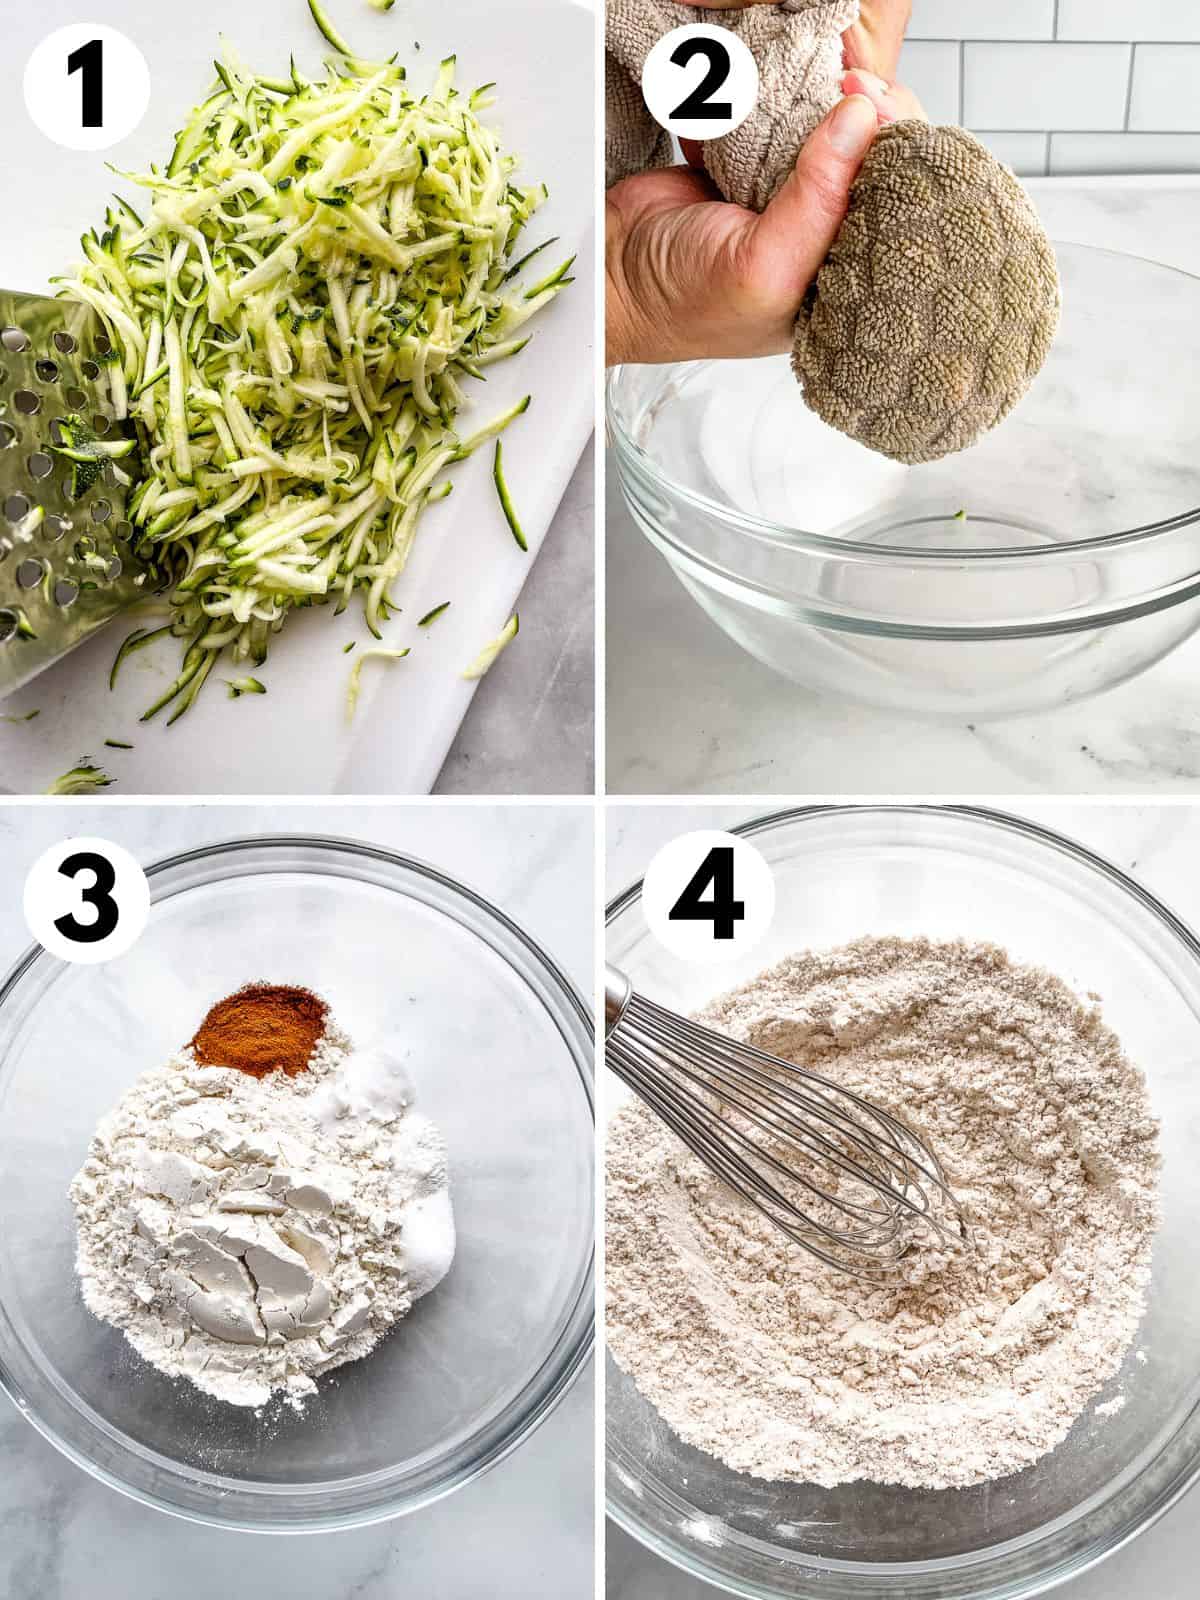
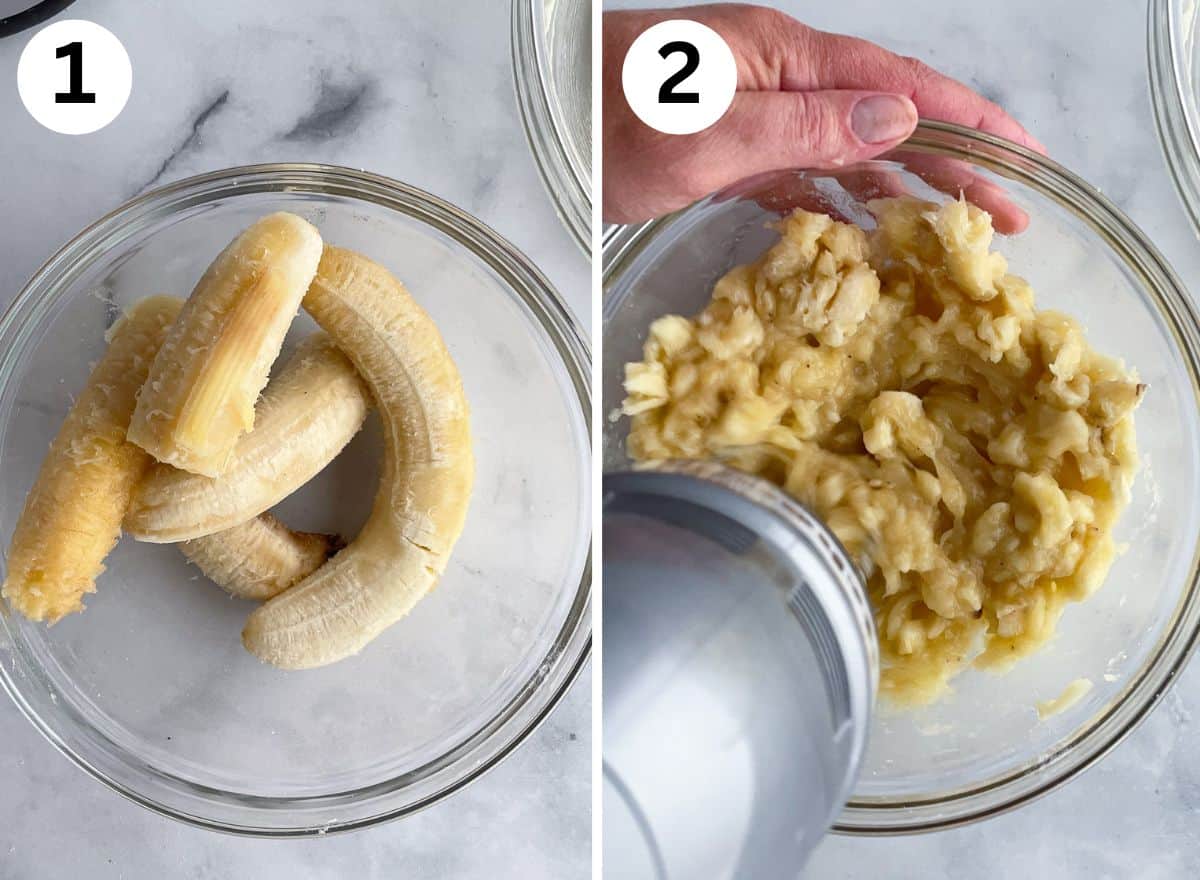
    1. Shred the zucchini. Trim the ends and then shred it. There’s no need to peel the zucchini. Note: If your zucchini is small, it’s ready to grate. If you’re using a large zucchini, cut it in half and use a spoon to remove the seeds before grating. 
    2. Drain the shredded zucchini. Place it into a clean kitchen towel. Wrap the towel into a bundle. Squeeze the towel firmly to remove the liquid. Or put the shredded zucchini into a colander and press it with the back of a wooden spoon to remove the liquid. Set the zucchini aside for now.
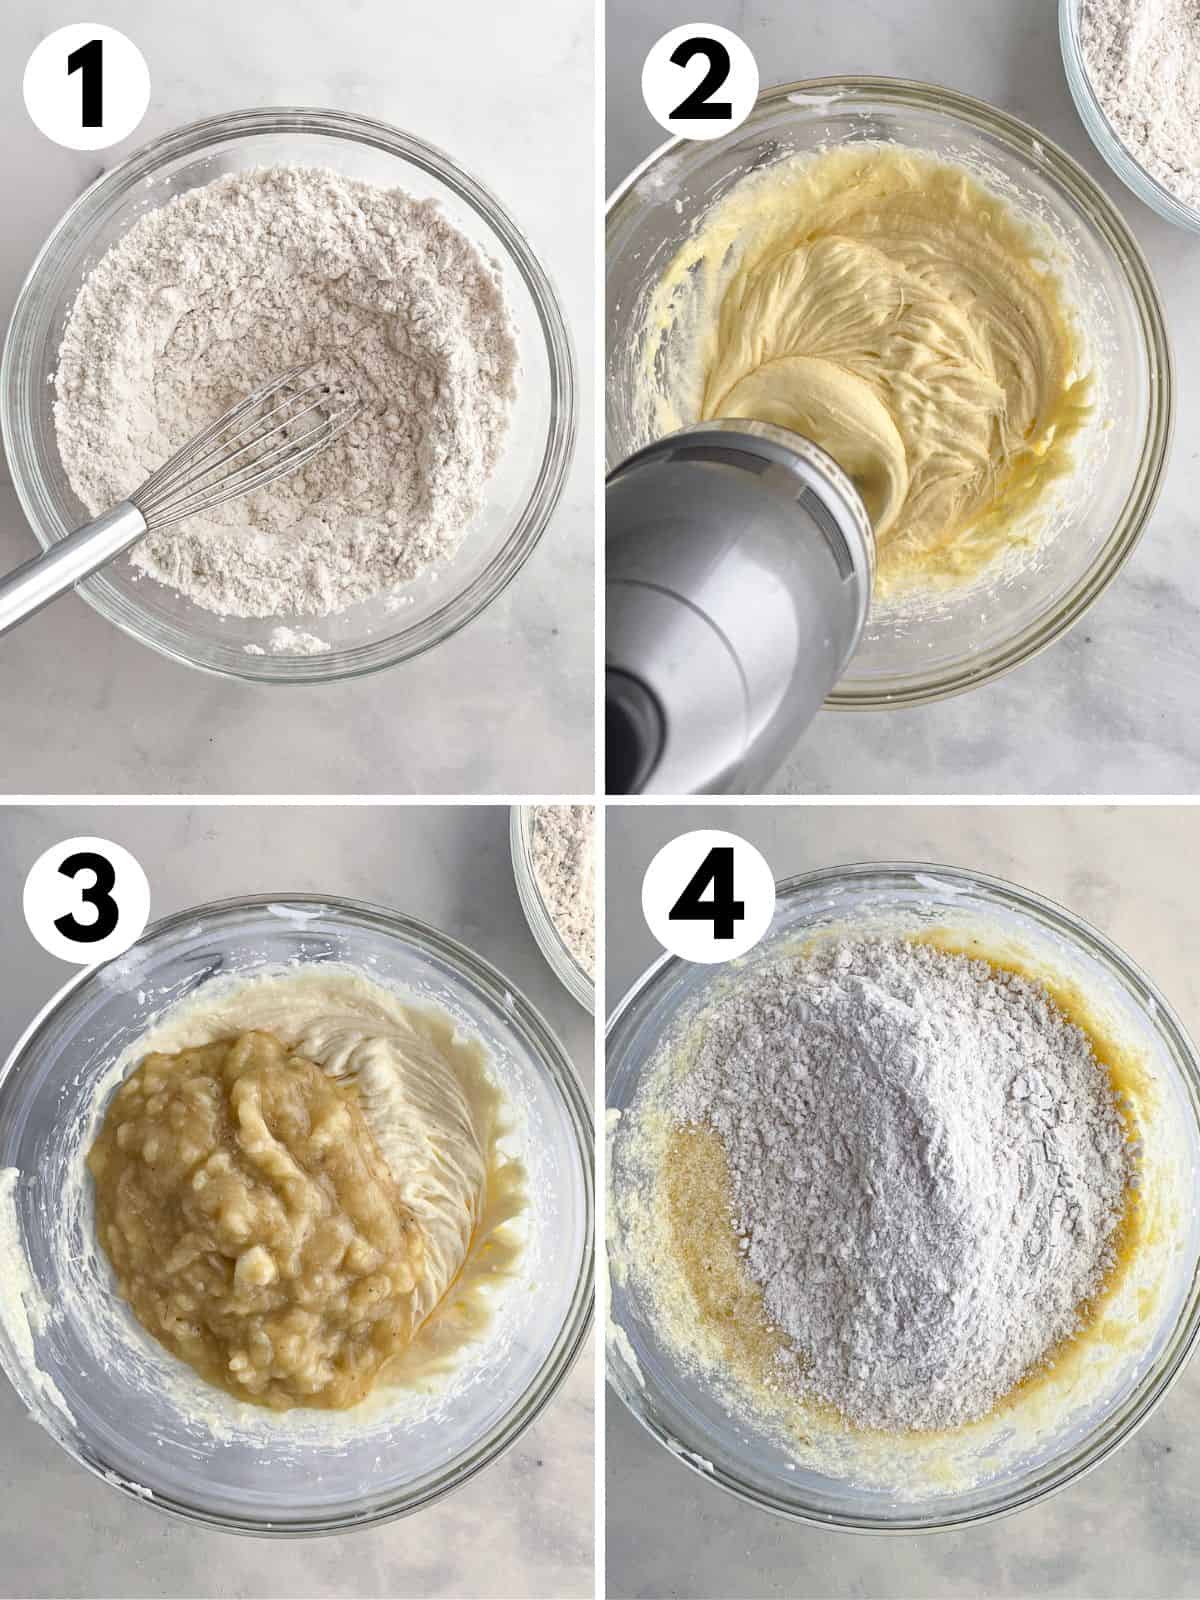
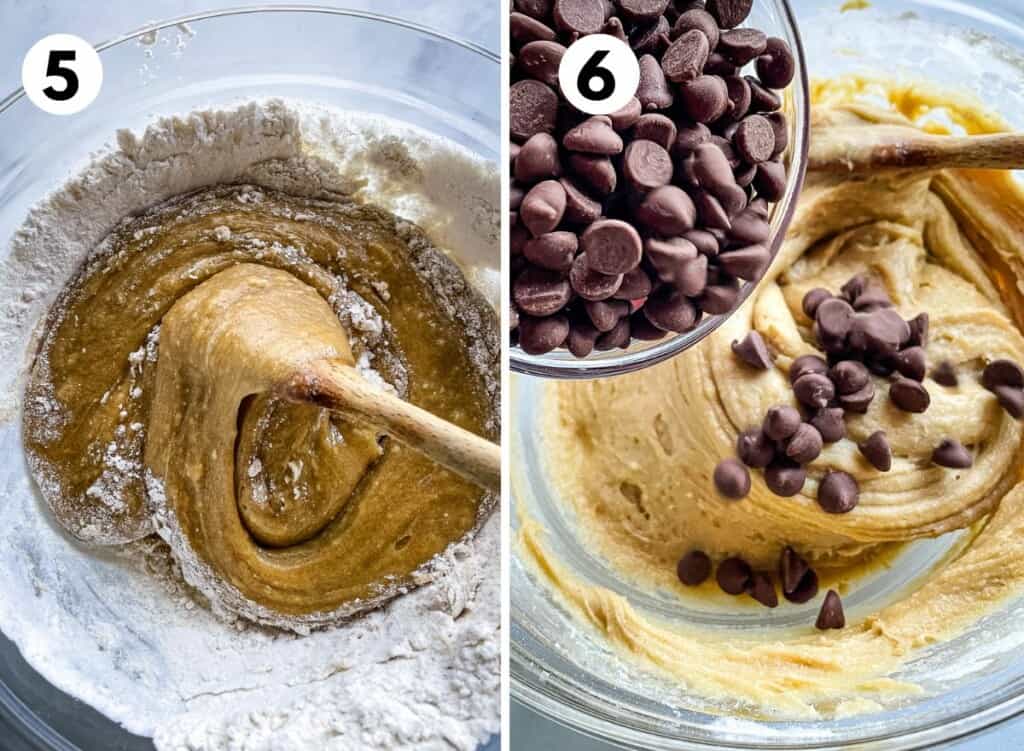
    3. Combine the dry ingredients. Place them into a large bowl. Don’t add the sugar yet.
    4. Whisk the ingredients together. This mixes the spices, baking soda, baking powder, and salt evenly throughout the gluten-free flour.
    Steps 5 through 8 of making gluten-free zucchini bread. 5. Adding wet ingredients. 6. Mixing together the thick batter. 7. Adding the shredded zucchini. 8. Letting the batter rest in the bowl.
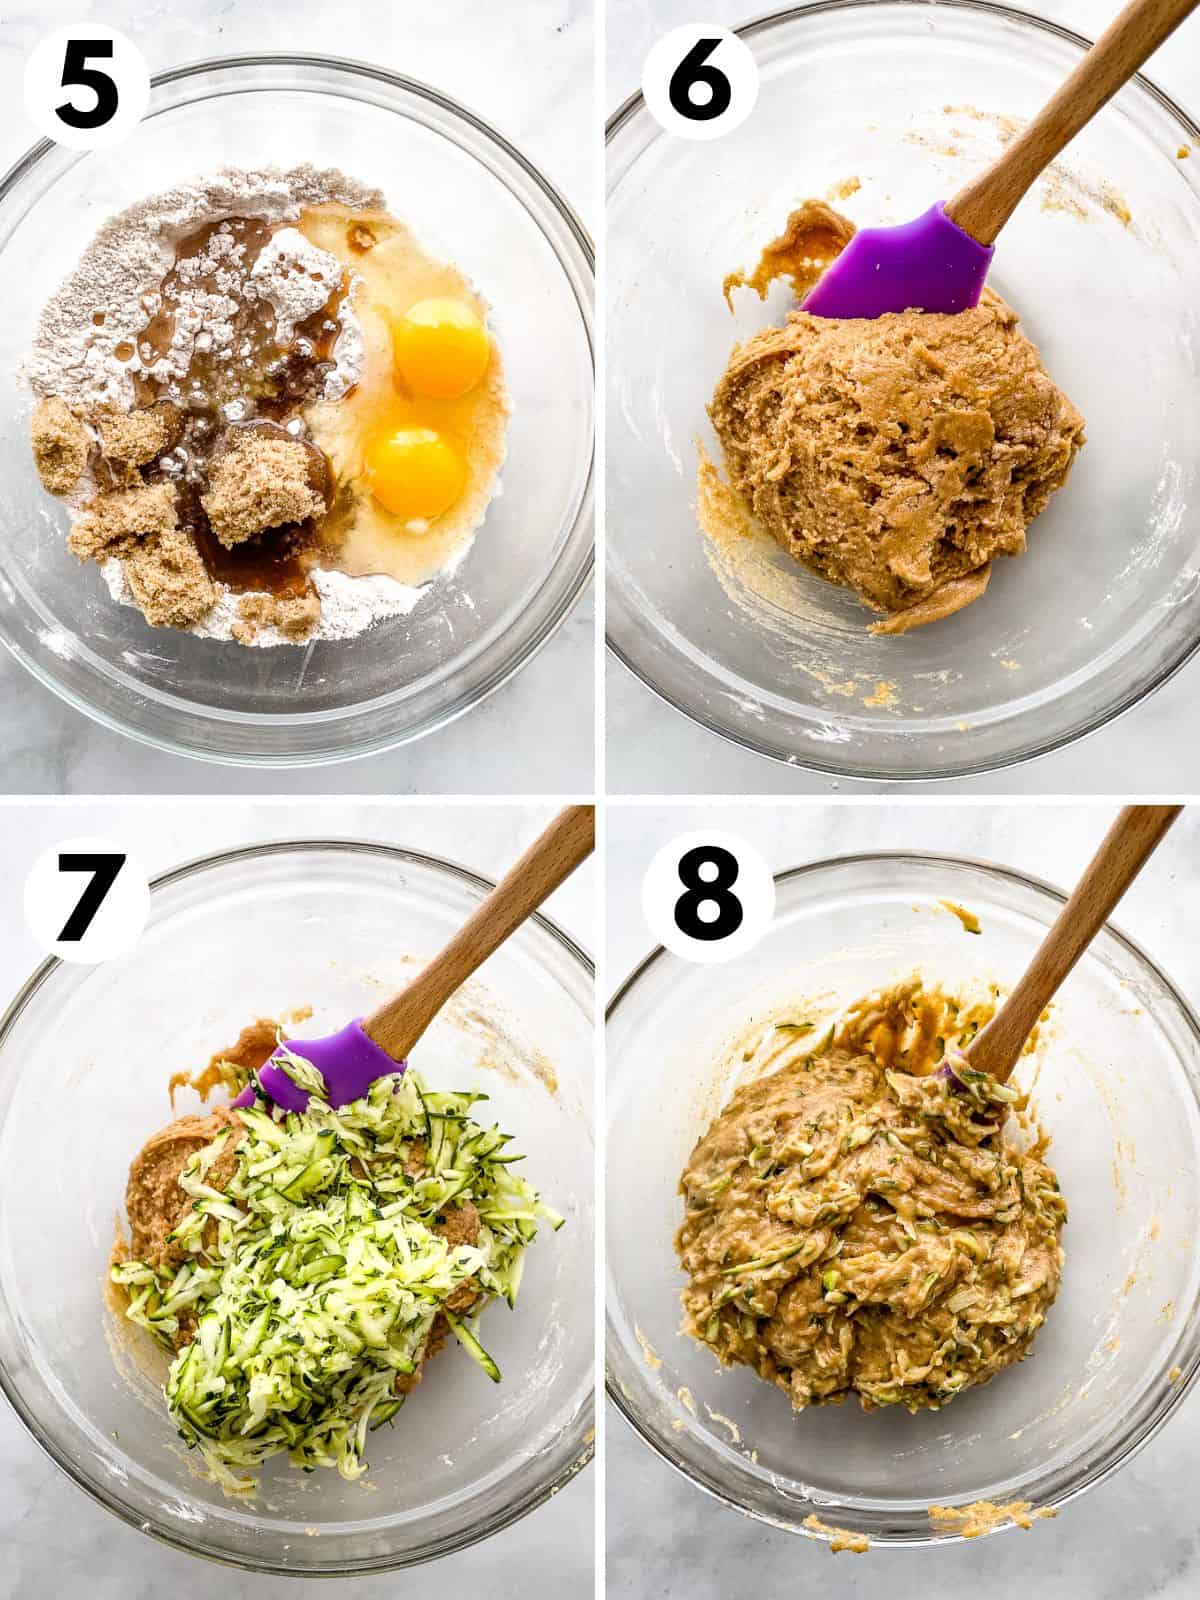
    1. Add the sugar, oil, eggs, and vanilla extract. 
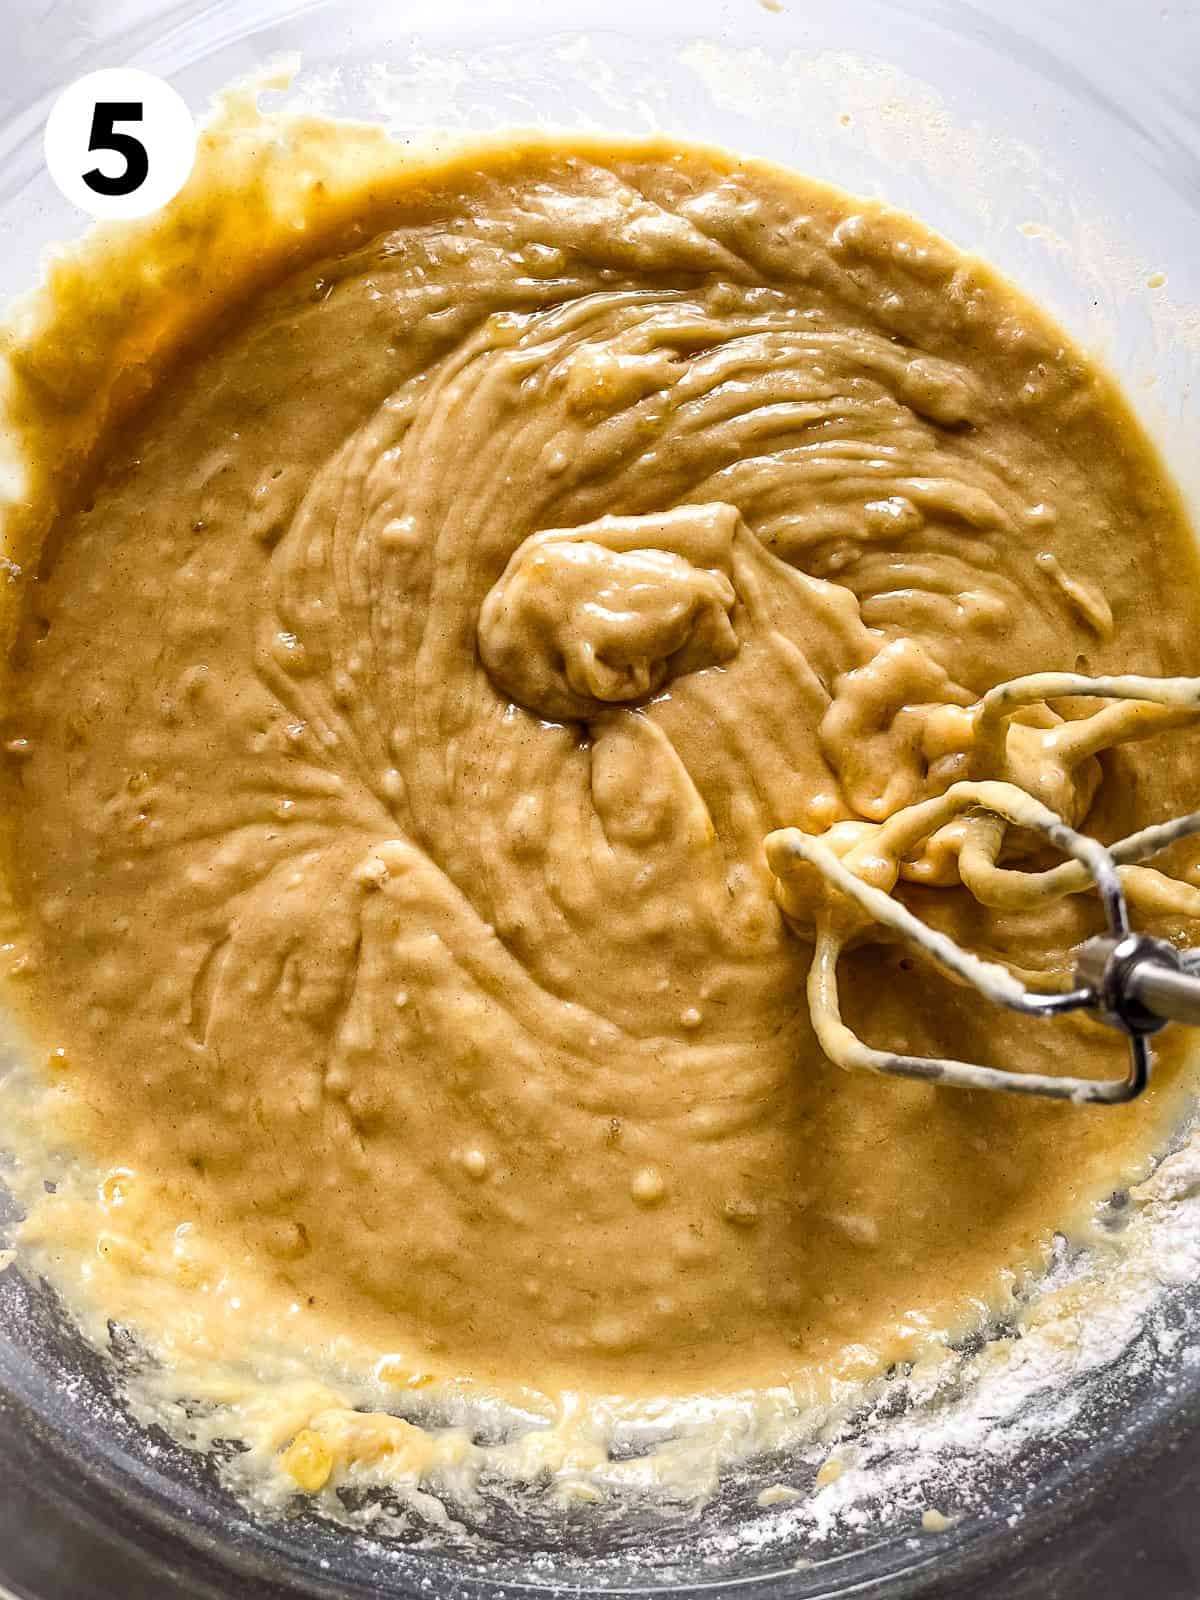
    2. Mix until a smooth batter forms. The batter looks very thick at this point. Almost like cookie dough. 
    3. Stir in the shredded zucchini.If you’re using mix-ins like chocolate chips or chopped nuts, add them now. 
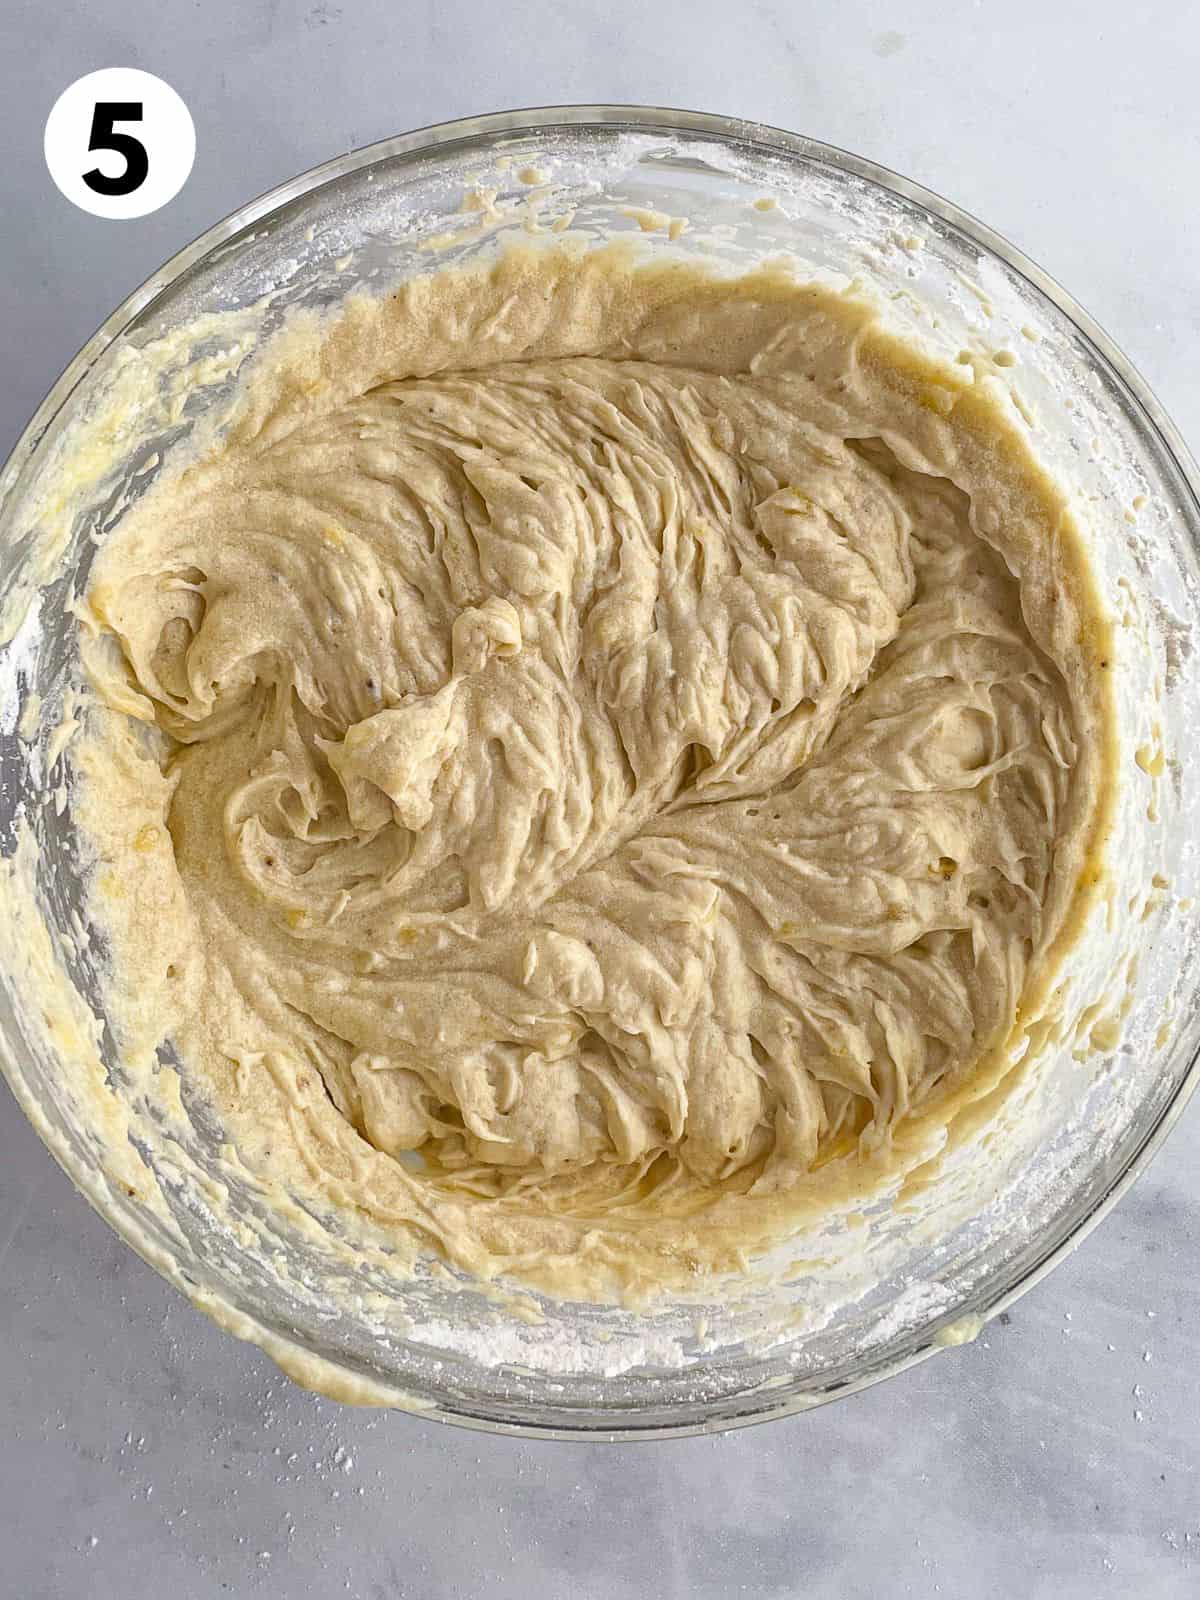
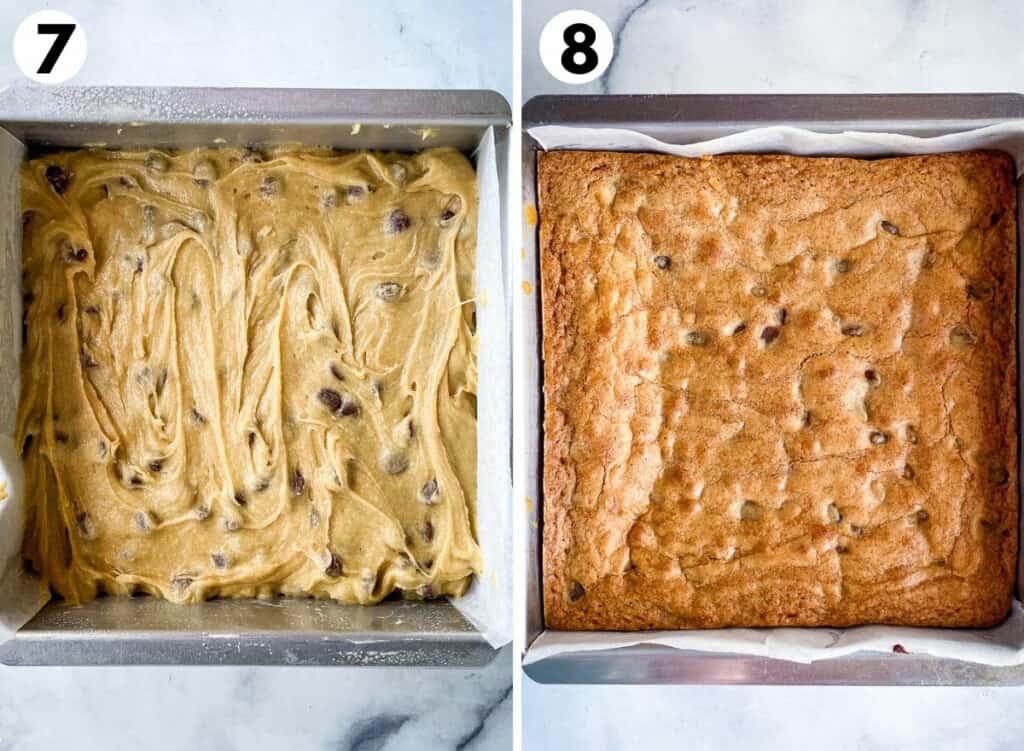
    4. Let the Batter Rest. Magic happens when this batter rests for about 5 minutes. The zucchini releases liquid, making the batter smooth. It goes from a thick batter to a cake batter-like consistency. 
    Gluten-free zucchini bread batter in a parchment-lined pan.
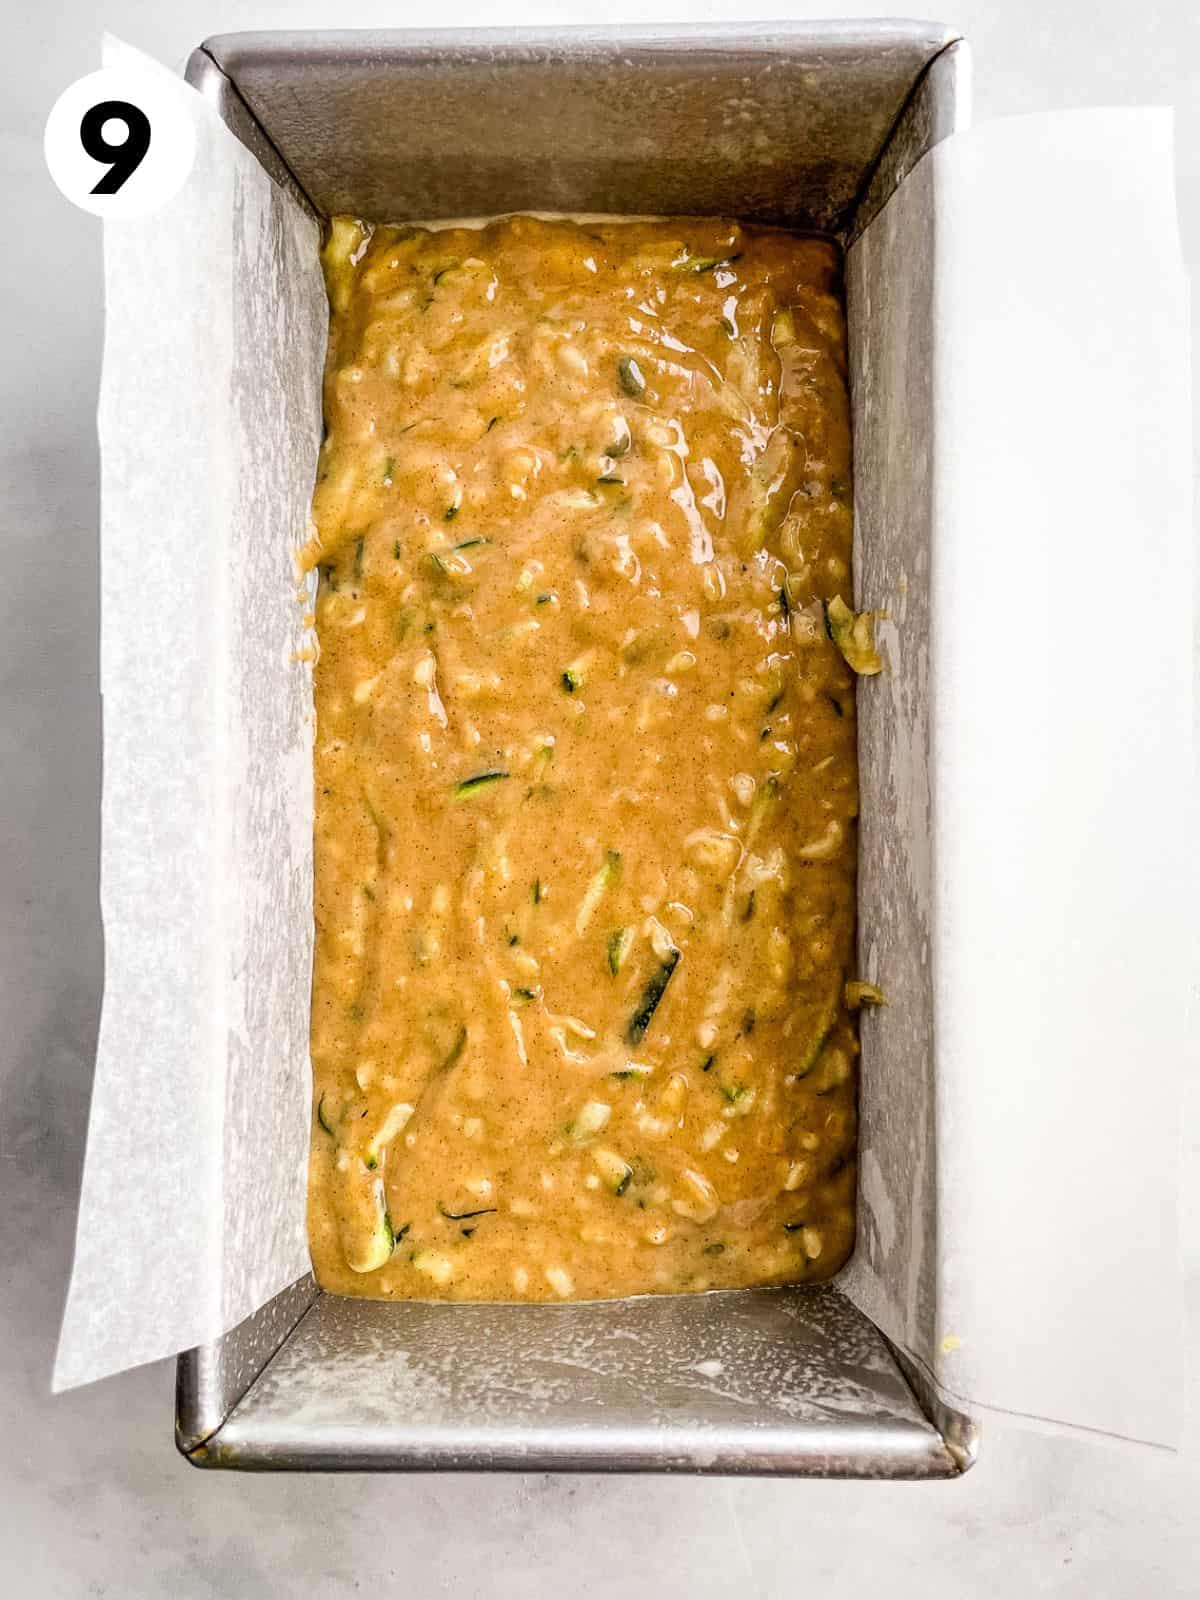
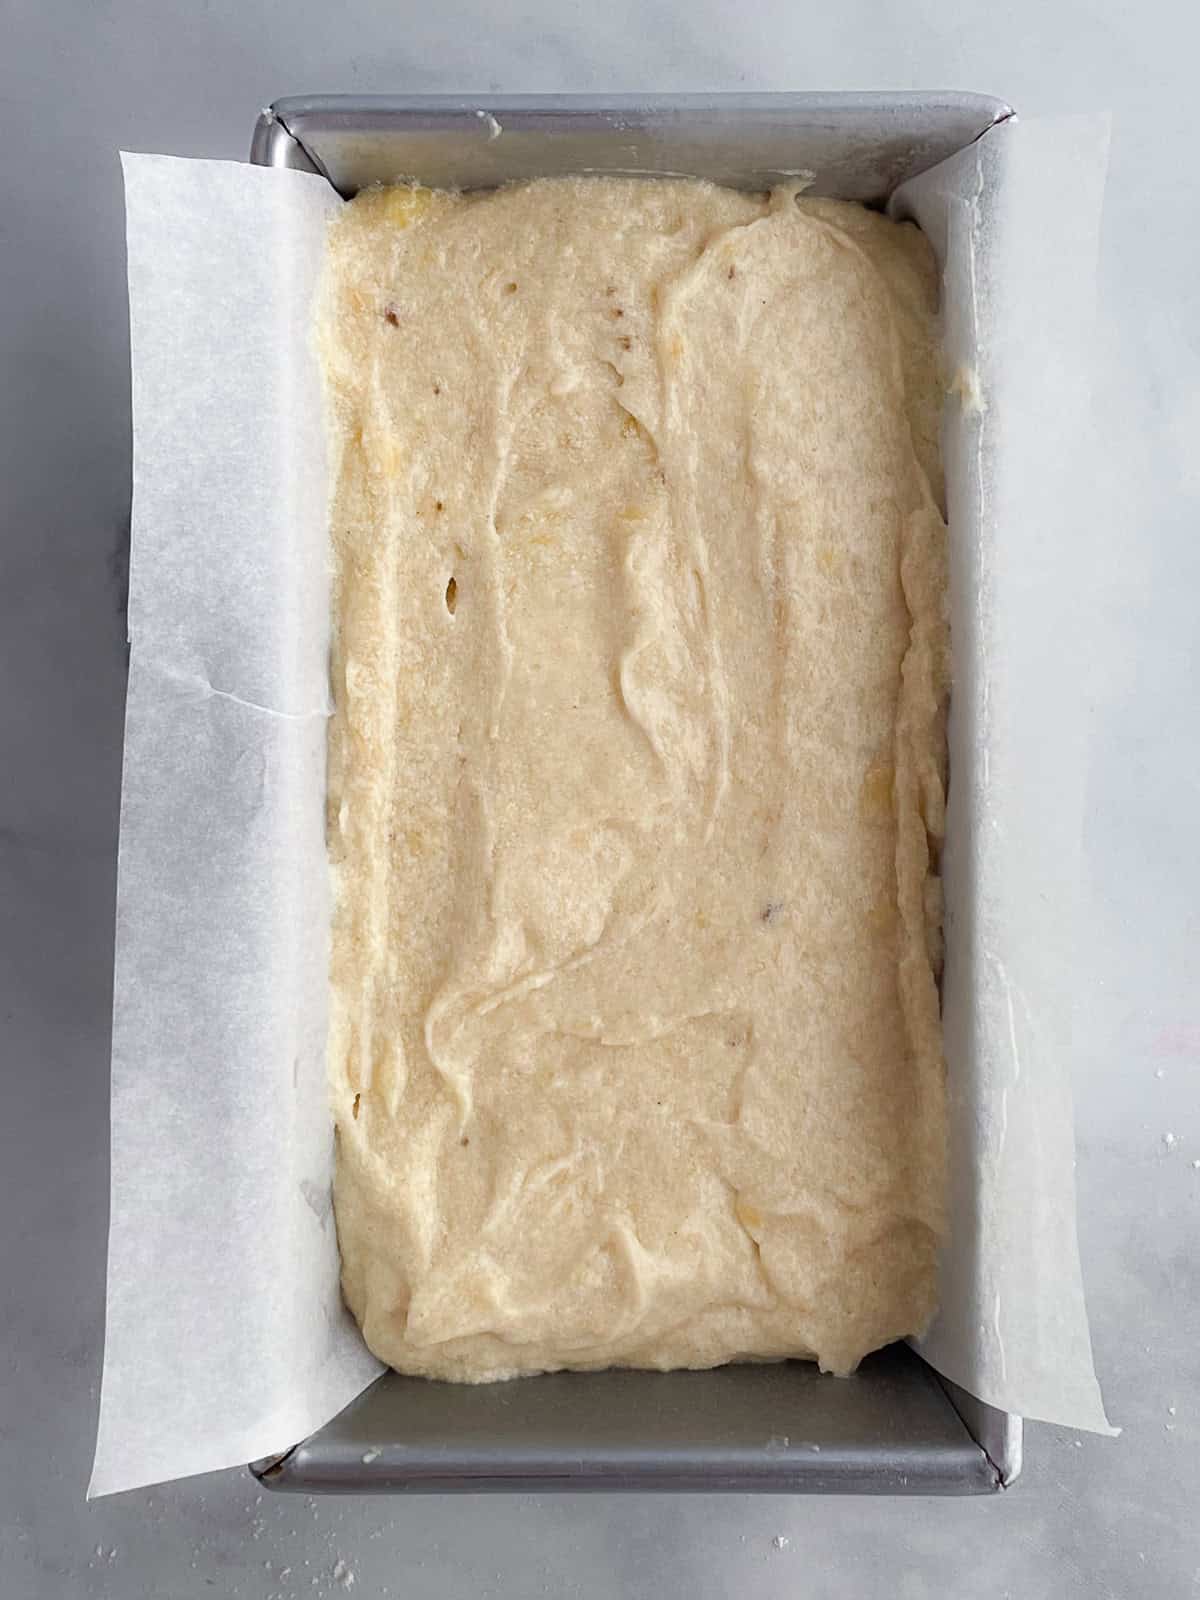
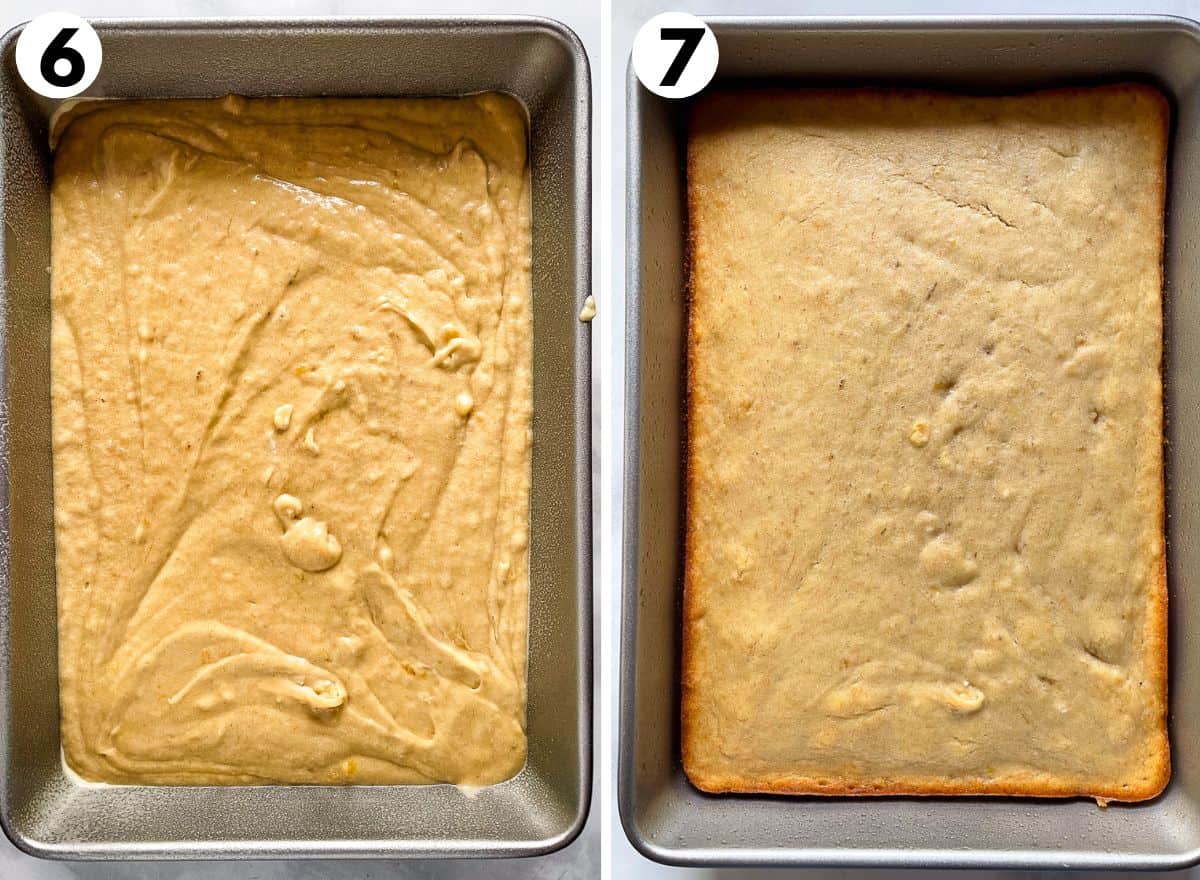
    1. Spread the batter into a greased 9×5-inch loaf pan.
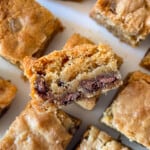
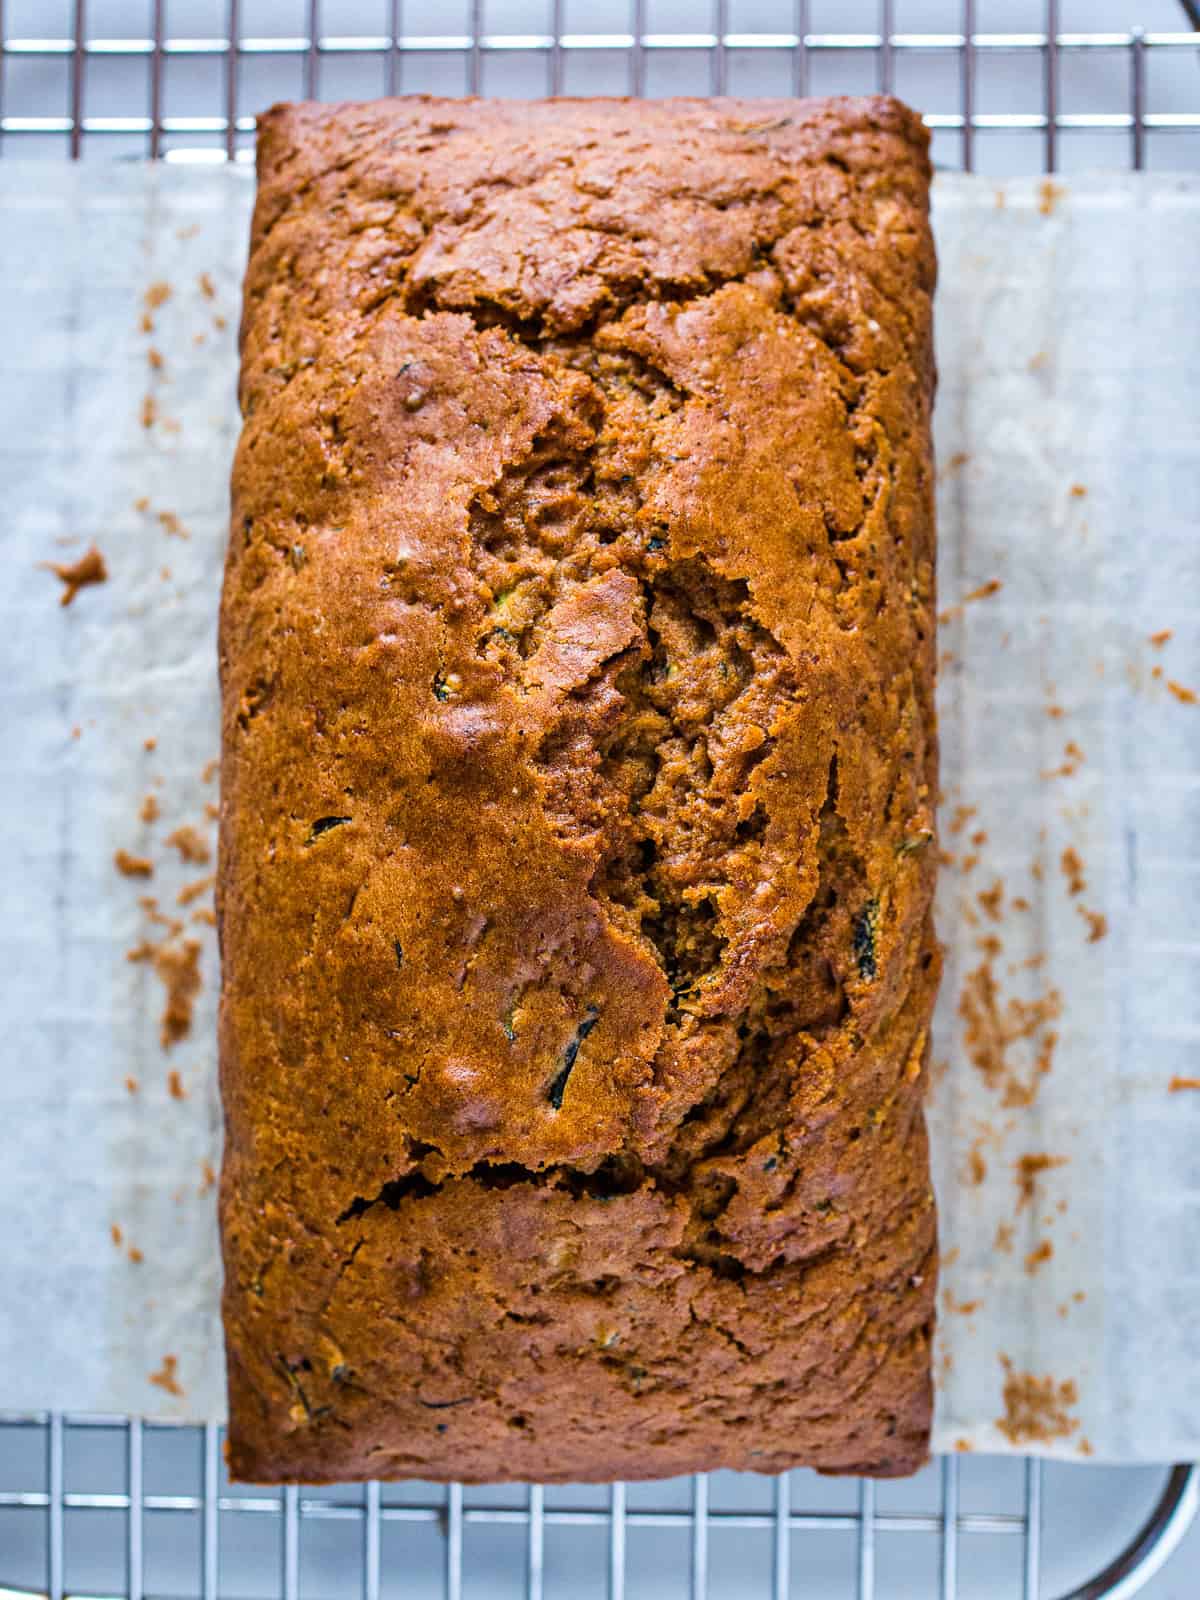
    2. Gluten-free zucchini bread takes about an hour to bake. Check the loaf for doneness by inserting a toothpick into the center of the bread. The toothpick should come out clean or with one or two crumbs attached. If the toothpick is coated in batter, keep baking.

    Adding Nuts, Chocolate Chips, or Dried Fruits.

    Add up to one cup of “add-ins”, like chocolate chips, chopped nuts, or dried fruit,  to this recipe. Stir them in along with the shredded zucchini.

    • Chocolate chips: milk, dark, or white. 
    • Chopped walnuts or pecans. 
    • Dried cranberries, raisins, golden raisins, or dried cranberries. 

    Storage and Freezing Tips

    Gluten-free zucchini bread cooling on a rack.

    This bread keeps for about four days after baking. Store it on the counter, wrapped in plastic, or in a storage bag or bread box

    Gluten-free zucchini bread freezes beautifully. You can either freeze the whole loaf or slice it and enjoy it one piece at a time. 

    1. Let the loaf cool completely. This is important. If you freeze a warm loaf of gluten-free zucchini bread, it can get soggy. 
    2. Slice it.(optional) Use a serrated knife and cut into slices. 
    3. Wrap well. Wrap the loaf in plastic wrap or place it into a freezer container. If you’re freezing slices, place a piece of parchment between each slice. 
    4. Freeze for up to six months. Baked zucchini bread can be frozen for up to 6 months. 
    5. Thaw and enjoy. Remove the loaf from the freezer and allow it to thaw at room temperature. Or remove one slice and thaw either on the counter or using a low defrost setting on a microwave.
    Slices of gluten-free zucchini bread on a cutting board.
    4.79 from 28 votes
    Print

    Easy Gluten-Free Zucchini Bread

    Easy gluten-free zucchini bread recipe. The bread is tender, moist, and loaded with zucchini. Add your favorite mix of chocolate chips, nuts, or dried fruit. The recipe makes one 9×5-inch loaf and doubles easily.

    Prep Time 15 minutes
    Cook Time 50 minutes
    Total Time 1 hour 5 minutes
    Servings 9 slices
    Calories 146 kcal

    Ingredients

    • 1 medium zucchini (about 8 ounces; 226 grams)
    • 1 ½ cups gluten-free flour, see note (7 ½ ounces; 212 grams)
    • 1 ½ teaspoons ground cinnamon
    • ½ teaspoon baking soda
    • ½ teaspoon baking powder
    • ½ teaspoon salt
    • 2 large eggs (about 4 ounces; 113 grams out of shell)
    • ½ cup light or dark brown sugar (4 ounces; 113 grams)
    • ½ cup vegetable oil, such as canola oil, or melted and cooled butter (2 ⅓ ounces; 65 grams)
    • 1 teaspoon vanilla extract

    Optional Mix-Ins. Use one cup total.

    • 1 cup chocolate chips (6 ounces; 170 grams)
    • 1 cup chopped nuts (4 ounces; 113 grams)
    • 1 cup dried fruit (4 ounces; 113 grams)

    Instructions

    1. Adjust oven rack to the middle position and preheat to 350°F.

      Grease a 9-by 5-inch loaf pan generously with nonstick cooking spray. Or grease with solid shortening and coat with gluten-free flour. Optional: after greasing, line the pan with a 7- by 13-inch sheet of parchment paper.

    2. Grate the zucchini using the large holes of a box grater. Drain the excess liquid by placing the shredded zucchini into a clean towel and squeezing. Or place the shredded zucchini into a coleander and press out the liquid using the back of a wooden spoon. Set aside.

    3. Whisk together the gluten-free flour, cinnamon, baking soda, baking powder, and salt in a large bowl.

    4. Add the brown sugar, eggs, vegetable oil, and vanilla extract. Mix until combined. Batter will look thick.

    5. Stir in the shredded zucchini. Allow the batter to rest for five minutes. It will loosen during this time. After five minutes, stir the batter and spread evenly into the prepared pan.

    6. Bake until golden brown, about 50 minutes. A cake tester inserted into the center of the loaf should come out clean or to an internal temperature of 205°F.

    7. Place the pan on a wire rack to cool. Once cool to the touch, turn out onto a wire rack to cool completely.
    8. Gluten-free zucchini bread keeps up to 3 days at room temperature. Wrap the bread tightly in plastic wrap or foil or place in a storage bag or bread box.

      To freeze; wrap the cooled bread tightly in plastic wrap and again in foil. Freeze up to six months. When ready to eat, remove from the freezer and allow to thaw at room temperature. To freeze slices, place a piece of parchment paper between each slice.

    Recipe Notes

    Gluten-free flour: use a gluten-free flour blend that contains xanthan gum or add a ½ teaspoon to your blend before using. To make your own blend: whisk together 1 cup white rice flour, ¼ cup sweet rice flour, ¼ cup cornstarch and a ½ teaspoon xanthan gum. 

    Brown Sugar: substitute with granulated sugar. Coconut sugar may be used. Gluten-free zucchini bread made with coconut sugar has a slightly drier texture.

    Mix ins: Use one cup total. For example, you could use one cup of chocolate chips OR ½ cup chocolate chips and ½ cup chopped nuts. 

    The Best Gluten-Free Confetti Cake Recipe

    Gluten-free confetti cake on a cake plate.

    Gluten-Free Confetti Cake Recipe makes a perfect birthday cake. The delicate yellow cake only requires one bowl to make. Then you stir in your favorite gluten-free sprinkles. It’s perfect for beginner bakers. Frost the cake with gluten-free vanilla buttercream frosting-and more sprinkles, of course!

    Gluten-free confetti cake on a cake plate.

    It’s no surprise that I love a confetti cake. I mean, it has sprinkles. And I LOVE sprinkles. Honestly, if you don’t love sprinkles, we can’t be friends. (Kidding. Mostly.)

    The recipe is quick to put together. It makes a perfect two-layer cake —which makes it great for birthday parties or other celebrations. Just be sure to have lots of gluten-free sprinkles on hand.

    Is Confetti Cake the same as Funfetti Cake?

    If you aren’t familiar with Funfetti®, I’m about to make your day! Funfetti® is white cake with sprinkles. Lots of sprinkles. Pillsbury is the creator of the Funfetti® phenomenon. They introduced it in 1989. And the rest, as they say, is history.

    Funfetti® is their brand name for a confetti cake. A confetti cake is the homemade version.

    What’s the Best Gluten-Free Flour to Use for Confetti Cake?

    For this recipe, use a gluten-free flour blend that contains xanthan gum. Without it, the cake turns out flat and dense.

    I tested the recipe with Bob’s Red Mill 1:1 Gluten-Free Baking Flour. If your flour blend doesn’t contain xanthan gum, add 1 teaspoon to the recipe.

    What Flavor is Confetti Cake?

    There’s a lot of debate around this. I believe that the unique flavor comes from a combination of clear vanilla extract and a dash of almond extract.

    It’s funny that I call for clear vanilla extract. If you’re familiar with vanilla, you know that clear vanilla is artificial vanilla. And that’s the point.

    Boxed Funfetti® cake mix, the type you probably grew up eating, includes artificial vanilla. If that’s the flavor you crave, grab a bottle. It makes a difference! I’d use clear vanilla extract in my frosting too, for the full effect.

    As for the almond extract, it adds an almost maraschino cherry flavor. (If you’re just realizing that maraschino cherries taste like almonds, raise your hand.) The almond extract isn’t required. Feel free to skip it if you don’t want to buy a bottle. 

    (left) adding sprinkles to gluten-free cake batter. (right) two cake pans filled with gluten-free confetti cake batter.

    How to Make Gluten-Free Confetti Cake

    1. Prepare the Batter. This is an easy one-bowl recipe. Whisk together the dry ingredients, add the eggs, oil, and flavors. Stir. Done!
    2. Add the sprinkles. Be sure to use gluten-free sprinkles.
    3. Pour batter into greased cake pans.
    4. Bake until golden brown. A cake tester inserted in the center should come out clean.
    5. Cool the cake. It’s important to wait for the cake to cool. This is key. If you frost a warm cake, the frosting melts and drips down the cake. Remember: wait for the cake to cool.
    6. Frost. Use your favorite gluten-free frosting.
    Sprinkles in a jar.

    Are Sprinkles Gluten-Free?

    It depends. Most sprinkles (also called Jimmies) are gluten-free. However, always read labels.

    What Kind of Sprinkles Should I Use for Confetti Cake?

    Good question! There’s lots of sprinkles on the market. For funfetti cake, I use “sprinkles”, they are also labeled jimmies. Don’t confuse these with nonpareils. “Sprinkles” are long and soft. Nonpareils are tiny, hard sugar balls. In batter, nonpareils tend to melt and bleed color, while sprinkles don’t–giving you nice bursts of color throughout the finished cake.

    Slice of gluten-free confetti cake on a plate.

    What Frosting Should I Use?

    Classic vanilla buttercream frosting is traditional. But chocolate and cream cheese also make nice frostings for confetti cake.

    Gluten-free confetti cake on a cake plate.
    4.82 from 33 votes
    Print

    Gluten-Free Confetti Cake

    Easy gluten-free confetti cake. Loaded with sprinkles, this tender cake makes a fun birthday cake®-no mix needed!

    Prep Time 15 minutes
    Cook Time 30 minutes
    Total Time 45 minutes
    Servings 12 slices

    Ingredients

    Gluten-Free Funfetti Cake

    • 2 ½ cups gluten-free all-purpose flour (see note) (11 ½ ounces; 326 grams)
    • 1 ½ cups granulated sugar (10 ½ ounces; 298 grams
    • 3 ½ teaspoons baking powder
    • 1 teaspoon salt
    • 1 ¼ cups milk, traditional or dairy-free
    • ⅔ cup vegetable oil (4 ¾ ounces; 134 grams)
    • 4 large eggs (about 8 ounces; 226 grams)
    • 2 teaspoons vanilla extract pure vanilla or clear (imitation)
    • ½ teaspoon almond extract, optional
    • ⅓ cup gluten-free sprinkles, plus additional for topping cake

    Gluten-Free Vanilla Buttercream

    • 1 cup butter, softened (8 ounces; 226 grams)
    • 4 cups powdered sugar, sifted (16 ounces; 454 grams)
    • 4 tablespoons milk, more as needed (2 ounces; 56 grams)
    • 2 teaspoons clear vanilla extract
    • ¼ teaspoon almond extract, optional

    Instructions

    1. Preheat oven to 350℉. Grease two 8-inch round cake pans with nonstick cooking spray.

    2. Whisk together gluten-free flour, sugar, baking powder, and salt. Add milk, oil, eggs, and extracts. Whisk until a smooth batter forms. Add ⅓ cup sprinkles. Stir to combine.

    3. Divide batter evenly between the two prepared pans.
    4. Bake until cake is golden brown and a cake tester inserted into the center of the cake comes out clean, about 30 minutes.
    5. Remove cakes from the oven and place on a wire rack to cool for five minutes. Then turn cakes onto the wire rack to cool completely.
    6. Once cool, frost with vanilla buttercream (recipe below) and sprinkle additional sprinkles onto cake.

    Gluten-Free Vanilla Buttercream

    1. Cream butter until smooth in a medium mixing bowl. Add powdered sugar, milk, vanilla, and almond extract. Mix, on low speed, until smooth. If buttercream seems thick, add a teaspoon or so additional milk. Use as directed. 

    Recipe Notes

    Gluten-Free Flour 

    Use a gluten-free flour blend that includes xanthan gum. Bob’s Red Mill 1:1 Gluten-Free Baking Flour recommended. If your blend doesn’t include xanthan gum, add 1 teaspoon along with the flour. Whisk together.  

    How to Make Gluten-Free Graham Crackers

    A s'more on the counter made with two gluten-free graham crackers.

    Gluten-free graham crackers are fun to make at home. You only need a few ingredients and about an hour to make this recipe. The result is graham crackers that are crunchy, not too sweet, and perfect for whenever you’re craving a graham.

    A s'more on the counter made with two gluten-free graham crackers.

    I haven’t found a store-bought gluten-free graham cracker that I love. The ones I’ve tried have been either too thick and dense or too rich and crumbly. I need my graham crackers light and crunchy–and not too sweet. So I make them myself!

    This recipe hits all those notes. The graham crackers, which are sweetened with honey and brown sugar, taste great enjoyed as a snack or used for s’mores. You can also grind them into crumbs to use for a pie or cheesecake crust.

    Ingredients

    Gluten-free graham cracker ingredients on the counter.
    • Gluten-Free Flour. Use your favorite gluten-free flour blend to make these crackers.  Unlike many gluten-free recipes, this one doesn’t require xanthan or guar gum. If your blend contains xanthan gum, you might need to use a splash of additional liquid to help the dough come together.
    • Dark Brown Sugar. The sweetness of these graham crackers comes from a combination of dark brown sugar and honey. Since dark brown sugar contains more molasses than light brown sugar, it adds a nice color and flavor to the crackers. 
    • Honey. Three tablespoons of honey give the graham crackers a nice sweetness and flavor without making the dough too soft. 
    • Butter. Cold butter is an important ingredient in this recipe. It releases steam as it bakes. This steam leaves behind tiny pockets of space, giving the crackers a nice cracker-like texture. Dairy-free butter works great in this recipe.
    • Baking Powder. Makes the dough rise and gives it a nice texture. 
    • Salt. Enhances the flavors. Use table “fine” salt.

    How to Make Gluten-Free Graham Crackers. Step-by-Step.

    The recipe requires a bit of special care. Here are the important steps you need to know to make a perfect batch of graham cracker.

    Make the Dough.

    (left) cutting butter into gluten-free flour mixture. (right) gluten-free graham cracker dough.

    The cracker-like texture of a graham cracker comes from both the baking powder and the way the cold butter is cut into the dough. If you’ve ever made a gluten-free pie crust or gluten-free biscuits, you’ll recognize the method.

    I think a food processor is the best tool for this recipe. It cuts the butter into the dough quickly. This keeps the butter cold and makes the crackers crisp and flaky.

    If you don’t have a food processor, I included options on how to make the dough by hand below. 

    1. Mix together the gluten-free flour, brown sugar, baking powder, and salt.
    2. Cut in the cold butter until it’s in little pieces all throughout the dough. 
    3. Pour in 5 tablespoons of milk and all the honey. Mix until a dough forms. If the dough looks dry, add the remaining milk.

    If you don’t have a food processor, here are a few ways to work the butter into the flour mixture.

    • a pastry cutter. Roll the cutter into the flour mixture and cubed butter.
    • two butter knives. Use these in almost a scissoring motion to work the butter into the flour.
    • rub the cold butter into the flour with your hands. I like to “snap” the butter into the flour. If you’ve got warm hands, a pastry cutter or two knives are the better options. 

    Roll Out the Dough.

    The easiest way to roll out this dough is to use two pieces of parchment paper. This way you can get the dough nice and thin without it sticking to the counter. 

    If you don’t have parchment paper, dust your counter with gluten-free flour and keep moving the dough as your roll. This will keep it from sticking to the counter.

    A sheet of gluten-free graham cracker dough.
    1. Sprinkle a 12×18-inch piece of parchment paper with gluten-free flour.  
    2. Place the dough in the center of the paper.  Sprinkle gluten-free flour generously on top of the dough. 
    3. Cover the dough with a second piece of parchment.
    4. Roll out until the dough is about 12×18 inches. If the dough tears, pull back the parchment and press the dough together. Cover with parchment and continue rolling.
    5. When the dough is the right size, gently peel the top piece of parchment off the dough.

    Cut into Crackers.

    Gluten-free graham cracker dough square, dotted with holes, on a baking sheet.

    You can cut these into any shape you like. I like to make them into squares, about 2 ½-inches each. To do this, I use a pizza wheel. You could use a sharp knife or cookie cutter to cut the dough.

    Have you ever noticed the small holes on top of graham crackers? These little holes are important. They allow steam to escape as the crackers bake, keeping them light and crisp. After you place the graham cracker on the pan, dot the top with a fork. 

    And to give them that classic graham cracker look, I also score a line down the center. If you do this, don’t cut all the way through the dough. All you need to do is cut gently into the top of the dough. When the crackers are baked and cooled, they’ll snap easily along this line.

    Bake Until Brown.

    A stack of gluten-free graham crackers sitting on brown parchment paper.

    A pan of 2 ½-inch squares takes about 18 minutes to bake. Look for the crackers to be a deep brown. This color means they have a lovely flavor. 

    Let them cool on the pan for at least 5 minutes. They’re really delicate when they come out of the oven. Then transfer them to a cooling rack. Like magic, they crisp as they cool.

    How to Store Gluten-Free Graham Crackers.

    Keep the leftover graham crackers in a container with a lid. It’s important to keep them dry. If it’s humid, they might soften. If your crackers get soft, place them onto a baking sheet and crisp in a 350℉ oven for about 10 minutes.

    Gluten-Free Graham Crackers

    Recipe Note: This recipe was first shared in 2018. It was updated in 2023 and 2024 to include step-by-step photos and information.

    A s'more on the counter made with two gluten-free graham crackers.
    4.89 from 9 votes
    Print

    Homemade Gluten-Free Graham Crackers

    Gluten-free graham crackers are fun to make at home. You only need a few ingredients and about an hour to make this recipe. The result is crunchy, not-too-sweet crackers that are perfect for whenever you're craving a graham.

    Prep Time 20 minutes
    Cook Time 15 minutes
    Total Time 35 minutes
    Servings 24 graham crackers
    Author Elizabeth Barbone

    Ingredients

    • 2 cups gluten-free baking flour (10 ounces; 283 grams)
    • ⅓ cup dark brown sugar (2 ⅔ ounces; 75 grams)
    • 1 teaspoon baking powder
    • ½ teaspoon salt
    • 6 tablespoons butter or dairy-free shortening, cold (3 ounces; 85 grams)
    • 5-6 tablespoons milk, traditional or dairy-free (2 ½ -3 ounces; 70-85 grams)
    • 3 tablespoons honey (1 ounces/ 30 grams)

    Instructions

    1. Preheat oven to 350°F. Line a 13 by-18 baking sheet with parchment paper.

    2. Food Processor Directions: In the bowl of a food processor, combine gluten-free flour, dark brown sugar, baking powder, and salt. Pulse to combine.

      Add the butter. Pulse until small pieces of butter dot the flour mixture. The butter should be about the size of small peas.

      Add 5 tablespoons of milk and honey. Run food processor until dough forms, about 20 seconds. If the dough looks dry, add the remaining milk.

      Proceed to step 4.

    3. By Hand Directions: Whisk the gluten-free flour, dark brown sugar, baking powder, and salt together in a medium mixing bowl.

      Cut cold butter into flour mixture with a pastry cutter, two knives or by rubbing the butter between your fingers. Work the butter into the flour until no large pieces of butter remain. The butter should be the size of peas or small pebbles.

      Add 5 tablespoons of milk and honey. Use a wooden spoon and stir until a dough forms. If the dough is dry, add the additional tablespoon of milk.

    4. Lightly dust a 12-by-16-inch piece of parchment paper with gluten-free flour. Place dough in the center of the parchment. Dust the top of the dough with gluten-free flour. Cover the dough with another piece of 12-by-16-inch parchment paper

      OR

      Dust your counter and rolling pin generously with gluten-free flour. Lightly flour the top of the dough.

    5. Roll dough into a 12 by-16-inch rectangle. It will be about ⅛-inch thick.

      If you're rolling the dough directly on the counter, move it frequently to prevent it from sticking.

    6. Carefully remove the top piece of parchment paper. Cut dough into shapes. For squares, cut the dough into 2 ½-inch squares or use your favorite cookie cutters.

    7. Transfer the dough to a parchment-lined baking sheet. Prick each graham cracker lightly with a fork.

    8. Bake for 15-18 minutes or until brown.

    9. Allow the crackers to cool on the pan for 5 minutes. They are very soft and delicate when they come out of the oven. Transfer the crackers to a cooling rack. They crisp as they cool.

    10. Store gluten-free graham crackers in a container with a lid. If it's humid, the crackers might soften. To crisp them, place them in a 350℉ on a baking sheet for about 5 minutes. The crackers keep for about a week.

    Recipe Notes

    Gluten-Free Flour Blend
    This recipe was tested with Bob’s Red Mill 1:1 Gluten-Free Baking Flour. Using a different flour blend might affect the texture of the crackers. 

    Note: The recipe was updated in 2024. The original recipe used the following homemade gluten-free flour blend. 

    1 ½ cups brown rice flour (7 ½ ounces; 212 grams)
    ½ cup cornstarch (2 ounces; 57 grams)

    Dairy-Free

    To make these gluten-free graham crackers dairy-free, use a solid, cold dairy-free butter and your favorite dairy-free milk. 

    Gluten-Free Brownies

    A stack of three gluten-free brownies.

    This gluten-free brownie recipe uses two types of chocolate for rich and fudgy brownies that chocolate fans love. You can customize it to include nuts and chocolate chips. The recipe also works great dairy-free!

    A stack of three gluten-free brownies.

    When it comes to recipes I make again and again, gluten-free brownies are in my top five. They’re right up there with gluten-free chocolate chip cookies and banana bread. Everyone loves them and they’re so easy to make!

    Ingredients

    Let’s take a look at the ingredients you need to make a batch of these brownies. If you’re dairy-free, I’ve included a substitution for the butter. 

    Ingredients for gluten-free brownies.
    • Chocolate Chips. Or you can chop up a bar of your favorite gluten-free chocolate. If you’re dairy-free, use your favorite dairy-free and gluten-free chocolate.  
    • Cocoa Powder. Regular and Dutch process cocoa powder both work in this recipe.
    • Butter. Melted butter adds richness. If you’re dairy-free, replace the butter with your favorite dairy-free buttery spread or coconut oil.
    • Sugar. Use granulated (white) sugar. It adds the right level of sweetness and gives the brownies a great texture.
    • Eggs. Use room temperature eggs. 
    • Gluten-Free Flour. The small amount of gluten-free flour holds the brownies together. 
    • Salt. A little salt enhances all the other flavors. Use table (fine) salt in the batter. If you love salted brownies, sprinkle a little flaky salt over the batter before baking.

    Optional Ingredients

    • Vanilla Extract. Since these gluten-free brownies are so flavorful, the vanilla extract is optional.  
    • Chopped Nuts. Add chopped nuts to the batter before baking.
    • Chocolate chips or chopped chocolate. For extra chocolate, stir in chocolate chips or chopped chocolate. You can use the same type of chocolate you used in the brownie batter or mix it up! 

    How to Make Gluten-Free Brownies

    These really are the best gluten-free brownies. Here’s how to make them.

    Steps for making gluten-free brownies. 1. A stick of butter melts in a pan. 2. Sugar and chocolate are stirred into the melted butter. 3. Three eggs are added to the chocolate-butter mixture. 4. Cocoa powder, gluten-free flour, and salt sit on top of the egg, butter, chocolate mixture.
    1. Melt the butter over low heat. Once it’s melted, add the sugar. Stir to combine.
    2. Add the chocolate chips. Stir until the chocolate is melted.
    3. Pour the mixture into a mixing bowl. Let it cool for a few minutes and then add eggs. 
    4. Stir in the cocoa powder, gluten-free flour, and salt.
    (left) Gluten-free brownie batter dripping off a whisk. (right) Gluten-free brownie batter in a parchment-lined pan.
    1. Mix until the batter is smooth. If you’re adding chocolate chips or nuts, add them now.
    2. Spread the batter into a parchment-lined pan.
    Gluten-free brownies cut into squares on the counter.
    1. Bake until set.
    2. Then let the brownies cool in the pan before cutting them into pieces!

    How do you know when brownies are done baking?

    It can be hard to tell when a pan of gluten-free brownies are done baking! The best way to test for doneness is to insert a toothpick into the center of the pan. You want it to come out clean or with just a few moist crumbs clinging to it. If the toothpick is covered in wet batter, the brownies aren’t done. Return the pan to the oven and bake for a few more minutes.

    Storing Leftover Brownies. 

    Gluten-free brownies keep well on the counter. Cover the brownies or place them into a container with a tight-fitting lid. Store them at room temperature for up to five days. 

    How to Freeze Brownies. 

    Let the brownies cool completely before freezing. If you freeze warm gluten-free brownies, the texture gets gummy. 

    • For an entire pan: To freeze an entire pan, don’t cut the brownies. Remove the brownies from the pan and wrap them tightly. Freeze for up to three months. 
    • For individual brownies: cut the brownies into squares. Place into a freezer container. If you want to stack the brownies, place a piece of parchment between each layer. Freeze for up to two months.
    Stack of gluten-free brownies on a brown piece of parchment paper.
    5 from 1 vote
    Print

    Gluten-Free Brownies

    This gluten-free brownie recipe uses two types of chocolate for rich and fudgy brownies that chocolate fans love. You can customize it to include nuts and chocolate chips. (Recipe also works great dairy-free.)
    Prep Time 10 minutes
    Cook Time 30 minutes
    Total Time 40 minutes
    Servings 9 brownies

    Ingredients

    • ½ cup butter or dairy-free buttery spread (4 ounces; 113 grams)
    • ¾ cup semi-sweet chocolate chips or 4 ounces dark chocolate, chopped (4 ounces; 113 grams)
    • 1 cup granulated sugar (7 ounces; 198 grams)
    • 3 large eggs (about 6 ounces out of shell, 170 grams)
    • ¾ cup gluten-free flour (3 ¾ ounces; 106 grams)
    • ¼ cup dutch process cocoa powder (¾ ounce; 21 grams)
    • ½ teaspoon salt

    Optional

    • 1 teaspoon vanilla extract
    • ½ cup chopped walnuts or pecans (2 ounces; 56 grams)
    • ½ cup chocolate chips or chopped chocolate (3 ounces; 85 grams)

    Instructions

    1. Preheat oven to 350°F. Grease an 8×8-inch square pan with nonstick cooking spray or butter. For easy removal, place a parchment into the pan, letting about 2 inches overhang the sides of the pan.
    2. Melt the butter in a small pan or medium microwave-safe bowl. Add the sugar. Heat over low heat or microwave on low power until warm. Don’t let the mixture bubble. Stir gently. Add the chocolate chips and stir until the chocolate melts. If needed, heat the mixture over low heat to fully melt the chocolate.

    3. Pour the mixture into a medium bowl. Let cool for about three minutes. Stir in eggs until smooth. (Add vanilla now, if using) Add gluten-free flour, cocoa powder, and salt. Mix until smooth. Stir in nuts or chocolate chips if using.

    4. Spread batter into prepared pan.

    5. Bake for about 30 minutes. Or until a toothpick inserted comes out clean or with just a few crumbs on it.

    6. Cool brownies in the pan. Cut into squares. Enjoy.
    7. Cover brownies and store on the counter for up to four days.

      To freeze: Wrap cooled brownies or place into a freezer container. Freeze up to three months.

    Recipe Notes

    For Gluten-Free and Dairy-Free Brownies: Replace the butter with a dairy-free butter replacement. Use dairy-free chocolate. 

    Easy Gluten-Free Banana Bread

    Gluten-free banana bread sliced on a wood cutting board.

    This gluten-free banana bread recipe is a great way to use those overripe bananas you’ve got on the counter. It’s easy to make and the loaf comes out moist and tender. The recipe calls for butter but there’s a dairy-free option included too!

    Gluten-free banana bread sliced on a wood cutting board.

    Banana bread was my favorite childhood treat. My mom made it a lot.  I’d barely wait for the loaf to cool before gobbling down a slice. She had a funny habit of removing it from the pan and letting it cool on its side. I’d watch until there was no steam coming from it. Then I’d pounce.

    Her bread was moist, sweet, and really flavorful. It inspired this gluten-free version. I think I first developed it 25 years ago. Which seems impossible! But it’s true. 

    Over the years, the recipe changed a little. Today gluten-free flour blends are both easy to find and high quality-two things that weren’t always true. The recipe now calls for a blend, instead of individual flours.

    And, as always, it makes a perfect loaf of banana bread. I wouldn’t have it any other way.

    Ingredients

    Here’s what you need to make this. The key, just like with gluten-free banana muffins and gluten-free banana cake, is to use over- ripe bananas. 

    Gluten-free banana bread ingredients on the counter.
    • Bananas. Use over-ripe bananas that are dark brown or almost black. The darker the bananas, the sweeter and more flavorful the banana bread. 
    • Gluten-Free Flour Blend. This recipe was developed with Bob’s Red Mill gluten-free baking flour. All gluten-free flours and blends behave differently. If you use a different flour, the texture of the bread might change.  
    • Sugar. Granulated sugar adds sweetness. 
    • Butter.  I make my gluten-free banana bread with butter because I prefer the flavor. If you’re dairy-free, use a dairy-free butter replacement. The recipe works great when made dairy-free.
    • Eggs. The two eggs in the recipe add structure and help give the banana bread a delicate texture. 
    • Vanilla. Adds flavor. 
    • Baking Powder and Baking Soda. They help the loaf to rise. 
    • Salt. Enhances all the other flavors.

    Variations

    Love chocolate chips, nuts, or dried fruit in your banana bread? Me too! Use up to 1 cup of your favorites.

    How to Make Gluten-Free Banana Bread

    If you’ve never made a gluten-free banana bread before, here’s what you need to know. As always, the full recipe is included below. Have fun!

    Step One: Mash the Bananas.

    1. Over ripe bananas in a bowl. 2. Mashing bananas with a handheld mixer.

    Use a small bowl for this step. You can use a fork, potato masher or handheld mixer. I like to leave a few lumps. They add a nice texture to the bread.

    Step Two: Make the Batter.

    Steps for making gluten-free banana bread. 1. Whisking the dry ingredients. 2. Mixing the butter and sugar. 3. Adding the mashed bananas. 4. Adding the gluten-free flour.
    1. Combine the gluten-free flour with the baking powder, baking soda, and salt in a medium bowl. Set this aside. You’ll use it later.
    2. Make the butter mixture. Mix the soft butter until it’s creamy in a large bowl. Add the sugar. Mix until it’s smooth and thick. Then add the eggs one at a time. Mix until it’s light and creamy. 
    3. Add the mashed bananas to the butter mixture. Stir the mashed bananas and butter mixture together. 
    4. Add the gluten-free flour mixture.
    Gluten-free banana bread batter in a bowl.
    1. Mix until the batter is thick. If you’re adding chocolate chips or nuts, add them now.

    Step Three: Bake and Cool.

    Gluten-free banana bread batter in a loaf pan that's been lined with parchment paper.

    Spread the batter into the prepared pan. It’s a thick batter. I like to use a spatula to spread it evenly into the corners.

    Gluten-free banana bread takes a long time to bake. Sometimes the outside looks done but the center is still raw. Remember to use a cake tester to check for doneness. 

    If the top is getting too dark before the center is done. cover the bread with a piece of foil. This keeps the outside from burning. 

    When the bread is done, remove it from the oven and let it cool in the pan for about 15 minutes. Then turn it out and cool it on a wire rack. 

    How to Store Leftovers

    This bread keeps nicely. Store it covered on the counter for up to four days. Or let it cool and freeze the loaf for up to three months.

    Gluten-free banana bread sliced on a plate spread with a little butter.

    FAQs

    Can I use this recipe to make banana muffins?

    You can but I have a recipe for gluten-free banana muffins that works perfectly. You should probably just use that one. 

    Why was my gluten-free banana bread raw in the center?

    Argh. This is the most frustrating thing about baking banana bread. Because the batter is thick and contains a lot of moisture, there’s a risk that the bread can look done, only to have a raw center. 

    Remember to check the bread with a tooth pick or cake tester. If the outside seems done but the center is raw, cover the bread with a piece of foil and continue to bake. The allows the center to bake without the outside getting too dark.

    Gluten-free banana bread sliced on a wood cutting board.
    4.95 from 19 votes
    Print

    Gluten-Free Banana Bread

    This recipe makes a moist and flavorful gluten-free banana bread. Remember to use very ripe bananas for the best flavor.

    Prep Time 10 minutes
    Cook Time 50 minutes
    Total Time 1 hour
    Servings 1 loaf

    Ingredients

    • 3 medium bananas, peeled (about 12 ounces; 340 grams)
    • 2 cups Bob's Red Mill Gluten-Free Baking Flour (10 ounces; 280 grams)
    • ¾ cup granulated sugar (5 ¼ ounces; 150 grams)
    • 1 teaspoon baking powder
    • 1 teaspoon baking soda
    • 1 teaspoon salt
    • ½ cup softened butter (4 ounces; 115 grams)
    • 1 teaspoon vanilla extract
    • 2 large eggs

    Instructions

    1. Preheat oven to 350℉. Spray a 9×5-inch baking pan with nonstick cooking spray. (Optional: Line pan with parchment paper and spray with cooking spray.)

    2. Mash the bananas until almost smooth in a small bowl with a fork. Set aside.

    3. Whisk together gluten-free flour, baking powder, baking soda, and salt in a medium bowl.

    4. In a large bowl, mix softened butter, sugar, and vanilla extract until light and creamy. Add the eggs one at a time. After you add the last egg, mix until it's smooth and creamy, about two minutes.

      Add the mashed bananas. Stir to combine.

      Mix in the dry ingredients. Stir until a batter forms.

      (If you're adding chocolate chips, nuts, or dried fruit, add them now.)

    5. Spread the batter into the prepared pan.

    6. Bake until a cake tester inserted into the middle of the loaf comes out clean, about 65 minutes.

      If the top browns too quickly and the center isn't done, cover the loaf a lightly greased piece of foil. (If the center is baked and top of the loaf is raw, cover with a greased piece of foil and reduce the oven temperature by 25 degrees. Bake until done.)

    7. Remove pan from the oven and place on a wire rack. After fifteen minutes, turn bread directly onto the rack.

    8. Store, wrapped, at room temperature for up to four days or freeze, wrapped tightly in plastic wrap, for up to one month. 

    Recipe Notes

    Gluten-Free Flour Blend

    This recipe was tested with Bob’s Red Mill Gluten-free Baking Flour. Use a gluten-free flour blend that contains xanthan gum. If your mix does not contain xanthan gum, add ½ teaspoon to the recipe.

    Dairy-Free Option

    For a gluten-free and dairy-free banana bread, replace the butter with a dairy-free butter spread.

    Variations: Stir in one cup total of chocolate chips, nuts, or dried fruit. 

    The Best Gluten-Free Pancakes

    A stack of gluten-free pancakes topped with maple syrup and butter on a plate.

    This is my go-to recipe for the best gluten-free pancakes. They come out light and fluffy—with hardly any work required. It’s a simple one bowl recipe. Stir the batter together, let it rest for a few minutes, and then cook them on a hot griddle. That’s it! 

    Looking for a gluten-free and grain-free pancake recipe? Try these fluffy almond flour pancakes or these cute coconut flour pancakes.

    A stack of gluten-free pancakes topped with maple syrup and butter on a plate.

    Ingredients Explained

    Here’s what you need to make a batch of these pancakes.

    Gluten-free pancake ingredients in bowls on the counter.
    • Gluten-Free Flour. Gluten-free flour blends vary from brand to brand. This recipe was developed with Bob’s Red Mill 1:1 Gluten-Free Flour blend. Using a different blend might change the results. 
    • Sugar. A little granulated sugar adds a touch of sweetness and helps with browning. 
    • Egg. One egg does a lot! It adds structure, flavor, and helps with the rise. 
    • Milk. Use your favorite milk. Both traditional and dairy-free milk work. 
    • Oil. Oil works great and it’s what I usually use.  If you prefer a buttery flavor, use melted butter. Just remember to let it cool a little before adding it to the batter.
    • Vanilla Extract. The vanilla adds a nice flavor. Almond or lemon extract can be used too. 
    • Baking Powder. Makes the pancakes nice and fluffy.
    • Salt. Use table salt. It blends easily into the batter. 

    Variations

    If you love blueberry or chocolate chip pancakes, you can use this recipe to make them! For an extra pop of flavor, make a batch of blueberry-chocolate chip pancakes. The two flavors go great together. 

    • Blueberry Pancakes: Stir ½ cup of fresh or thawed blueberries into the batter.
    • Chocolate Chip Pancakes: Replace the granulated sugar with light brown sugar and sprinkle a few chocolate chips onto the batter immediately after you spoon the batter onto the griddle. Serve with a dollop of whipped cream.

    How to Make Gluten-Free Pancakes

    This recipe is so easy you can make a batch while still half asleep. Grab a bowl, whisk everything together, and cook. That’s it! No whipping egg whites. Just light and fluffy pancakes that gluten-free eaters will gobble up.

    Left: Dry ingredients for gluten-free pancakes. Right: Gluten-free pancake batter.

    Step One: Make the Batter.

    First whisk the dry ingredients together. This evenly distributes the sugar, baking powder, and salt within the gluten-free flour, ensuring that each pancake rises and browns uniformly.

    Then add the wet ingredients. Mix until the batter is smooth. You might see a lump here and there. That’s fine. 

    Run a spatula along the bottom and sides of the bowl. If you see any dry flour, stir it gently into the batter.

    Step Two: Let the Batter Rest.

    After you mix it, let the batter rest (sit on the counter) for between 5 and 15 minutes. This helps the gluten-free flours and starches fully absorb the liquid. 

    Since it thickens a little during the rest, give the batter a stir right before cooking. If it’s too thick to drop from a spoon, stir in a tablespoon or so of milk.

    Left: Greasing a cast iron griddle. Right: Ladling gluten-free batter on the griddle.

    Step Three: Cook on a Hot Griddle.

    The key to great gluten-free pancakes is to cook them on a hot greased griddle. Oil your pan with a light brush of oil or a spray of nonstick cooking spray. 

    When your pan is hot-but not smoking-spoon about a ¼ cup of batter onto it. 

    Cook the pancakes for about two minutes. When you see a few bubbles on the surface of the pancake, it’s time to flip them. Then cook for another minute or so.

    How to Flip a Pancake

    There’s a bit of an art to flipping a pancake. Here’s how to do it.

    Lifting a gluten-free pancake on the griddle to check for doneness.
    • Heat and grease the griddle. If you cook pancakes on a cold pan, they won’t brown or rise nicely. And if your pan isn’t nicely greased, they’ll stick. Nonstick and cast iron griddles are perfect for gluten-free pancakes! If you’re using an electric griddle, heat it to 350℉. 
    • Leave space. First, remember that it’s hard to flip a pancake on a crowded griddle! Leave about an inch between each pancake. 
    • Wait for bubbles. Look for the batter to lose a little of its shine and for bubbles to appear on the surface.
    • Use a the right spatula. The best spatula for flipping a pancake is a large one with a thin edge. If the spatula is too small, it’s hard to get under the pancake to flip it.
    • Take a peek! I like to gently slide the spatula under the pancake and carefully lift the edge. I give it a quick peek to see if it’s brown. If it’s still pale, I let it cook for another minute or so.
    Three gluten-free pancakes cooked on a griddle. The top of the pancakes are brown.
    • Flip gently. Lift the pancake a little. There’s no need to lift it very high off the pan. Then, using your wrist, quickly flip the pancake. Think of it more like a turn, than a flip.
    • Cook until brown. After you flip, the pancake only needs a minute or so more to cool. You can gently tap the top to make sure it’s set and not soft.

    Keeping Pancakes Warm

    Six gluten-free pancakes on a sheet pan.

    Place a parchment-lined baking sheet into the oven before you mix the pancake batter. Heat your oven to 225°F. As you make the pancakes, transfer them to the warm baking sheet. Pancakes keep for about 30 minutes in a warm oven. After that, they start to dry out.

    Storing and Reheating Leftovers

    If you’ve got leftover pancakes, lucky you! They’re great for a quick gluten-free breakfast. 

    Store the leftover pancakes covered at room temperature for a day. They tend to dry out. So I recommend freezing leftovers. 

    Freezing

    Place cooled pancakes into a freezer bag or container. If you’re going to stack them, put a piece or waxed or parchment paper between them.

    They keep for about two months in the freezer. 

    Reheating

    When you’re ready to eat, you’ve got options! 

    • Microwave. Place frozen pancakes in a single layer on a microwave-safe plate. Heat on medium-high for one minute. Flip the pancakes and heat for another 30 seconds or until warm. The reheating time will vary depending on your microwave.
    • Air Fryer. Place the frozen pancakes in a single layer on the tray of your air fryer. 
    • Oven. If you need to reheat a lot of pancakes, the oven is the best method. Heat the oven to 325℉. Place the frozen pancakes on a baking sheet. Heat until warm, this usually takes about 10 minutes. 

    Note: This recipe was originally published in 2017. It has been updated to use a gluten-free flour blend. Here is the link to the original gluten-free pancake recipe.

    A stack of gluten-free pancakes topped with maple syrup and butter on a plate.
    4.6 from 115 votes
    Print

    Fluffy Gluten-Free Pancakes

    These gluten-free pancakes are incredibly light and fluffy. For the best texture and rise, let the batter rest for at least five minutes before cooking. A hot, greased skillet ensures the pancakes don’t stick.

    Course Breakfast
    Cuisine American
    Keyword gluten-free, gluten-free pancakes, pancakes
    Prep Time 5 minutes
    Cook Time 3 minutes
    Resting Time 5 minutes
    Total Time 13 minutes
    Servings 6 pancakes
    Calories 150 kcal

    Ingredients

    • 1 cup gluten-free flour (Bob's Red Mill 1:1 Gluten-Free Baking Flour recommended) (5 ounces; 142 grams)
    • 2 tablespoons granulated sugar (1 ounce; 28 grams)
    • 1 ½ teaspoons baking powder
    • ½ teaspoon salt
    • ¾ cup milk (6 ounces; 170 grams)
    • 1 large egg (2 ounces; 56 grams)
    • 2 tablespoons oil or melted butter (1 ounce; 28 grams)
    • ½ teaspoons vanilla extract

    Instructions

    1. Whisk the gluten-free flour, sugar, baking powder, and salt together in a medium bowl. Add the milk, egg, oil, and vanilla extract. Let the batter rest for 5 minutes. (Batter can rest up to 30 minutes.)

    2. Heat a nonstick griddle or skillet over medium-high heat. Lightly grease the griddle with oil or butter.

    3. Spoon about ¼ cup of batter onto the skillet. Cook until the edges look set and bubbles appear all over the surface of the pancake, about two minutes. To check for doneness, lift the edge of the pancake with a spatula. It should be golden brown.

    4. Flip the pancake and cook until golden brown, about two additional minutes.

      Repeat with the remaining batter. Serve with butter and syrup.

    To Keep Pancakes Warm

    1. Before making the batter, place a parchment-lined baking sheet in the oven. Heat oven to 225°F.

      Transfer cooked pancakes to the baking sheet. Don't overlap the pancakes. Keep warm for up to 30 minutes.

    Recipe Notes

    Ingredients and  Substitutions

    Gluten-Free Flour. For best results, use a gluten-free flour blend that contains xanthan or guar gum. If your blend doesn’t, whisk in ¼ teaspoon. The recipe was tested with Bob’s Red Mill 1:1 Gluten-Free Flour Blend. 

    Milk. If you want to make gluten-free and dairy-free pancakes, use dairy-free milk. 

    Egg. Use a large egg. If you’d like gluten-free and egg-free pancakes, use an egg replacer and follow the directions on the package for replacing one egg. Please note: I tested the recipe using Bob’s Red Mill’s egg replacer and a flax egg. Both work. The pancakes made with Bob’s egg replacer turned out a bit lighter than those made with the flax egg. Both were a little heavier than pancakes made with an egg. Since egg-replacers vary from brand-to-brand, use your favorite. 

    Oil. Any neutral oil, like corn or canola oil, works. Melted butter may also be used. After melting the butter, let it cool for a few minutes before adding it to the batter.

    Freezing and Reheating

    Place pancakes in a freezer bag or container. To keep them from sticking, place a piece of waxed or parchment paper between each pancake. 

    To reheat in the microwave: heat on low power for one minute. Flip and heat an additional minute as needed.

    To reheat in the oven: Preheat the oven to 325℉. Place frozen pancakes on a baking sheet. Heat for about 10 minutes. 

    For additional information, including air fryer and toaster directions, see above.

    Gluten-Free Yellow Cake Recipe

    Slice of gluten-free chocolate cake with chocolate frosting on a plate.

    This gluten-free yellow cake recipe is so simple to make. It makes a moist and tender cake that’s perfect for parties. Use your favorite dairy-free milk to make the recipe dairy-free.

    Slice of gluten-free chocolate cake with chocolate frosting on a plate.

    Why You’ll Love This Gluten-Free Yellow Cake

    This is an easy one-bowl gluten-free cake recipe. Unlike my gluten-free white cake, which is amazing, but requires several specific steps, this recipe is similar to a box mix. You mix all the ingredients in one bowl and bake.  It’s easy enough to make on a busy weeknight and yummy enough to be served at birthday parties. There’s a lot to love about this cake.

    • Easy to make. It’s a one-bowl recipe. 
    • Dairy-free. (When made with dairy-free milk.)
    • Tender with a tight, soft crumb.
    • Perfect for birthday parties. 

    Ingredients

    The ingredients for this cake are pretty simple. Here’s a look at what you’ll need. As always, the full recipe with amounts is listed at the bottom of the post.

    Ingredients for the gluten-free yellow cake recipe on the counter.
    • Gluten-Free Flour. I developed this recipe with Bob’s Red Mill 1:1 Gluten-Free Flour blend. It gives the cake a nice tender crumb. If you use a different flour blend, you might experience different results. Look for a flour blend that contains xanthan or guar gum. Without these ingredients, the cake won’t rise as high.
    • Eggs. Since this is a yellow cake, we use four whole eggs. Fun fact: the yolk gives the cake its nice yellow color. I haven’t tested the recipe with an egg replacer. 
    • Milk. Both traditional or dairy-free milk work. It’s best to use a milk that includes a little fat. This helps keep the cake moist. I’d avoid full-fat coconut milk because it’s a little too rich for the cake.
    • Granulated Sugar: For the best flavor, texture, and color, use regular granulated sugar. 
    • Oil. A liquid oil, like vegetable oil or canola oil gives the cake a moist and tender crumb. Avoid olive oil or any other strong flavored oil. If you prefer butter, you can replace the oil with melted butter.
    • Vanilla Extract. A little vanilla extract is the traditional flavor but you could also use almond or lemon.
    • Salt and Baking Powder. The salt enhances flavor and the baking powder helps the cake to rise. 

    Tips for Success

    The four steps for making a gluten-free yellow cake. 1. Whisking the dry ingredients. 2. Adding the eggs, milk, oil, and vanilla. 3. The batter in a mixing bowl. 4. The batter in two round cake pans.
    1. Whisk the dry ingredients. This ensures that the baking powder is evenly distributed throughout the mixture. 
    2. Add the wet ingredients. Stir the eggs, oil, milk, and vanilla in until a smooth batter forms. 
    3. Check the bottom of the bowl for dry flour. Gluten-free flour loves to cling to the bottom of a mixing bowl. Before pouring the batter into the prepared pans, take a spatula and scrape the bottom of the bowl. If you see streaks of flour, stir them into the batter.  
    4. Remember to grease your pan. Spread the batter into two well-greased cake pans. I like to use a nonstick cooking spray.
    Two gluten-free yellow cake rounds cooling on a wire rack.
    1. Bake until Brown. Two 8-inch cakes cakes take about 30 minutes to make.
    2. Cool on a wire rack. Let the cakes cool in the pan for about five minutes. If you remove them right away, they can break because they’re so delicate when they’re hot. After five minutes, take them out of the pan. Place them on a wire rack to cool. This allows the steam to escape. If they remain in the pan, the steam can cause the cakes to stick.
    3. Let the cake cool before frosting. Make the cake is totally cool before you frost it. The center of the cake loves to hold on to heat. Take your hand and place it on the center of the cake. If it feels warm, don’t frost it yet. Frosting melts right off a warm cake!
    Spreading chocolate frosting on a gluten-free yellow cake round.

    Gluten-Free Yellow Cake: FAQs

    Can I make this cake without eggs?

    I haven’t tested the cake egg-free, sorry. 

    Can I make this cake with a sugar substitute? 

    I haven’t tested the recipe with a sugar replacement.

    Can I use this recipe to make cupcakes?

    Yes. Directions for making cupcakes are included below in the notes section of the recipe. 

    Can I use this recipe to make a sheet cake?

    You sure can! It makes a 9×13-inch sheet cake. Directions for baking are included below the recipe. 

    A slice of gluten-free yellow cake with chocolate frosting.

    Make Ahead Tips

    You bake this cake ahead. To do this, bake the cake as directed. When it’s completely cool, wrap each layer tightly with plastic wrap. Freeze for up to 3 months. 

    When you’re ready to serve, thaw the layers at room temperature before frosting. 

    How to Store Leftovers

    Cover the leftover cake and store it at room temperature for up to three days. Gluten-free cake tend to dry out after that. You can also slice the cake and freeze the slices to enjoy later. 

    Slice of gluten-free chocolate cake with chocolate frosting on a plate.
    4.86 from 27 votes
    Print

    Gluten-Free Yellow Cake

    An easy gluten-free yellow cake recipe. Dairy-free. Perfect for birthdays and other special occasions.
    Prep Time 15 minutes
    Cook Time 30 minutes
    Total Time 45 minutes
    Servings 12 servings

    Ingredients

    For the Gluten-Free Yellow Cake

    • 2 ½ cups gluten-free flour blend, see note (12 ½ ounces; 355 grams)
    • 1 ½ cups granulated sugar (10 ½ ounces; 298 grams)
    • 2 ¼ teaspoons baking powder
    • ¾ teaspoon salt
    • 1 cup vegetable oil (7 ounces; 198 grams)
    • ⅔ cup milk, traditional or dairy-free (5 ⅓ ounces; 150 grams)
    • 4 large eggs
    • 2 teaspoons vanilla extract

    For the Chocolate Frosting

    • 1 cup butter or dairy-free butter replacement, softened (8 ounces; 226 grams)
    • 4 cups powdered sugar, sifted (16 ounces; 453 grams)
    • ¾ cup Dutch-process or natural cocoa powder, sifted (2 ¼ ounces; 65 grams)
    • ¼ teaspoon salt
    • ¼ cup milk, plus more as needed, see note (2 ounces; 56 grams)

    Instructions

    1. Preheat oven to 350℉. Grease two 8-inch round cake pans with gluten-free nonstick cooking spray.

    2. Whisk together gluten-free flour, sugar, baking powder, and salt in a large bowl. Add oil, milk, eggs, and vanilla extract. Stir until smooth.

    3. Divide batter between the two prepared cake pans.

    4. Bake until a cake tester inserted into the center of the cake comes out clean, about 30 minutes.

    5. Allow cakes to cool in the pan for five minutes and then turn out onto a wire rack to cool completely.

    6. Prepare chocolate frosting. Mix butter for 30 seconds on high speed until light. Stop mixer. Add powdered sugar, cocoa powder, salt and milk. Mix, on low speed, until creamy. If frosting seems dry, add additional milk until smooth and creamy.

    7. Frost Cake. When cake is cool, fill and frost the cake.

    Recipe Notes

    Gluten-Free Flour Blend

    This recipe was tested with Bob’s Red Mill 1:1 Gluten-Free Flour Blend. Replacing the flour with another brand might change the texture of the cake. Be sure to use a flour blend that contains xanthan gum. If it doesn’t, add 1 teaspoon of xanthan gum to the flour. Whisk to combine. Then use as directed.

    Sheet Cake Directions

    Lightly grease a 9 x13-inch pan. Bake the cake until golden brown  about 40. Allow cake to cool in the pan. Prepare frosting as directed above and frost cake when cool. 

    Cupcake Directions
    Line two 12-cup muffin pans with cupcake liners. Spoon batter into muffin cups, about ⅔ full. Bake until a toothpick inserted into the center of the cake comes out clean, about 20 minutes. Prepare frosting and frost cupcakes when cool. 

    Gluten-Free Lemon Cake

    Slice of gluten-free lemon cake on a white plate.

    This recipe makes the best gluten-free lemon cake! It’s moist, dense, and easy-to-make. Thanks to the lemon zest and juice, it’s got a great lemon flavor. The recipe makes one 8-inch layer cake but can easily be used to make cupcakes or a sheet cake. 

    Slice of gluten-free lemon cake on a white plate.

    This recipe is almost as easy to make as a box mix. You simply mix all the ingredients together in a large bowl and bake.

    You’re rewarded with a cake that’s lemony and nicely dense. Just like my gluten-free chocolate cake recipe, this cake is perfect for birthdays and other celebrations.

    Thanks to the lemon sugar (that you make in about 20 seconds!) every bite of this cake is nicely lemony.

    Ingredients

    Here’s what you need to make this along with a substitution for folks who are dairy-free.

    Ingredients for gluten-free lemon cake on the counter.
    • Gluten-Free Flour. I tested the recipe with Bob’s Red Mill 1:1 Gluten-Free Baking Flour. Since gluten-free flour blends vary so much from brand to brand, using a different one might change the texture of the cake.
    • Sugar. Use granulated sugar (white sugar) for the best taste and results. 
    • Lemon Juice and Zest. Fresh lemon juice and zest add a light lemon flavor to the cake. Remember to zest the lemon before juicing it. 
    • Oil. Vegetable oil gives the cake a moist crumb.
    • Eggs. You want the eggs at room temperature. Take them out of the refrigerator about 20 minutes before you need them. 
    • Milk. Any milk works. I like to use whole milk. The richness keeps the cake fresh and adds a nice flavor.
      Substitution: Use any dairy-free milk except full-fat coconut milk. 
    • Baking Powder. There’s three and half teaspoons of baking powder in this recipe. It lightens the cake. 
    • Salt. A little salt enhances all the other flavors. Use table (fine) salt. 
    • Lemon or vanilla extract. I like to add a little lemon extract to the batter. If you don’t want to get a bottle for just this recipe, use vanilla extract.

    Lemon-Sugar: The simple ingredient for the best gluten-free lemon cake ever! 

    This cake starts with a lemon-infused sugar. But don’t worry, there’s no need to buy it. Just grab the lemon zest and granulated sugar. It takes about 20 seconds to make.

    Making lemon sugar. (left) Lemon zest sitting on granulated sugar. (right) Zest rubbed into the sugar. The sugar now looks damp and sandy.

    First, zest your lemon with a microplane grater or fine zester. You’ll need one large lemon or two medium.

    Then rub the lemon zest into the sugar. This simple process infuses the sugar with lemon flavor. You can do this by hand or let your mixer do the heavy lifting. After about 20 seconds of mixing, your sugar will take on a damp texture – that’s what you want! And oh, the aroma! It’s downright heavenly.

    Once you make the lemon sugar, it’s time to make the batter. 

    How to Make Gluten-Free Lemon Cake

    You’ll need one large bowl, a whisk or electric mixer and two round cake pans to make this batter.

    Steps for making gluten-free lemon cake batter. 1. Homemade lemon sugar in a bowl. 2. Dry ingredients. 3. Wet and dry ingredients in the bowl. 4. Mixed batter.
    1. Make the lemon sugar. Rub the lemon zest together with the granulated sugar until it’s damp and looks like sand.
    2. Whisk the dry ingredients together with the lemon sugar. 
    3. Add the milk, eggs, oil, lemon juice, and extract. 
    4. Mix until a thick batter forms. Use a whisk or electric mixer. Both work great!
    Gluten-free lemon cake in pans. (left) batter. (right) baked cakes.
    1. Divide the batter evenly between two greased 8-inch pans. 
    2. Bake until the cake is golden brown and a cake tester inserted into the center of the cake comes out clean. 
    3. Place the cake pans on a wire cooling rack. Let them cool for about 15 minutes. Then carefully remove the cakes from the pan. Place them directly on the wire rack. Make sure they’re completely cool before frosting. This takes about an hour or so. 

    Tips for Success

    A gluten-free lemon cake on a cake stand.
    • Grease the pans well. I like to use a nonstick gluten-free spray. You can also line them with a piece of parchment. Remember to grease the sides of the pan if you use parchment on the bottom. 
    • Spread the batter into the pans. This recipe makes a thick batter. Spread the batter evenly into the pans with the back of a spoon. 
    • Let the cake cool before you frost it! If you frost a warm cake, the frosting will melt and run off the cake. 

    Storing Leftovers

    Cover the leftover cake and store it at room temperature for up to three days. Like most gluten-free cakes, it will get dry after that. If you’re not going to eat the cake in that time, freeze it. 

    Place the frosted cake in a freeze container and freeze for up to three months. Thaw the cake at room temperature when you’re ready to enjoy. 

    Slice of gluten-free lemon cake on a white plate.
    Print

    Gluten-Free Lemon Cake

    This moist gluten-free lemon cake recipe is so easy to make. The combination of lemon zest and juice give this cake a bright lemony flavor.
    Prep Time 15 minutes
    Cook Time 30 minutes
    Total Time 45 minutes
    Servings 10 servings

    Ingredients

    For the Cake

    • 1 ¾ cups granulated sugar (12 ½ ounces; 350 grams)
    • 1 tablespoon lemon zest
    • 3 cups Bob’s Red Mill 1:1 gluten-free baking flour, see note 1 (14 ½ ounces; 405 grams)
    • 3 ½ teaspoons baking powder
    • ½ teaspoon salt
    • 1 cup milk (8 ounces; 226 grams)
    • ¾ cup oil (5 ¼ ounces; 150 grams)
    • 3 large eggs, at room temperature
    • ¼ cup fresh lemon juice (2 ounces; 56 grams)
    • 2 teaspoons lemon or vanilla extract

    For the Lemon Frosting

    • 1 cup softened butter (8 ounces; 226 grams)
    • 4 cups powdered sugar (16 ounces; 455 grams)
    • 3 tablespoons fresh lemon juice (1 ½ ounces; 42 grams)
    • 2 tablespoons milk (1 ounce; 28 grams)
    • 2 teaspoons lemon zest
    • pinch salt

    Instructions

    1. Preheat oven to 350°F. Prepare your pans. Lightly grease two 8" round cake pans with nonstick cooking spray.

    2. Rub sugar together with the lemon zest until fragrant in a large bowl.

    3. Add the gluten-free flour, baking powder, and salt. Whisk to combine. Add the milk, oil, eggs, lemon juice, and extract. Stir until a thick batter forms.

      Scrape the bottom of the bowl to make sure all the dry ingredients are incorporated. Give the batter a final stir.

    4. Divide the batter evenly between the two prepared pans. Spread the batter evenly into the pans with the back of a spoon.
    5. Bake until the cake is golden brown and a cake tester inserted into the center comes out clean or with a few moist crumbs, about 30 minutes.

    6. Let the cakes cool for 10 minutes in the pan. Turn them out onto a wire rack to cool completely before frosting. This takes about 1 hour..

    7. Prepare the frosting. Mix the butter until light and creamy in a large bowl. Add the powdered sugar, lemon juice, milk, lemon zest, and salt. Mix until smooth and creamy. If frosting is too thin, add an additional ½cup powdered sugar. If it’s too thick, add another tablespoon of milk.

    8. Fill and frost the cake. If the frosting gets very warm, chill the frosted cake for 30 minutes before serving.

    9. Cover the leftover cake and store for up to three days. You can freeze the frosted cake in a freezer container for up to three months.

    Recipe Notes

    Note 1 Gluten-Free Flour. I tested the recipe with Bob’s Red Mill 1:1 Gluten-Free Baking Flour. Since gluten-free flour blends vary so much from brand to brand, using a different one might change the texture of the cake. 

    Note 2 Cupcakes. This recipe makes about 24 cupcakes. Spoon the batter into paper-lined cupcake pans and bake until set, about 20 minutes.

    Note 3. Sheet Cake. To make a sheet cake, spread batter into a greased 9×13-inch pan. Bake until golden brown and a cake tester inserted into the center comes out clean, about 40 minutes. 

    Gluten-Free Corn Muffins

    Gluten-free muffins cooling on a wire rack.

    Sweet, tender, and cakey, these gluten-free corn muffins are just like the ones you remember from a bakery. They’re tasty enjoyed on their own or alongside a bowl of warm chili. If you’re dairy-free, these muffins are for you too! Replace the milk and butter with your favorite dairy-free substitutes. 

    Gluten-free corn muffins cooling on a rack.

    Gluten-free corn muffins are one of the tastiest—and easiest—gluten-free goods you can make. The recipe included below makes sweet muffins with a cake-like texture. Have fun changing it up to suit your tastes. Reduce the sugar for a more savory muffin to serve with chili. Or stir in blueberries for a yummy blueberry corn muffin.

    If you love corn muffins, you’ll want to try this classic gluten-free cornbread recipe or this spicy and cheesy gluten-free jalapeno cornbread.

    Ingredients for gluten-free corn muffins in individual bowls on the counter.

    Ingredients

    Here’s what you need to make a batch of these muffins.

    • Gluten-Free Flour. I tested the recipe with Bob’s Red Mill 1:1 Gluten-Free Baking Flour. Using a different flour might change the texture of the muffins. 
    • Gluten-Free Cornmeal. Always use cornmeal that’s labeled gluten-free. Although corn is a gluten-free grain, some cornmeal isn’t considered gluten-free because of cross-contact with wheat during manufacturing 
    • Sugar. Adds sweetness and helps the muffins stay moist. You can decrease the total amount of sugar to ⅓ cup if you prefer less-sweet muffins. Reducing the sugar changes the texture. They’ll bake up a little less cakey and have a more crumbly texture.
    • Salt. Fine (table) salt is the best for baking. 
    • Milk. This recipe works well with dairy or non-dairy milk.
    • Oil or Melted Butter. Makes the muffins moist! Both oil and melted butter work. If you use melted butter, allow it to cool for a few minutes before adding it to the batter.
    • Eggs. Two eggs add structure to the batter.

    How to Make Gluten-Free Corn Muffins.

    This recipe is so simple to put together. Here’s how to make the batter. (Full recipe with amounts and ingredients is listed below!)

    Steps for making gluten-free corn muffins. 1. Whisking the dry ingredients. 2. Adding the milk, eggs, and oil. 3. Stirring the batter. 4. The corn muffin batter in a greased muffin pan.
    1. Whisk together the dry ingredients in a large bowl.
    2. Add the milk, eggs and oil. 
    3. Mix until the batter is smooth. 
    4. Spoon batter into a prepared muffin pan. Bake for about 50 minutes.
    A gluten-free corn muffin split in half, spread with butter, and drizzled with honey.

    How to Store and Freeze Gluten-Free Corn Muffins. 

    Gluten-free corn muffins stay fresh on the counter for about three days. Store them covered or wrapped to prevent them from drying out. 

    How to Freeze.

    • Let the muffins cool completely. You don’t want to freeze hot or warm muffins or they’ll get crumbly when thawed. 
    • Place muffins in a freezer container. Freeze for up to three months. Allow the muffins to thaw at room temperature. 

    How to Reheat.

    Place the muffin on a microwave-safe plate. Heat for 20 seconds on low. Repeat as needed. 

    Gluten-free muffins also taste great grilled or toasted. To grill, split the muffin in half and cook on a buttered skillet or grill pan until lightly brown. Toast the muffin in a toaster oven or air-fryer until warmed through.

    Gluten-free corn muffins cooling on a rack.
    4.8 from 10 votes
    Print

    Gluten-Free Corn Muffins

    These gluten-free corn muffins are cakey and sweet, just like the ones sold at a bakery. To make the recipe, simply mix all the ingredients together in one bowl. Spoon the batter into a muffin pan and bake.

    Prep Time 10 minutes
    Cook Time 20 minutes
    Total Time 30 minutes
    Servings 12 muffins
    Calories 188 kcal

    Ingredients

    • nonstick cooking spray or paper muffin liners
    • 1 cup gluten-free all-purpose flour, see note 1 (5 ounces; 140 grams)
    • 1 cup gluten-free cornmeal, see note 2 (5 ¼ ounces; 148 grams)
    • ⅔ cup granulated sugar (5 ounces; 140 grams)
    • 1 ¼ teaspoons baking powder
    • ¾ teaspoon salt
    • ⅔ cup milk, see note 3 for a dairy-free variation (5 ⅓ ounces; 150 grams)
    • ½ cup vegetable oil or melted and slightly cooled butter (4 ounces; 113 grams)
    • 2 large eggs, whisked (about 4 ounces; 113 grams)

    Instructions

    1. Preheat oven to 350℉. Grease a 12-cup muffin pan with nonstick cooking spray or line with paper liners. 

    2. Whisk together gluten-free flour, cornmeal, sugar, baking powder, and salt in a large bowl. Add milk, oil, and eggs. Whisk until batter is smooth. 

    3. Fill prepared muffin cups about ⅔ full. Bake until muffins are golden brown and a cake tester inserted into the center comes out clean, about 20 minutes. 

    4. Allow muffins to cool in the pan for 5 minutes. Then transfer the muffins to a wire rack to cool completely. Store, wrapped, on the counter for up to three days or freeze, up to three months. 

    Recipe Notes

    Note 1: Gluten-Free Flour. The recipe was tested with Bob’s Red Mill 1:1 Gluten-Free Baking Flour. For the best results, use a gluten-free flour blend that contains xanthan or guar gum. If your blend doesn’t, whisk ½ teaspoon into the recipe along with the other dry ingredients. 

    Note 2: Gluten-Free Cornmeal. If you prefer a soft, cake-like muffin, use finely ground cornmeal. For a muffin with a little crunch, use medium-ground cornmeal. I’d avoid coarsely ground or polenta-style cornmeal. It’s very coarse and will make the muffins unpleasantly crumbly.

    Note 3: Dry-Free Variation. Replace the milk with your favorite dairy-free milk.

    Variations

    • Blueberry Corn Muffins. Stir in 1 cup fresh or frozen blueberries
      1 cup frozen corn kernels.
    • Extra Corny Muffins. Add 1 (8.25) can creamed corn. Be sure to use the eight-ounce can. The 15-ounce size can make the muffins too moist and almost gummy.
    • Cranberry or Cherry Corn Muffins. Add 1 cup dried cranberries or dried cherries suggested.
    • Bacon Corn Muffins. Add ½ cup cooked and crumbled bacon.

    Gluten-Free Vanilla Cake

    Gluten-free vanilla cake on a plate. The cake is frosted with vanilla buttercream.

    This gluten-free vanilla cake is moist, rich, and with a lovely vanilla flavor. It’s a perfect cake for birthdays, weddings, or any celebration. Thanks to the gluten-free flour, butter, and sour cream, it remains soft and fresh for several days. Frost it with vanilla or gluten-free chocolate frosting.

    Gluten-free vanilla cake on a plate. The cake is frosted with vanilla buttercream.

    Vanilla cake is one of those recipes that every gluten-free baker will (most likely) bake. Like my gluten-free chocolate cake recipe, this vanilla cake is a reader’s favorite. Here’s why:

    • The crumb. This cake has a dense, buttery crumb that’s not dry or grainy.
    • The flavor. The vanilla and butter are the stars of the show.
    Ingredients for gluten-free vanilla cake recipe measured on the counter.

    Ingredients.

    • Gluten-Free Flour. I developed the recipe with Bob’s Red Mill 1:1 Gluten-Free Baking Flour. Using a different blend might change the texture of the cake. 
      Baker’s Note: Use a gluten-free flour blend that contains xanthan or guar gum. If your blend doesn’t, whisk ¾ teaspoon of xanthan gum into the flour before using. Don’t replace the gluten-free flour with almond flour. The recipe won’t work. If you’d like to use almond flour, try this recipe for an almond flour yellow cake. It works great. 
    • Butter. Adds flavor, keeps the cake moist, and helps the cake to rise. 
    • Eggs. Three eggs play a key role in this recipe. They help the cake to rise, provide structure, and keep the cake moist. Unfortunately, this cake doesn’t work with egg replacers. 
    • Granulated Sugar. Adds sweetness. Be sure to use granulated sugar. Other sugars, including honey and sugar replacements, don’t work in this recipe.
    • Milk. Gives the cake the flavor and texture. It also helps the batter come together.
    • Sour Cream. Adds flavor and richness. You can replace the sour cream with whole-milk yogurt. Since yogurt contains less fat than sour cream, the texture of the cake will be a little drier. I don’t recommend using low-fat or fat-free sour cream or yogurt in this recipe. 
    • Vanilla Extract. Two teaspoons of vanilla extract give the cake batter a lovely flavor.
    • Baking Powder and Baking Soda. The combination of baking powder and baking soda gives this cake a nice rise and tender texture.
    • Salt. A teaspoon of salt enhances the flavor of this cake.  Without salt, most gluten-free baked goods taste flat. This cake is no expectation. 

    How to Make a Gluten-Free Vanilla Cake.

    Here’s how to make this cake. It’s important to note that the gluten-free flour must be added in two stages. You alternate adding the gluten-free flour with the milk and sour cream. It’s an extra step but it gives you a batter that’s smooth and creamy. This makes a cake with a wonderful crumb.

    Steps for making gluten-free vanilla cake. 1. Whisking the gluten-free flour. 2. Making the batter. 3. Batter spread in cake pans. 4. Gluten-free vanilla cake baked in a pan.

    Prepare the Pan, Oven, and Ingredients.

    • Grease two 8-inch pans with nonstick cooking spray and line with a piece of parchment paper. 
    • Set the oven to 350℉ 
    • Whisk the gluten-free flour, baking powder, baking soda, and salt in a medium bowl.
    • In a separate bowl or large measuring cup, mix the milk, sour cream, and vanilla extract together until smooth.

    Make the Batter.

    • In a large bowl, mix the softened butter and sugar until it’s light and fluffy. If it looks like frosting, you’ve done it right.
    • One by one, add the eggs. Let each egg mix into the sugar-butter mixture before you add the next one. 
    • After you’ve added all the eggs, stop the mixer. Scrape down the bottom and sides of the bowl. 
    • Turn the mixer to low speed. Add half the gluten-free flour mixture. Let it mix until smooth. It will be thick.
    • Add half the milk-sour cream mixture in a slow and steady stream. Mix until creamy.
    • Once it’s smooth, repeat the process. Add the remaining gluten-free flour. Let it mix into the batter. Add the remaining milk-sour cream mixture. Let it mix until a thick batter forms.
    • Stop the mixer. Scrape down the sides and bottom of the bowl. Mix for another 30 seconds or so.

     Fill the Pans.

    Spread the batter into your prepared cake pans. This is a thick batter. Use the back of a spoon or an angled spatula to spread the batter evenly into the pans.

    Bake Until Golden Brown.

    This cake takes about 35 minutes to make. Test for doneness by inserting a cake tester or toothpick into the center of the cake. It should come out clean or with a few moist crumbs clinging to it.

    Tips for a Perfect Gluten-Free Vanilla Cake

    Gluten-free vanilla cake on a white cake stand. The cake is cut, showing the inside crumb and vanilla buttercream filling.

    Use soft butter. You want your butter to be about  65°F. At this temperature, it mixes easily with the sugar.

    Take Your Time. Don’t rush making the batter. Let the butter and sugar mix until it’s light. Then add the gluten-free flour and milk in stages. Your time will be rewarded with a perfect gluten-free vanilla cake.

    Frost only when cool. It’s hard to wait to frost a cake! But if you frost a still-warm cake, the frosting melts right off. Wait until the cake is totally cool before you frost it. 

    Storage Tips

    A slice of gluten-free vanilla cake on a plate.

    To store at room temperature: Cover the cake. Do this by covering it loosely with plastic wrap or use a covered cake dome.

    To freeze unfrosted layers. Allow the cake layers to cool completely before freezing. Wrap each layer tightly with plastic wrap. Freeze for up to three months. Thaw the cake overnight in the refrigerator.

    To freeze a frosted cake. Place the frosted cake in the freezer for two to three hours. You want the frosting to freeze. Once the frosting is set, remove the cake from the freezer. Wrap the cake quickly in plastic wrap. Freeze the cake for up to two months. When you’re ready to enjoy, thaw the cake on the counter or in the refrigerator overnight.

    Note: This recipe was originally shared in May 2022. It was updated to include new photos and step-by-step information in April 2024.

    Gluten-free vanilla cake on a plate. The cake is frosted with vanilla buttercream.
    4.5 from 2 votes
    Print

    Gluten-Free Vanilla Cake

    This gluten-free vanilla cake recipe makes a cake that's moist, rich, and very flavorful It’s a perfect cake for birthdays, weddings, or any celebration. Thanks to the gluten-free flour, butter, and sour cream, it remains soft and fresh for several days.

    Course Dessert
    Cuisine American, Gluten-Free
    Keyword gluten-free cake, vanilla cake
    Prep Time 20 minutes
    Cook Time 35 minutes
    Total Time 55 minutes
    Servings 12 servings

    Ingredients

    For the Gluten-Free Vanilla Cake

    • 2 ½ cups gluten-free flour, Bob’s Red Mill 1:1 Gluten-Free Baking Flour, see note 1 (12 ounces; 340 grams)
    • 2 teaspoons baking powder
    • 1 teaspoon salt
    • ½ teaspoon baking soda
    • 1 cup milk (8 ounces; 226 grams)
    • ½ cup sour cream (4 ounces; 113 grams)
    • 2 teaspoons vanilla extract
    • ¾ cup butter, softened , see note 2 (6 ounces; 170 grams)
    • 1 ¾ cups granulated sugar (12 ¼ ounces; 346 grams)
    • 3 large eggs (6 ounces; 170 grams)

    For the Gluten-Free Vanilla Frosting

    • 1 cup butter, softened (8 ounces; 226 grams)
    • 4 cups confectioners’ sugar (16 ounces; 454 grams)
    • ⅛ teaspoon salt
    • ¼ cup milk or cream, plus more as needed (2 ounces; 56 grams)
    • 2 teaspoons pure vanilla extract

    Instructions

    1. Preheat oven to 350℉. Grease two 8-inch or 9-inch round cake pans. (see note 3 for other pan size options.)

    2. Whisk gluten-free flour, baking powder, salt, and baking soda together in a medium bowl. Set aside. In a small bowl, whisk together milk, sour cream, and vanilla extract until smooth. Set aside.

    3. In a large bowl, mix the butter and sugar on high speed until light and fluffy, about two minutes.

      Reduce the mixer to medium-high. Add the eggs, one at a time. Let each egg mix into the butter-sugar mixture before adding the next one.

      After the last egg mixes into the butter-sugar, stop the mixer. Scrape down the bottom and sides of the bowl.

      Turn the mixer back on to medium-high. Mix until light and fluffy, about two minutes. You want the butter-sugar mixture to look like frosting.

    4. Stop the mixer. Add half the gluten-free flour mixture. Mix on low speed until blended. 

      Add half the milk-sour cream mixture. Increase mixer to medium. Blend until the batter is smooth.

      Again, stop the mixer. Add the remaining flour. Turn the mixer to low and mix until blended.

      Add the remaining milk-sour cream mixture. Increase mixer to medium speed and mix until the batter is smooth, about 45 seconds. 

    5. Divide the batter evenly between the two prepared cake pans. Use a small spatula or the back of a spoon to spread the batter into the pans.

    6. Bake the cake until a cake tester inserted in the middle comes out clean, about 35 minutes.
    7. Remove the cake from the oven. Place the pans on a wire rack. Let them cool in the pan for 10 minutes. Remove the cakes from the pan and let them cool completely directly on the rack.
    8. Make the frosting: In a large bowl, using a hand-held mixer or stand mixer fitted with the paddle attachment beat the butter until smooth, about 30 seconds. Stop the mixer. Add the confectioners’ sugar and salt. Turn the mixer to low. Add the milk and vanilla. Mix on high speed until fluffy, about two minutes.

    9. Place 1 cake layer on a serving plate, frost top of cake, about 1½ cups of frosting. Top with the second layer. Frost side and top of cake with remaining frosting.

    10. Store cake loosely covered. Cake keeps at room temperature for about four days. Freeze cake, frosted or unfrosted, for up to three months. Wrap cake well in plastic wrap before freezing.

    Recipe Notes

    Note 1: Gluten-Free Flour Blend. This recipe was tested with Bob’s Red Mill 1:1 Gluten-Free Flour Blend. Replacing the flour with another brand might change the texture of the cake. Be sure to use a flour blend that contains xanthan gum. If it doesn’t, add 1 teaspoon of xanthan gum to the flour. Whisk to combine. Then use as directed.

    Note 2: Butter Temperature Use softened butter, about 65°F. Cold butter turns into a paste. Warm/greasy butter doesn’t get fluffy.

    Note 3: Pan Options. 

    Sheet Cake Directions
    Lightly grease a 9 x13-inch pan. Bake the cake until golden brown, about 40. Allow the cake to cool in the pan. Frost cake when cool. 

    Cupcake Directions
    Line two 12-cup muffin pans with cupcake liners. Spoon batter into muffin cups, about ⅔ full. Bake until a toothpick inserted into the center of the cake comes out clean, about 20 minutes. Prepare frosting and frost cupcakes when cool.

    Gluten-Free Hot Cross Bun Recipe

    Gluten-free hot cross buns sitting on a baking sheet. The buns are piped with a white icing cross.

    Hot cross buns are a classic Easter treat. This gluten-free recipe makes sweet and tender buns with spices, raisins, and finished with a icing cross. Yeast-based recipe.

    Gluten-free hot cross buns sitting on a baking sheet. The buns are piped with a white icing cross.

    If you love hot cross buns, I’ve got some great news: the gluten-free version is wonderful. It makes buns that are soft and tender buns and filled with raisins and spices. While this is a traditional Easter recipe, you might find yourself baking them all year long.

    Ingredients.

    Here’s a look at the ingredients and what role they play in the recipe. As with any recipe, I suggest measuring all of your ingredients before you start mixing. This is especially important when making gluten-free yeast dough. You don’t want to get halfway into mixing and realize you’re out of an ingredient!

    Gluten-free hot cross bun ingredients on the counter in individual bowls.
    • Yeast. Instant dry yeast works perfectly for these rolls. Be sure to use yeast that’s gluten-free.
    • Milk. Helps bring the dough together, adds flavor, and keeps the dough soft. If you’re dairy-free, use a dairy-free milk. Use a milk that’s about 100 degrees F. 
    • Gluten-Free All Purpose Flour. The recipe was tested with Bob’s Red Mill 1:1 Gluten-Free Baking Flour. Using a different flour might change the results. 
    • Granulated Sugar. Adds a light sweetness. 
    • Baking Powder. Works with the yeast to help the dough rise.
    • Xanthan Gum. Important ingredient. Xanthan gum gives the dough structure. Without the additional xanthan gum, the rolls won’t rise as high and kneading the dough will be messy.
    • Salt. Enhances all the other flavors and helps control yeast growth. Use table salt for this recipe.
    • Cinnamon and Cloves. Adds a subtle spice. 
    • Eggs. Adds richness and flavor. You’ll use two large eggs in the dough and will need one egg white for the egg-wash that’s brushed onto the rolls right before baking.
    • Butter. Melt the butter and let it cool slightly before using. You don’t want to pour hot, melted butter into the dough. If you’re dairy-free, use a dairy-free butter spread.
    • Raisins. You can use use purple or golden raisins, dried currants, or any dried fruit you enjoy.
    • Powdered Sugar. After baking, a powdered sugar cross is piped onto the top of the cooled rolls. 

    How to Make Gluten-Free Hot Cross Buns. 

    The full recipe and directions are included below. But I suggest you read through this–especially if you’ve never worked with a gluten-free yeast dough before.

    Step One: Make the Dough.

    Steps for making gluten-free hot cross bun dough. 1. Yeast and warm milk bubbling. 2. Dough in a mixing bowl. 3. Dough kneaded on the counter. 4. Dough risen in the bowl.
    1. Combine the warm milk and yeast. Let it sit for five minutes. This gives the yeast a chance to dissolve and start working. You’ll notice a few bubbles on top of the milk.
    2. Whisk the dry ingredients together in a large mixing bowl or in the bowl of a stand mixer.

      Baker’s Note: If you don’t have a stand mixer, I suggest you mix this dough with a wooden spoon. It’s too thick for most handheld mixers.

      Add the yeast-milk mixture, the melted butter, and eggs.

      Mix until the dough comes together. It will be very thick but won’t form a ball in the mixing bowl. Add the raisins. Mix until they’re mixed throughout the dough. If you’re making this dough by hand, you can knead the raisins into the dough on the counter.
    3. Dust your counter with gluten-free flour.  Turn the dough out onto your counter. Knead it a few times until it’s smooth. 
    4. Place the dough in a greased bowl. Cover with plastic wrap and let it rise until it looks light and puffy. This takes about an hour in a 70℉ room.

    Step Two: Shape the Rolls.

    After the dough is puffy, it’s time to shape the rolls. They’ll need another rise after shaping. But we’re getting close to baking!

    Steps for shaping gluten-free hot cross buns. 5. Dough cut into 4 pieces. 6. Dough cut into 12 pieces. 7. Buns shaped on and placed on a sheet pan. 8. Brushing egg wash onto dough.
    1. Turn the dough back onto the counter. Knead it once or twice to deflate it. Pat it into a large round.
    2. Cut the dough into 12 pieces even pieces. Use a sharp knife for this step.
    3. Roll the dough into balls and place them onto a parchment-lined baking sheet. Cover the pan with a piece of greased plastic wrap. Let rise until the rolls are puffy. This takes about 45 minutes. 
    4. When the rolls have risen, combine the egg white with milk. Brush this mixture onto the rolls right before baking. It adds a nice shine to the top of the rolls. 
      Baker’s Note: You can cut a cross in each roll with a sharp knife before baking. This gives the rolls a pretty appearance and can help the rolls from splitting as they bake. I didn’t cut a cross into the rolls pictured. So you can see what they look like without being cut.

    Step Three: Bake and Ice.

    Gluten-free hot cross buns. (left) 12 buns on a sheet pan. (right) Closeup of bun.
    1. Bake the rolls until they’re golden brown. If you don’t cut a cross into the buns, they might crack as they bake. This is normal. It gives them a rustic appearance that I really like. And those cracks are perfect for holding butter or jam.
    2. Let the buns cool before adding the icing cross.
    Gluten-free hot cross buns on a baking sheet. A small bowl of icing sits off to the side.
    1. When the rolls are cool, make the icing. It’s important that the rolls are fully cooled before icing. If they’re warm—even just a little warm—the icing will melt and run off. 
    Gluten-free hot cross buns on a sheet pan.

    Tips for Making the Best Gluten-Free Hot Cross Buns.

    1. Adjust the consistency of the dough. If it seems too sticky, add a little more gluten-free flour. If it seems dry–where you see flour at the bottom of the bowl or the dough doesn’t come together–add milk, one tablespoon at a time. 
    2. Let the dough rise in a greased bowl. It’s important to transfer the dough from your mixing bowl to a greased bowl. (If you don’t have another bowl, no problem. Just wash out your mixing bowl and grease it.) The dough will stick to a non-greased bowl and won’t rise as high.
    3. This dough requires two rises. The first rise enhances the flavor of the finished buns. So you don’t want to skip it. If you’d like, you can mix the dough the night before you plan on baking and allow it to rise overnight in the refrigerator. The next morning, stir and shape as directed. The second rise might take a little longer since the dough will be cool from the refrigerator. 
    4. Don’t rush the rise. If your kitchen is cool, the dough might take a little longer than an hour to rise. Look for the dough to feel light and puffy. 
    5. Knead gently. When you knead this dough, use gentle pressure. If you press too hard, it can stick to the counter, instead of forming a ball.
    6. Preheat the oven early. Once the buns have almost doubled in size, preheat the oven. Don’t wait for the buns to fully double in size to preheat the oven or the rolls can rise too much and then collapse after baking.
    Gluten-free hot cross bun split in half on a plate.

    Storing and Freezing.

    These last about two days on the counter. Like all gluten-free bread, this largely depends on your location. If you live in a cold, dry area, the hot cross buns will stale faster than if you live somewhere warm and humid.

    Store the cooled hot cross buns wrapped on the counter. If you aren’t going to finish them before they’ll stale, freeze them for up to two months.

    To freeze, let the buns cool. Place them into a freezer container. If you need to stack them, place a piece of parchment paper between the layers. 

    Note: This recipe was originally shared in 2019. In 2024, it was updated. The blog posts now includes step-by-step directions and photos. The recipe has been updated to use a gluten-free flour blend and now makes a kneadable dough.

    Gluten-free hot cross buns sitting on a baking sheet. The buns are piped with a white icing cross.
    4.5 from 2 votes
    Print

    Gluten-Free Hot Cross Buns

    Hot cross buns are a classic Easter treat. This easy gluten-free recipe makes sweet and tender buns with spices, raisins, and finished with an icing cross. (Yeast-based recipe.)

    Prep Time 15 minutes
    Cook Time 15 minutes
    Rising Time 1 hour 45 minutes
    Total Time 2 hours 15 minutes
    Servings 12 buns

    Ingredients

    For the Dough

    • 1 cup warm milk, about 105℉, plus more as needed (8 ounces; 226 grams)
    • 2 ¼ teaspoons (1 packet) instant dry yeast
    • 4 cups Bob's Red Mill 1:1 Gluten-Free Baking Flour, see note 1 (17 ounces; 480 grams)
    • ½ cup granulated sugar (3 ¾ ounces; 105 grams)
    • 2 teaspoons baking powder
    • 1 teaspoon xanthan gum, see note 2
    • 1 teaspoon salt
    • 1 teaspoon cinnamon
    • ¼ teaspoon ground cloves
    • 2 large eggs
    • 6 tablespoons butter, melted and cooled, see note 3 (3 ounces; 85 grams)
    • ¾ cup raisins, see note 4 (about 4 ounces; 113 grams)

    For the Egg Wash

    • 1 egg white
    • 1 tablespoon milk

    For the Icing Crosses

    • 1 ¼ cups powdered sugar (5 ounces; 140 grams)
    • 1 tablespoon milk, plus more as needed
    • 1 teaspoon vanilla extract

    Instructions

    1. See notes included below before making this recipe.

    2. Make the Dough: Combine the warm milk and yeast in a small bowl. Stir to dissolve. Allow to stand for about five minutes.

    3. In a large bowl or the bowl of a stand mixer, whisk together the gluten-free flour, sugar, baking powder, xanthan gum, salt, cinnamon, and cloves.

    4. Add the milk-yeast mixture, eggs, and melted butter. Mix on medium-low speed until thick and smooth, about three minutes.

      Note: If you don't have a stand mixer, mix the dough with a wooden spoon. This dough is very thick and might be too much for most handheld electric mixers.

    5. Stop the mixer. Add the raisins. Mix until raisins are mixed throughout the dough.

      Dust your counter with gluten-free flour. Turn the dough onto the counter and knead it a few times, until it's smooth. If the dough seems dry, add a little more milk, one tablespoon at a time. If it's very sticky, add a little more gluten-free flour until you can knead it.

      Transfer dough to a large greased bowl. Cover the bowl with a piece of greased plastic wrap.

    6. Rise: Allow dough to rise in a warm place until it looks light and puffy, about one hour in a 70℉ room. Or refrigerate overnight.

    7. Shape: Turn the dough out onto a gluten-free floured counter.

      Knead it a few times to deflate. Pat the dough into a large round. Cut into 12 pieces.

      Roll each piece into a ball. Line a baking sheet with parchment paper. Place the buns on the baking sheet. Cover with greased plastic wrap. Allow buns to rise until light, about 45 minutes.

    8. When buns have almost doubled in size, preheat oven to 375°. (If you wait until they double in size to preheat the oven, the buns can over-rise and sink during baking.)

    9. Remove plastic wrap from the pan. Whisk together the egg white and milk. Brush each bun with the egg wash.

      (optional) Using a sharp knife, cut a cross on top of each bun.

    10. Bake for 20 minutes or until golden brown.

    11. Once the buns are completely cool, combine the powdered sugar, milk, and vanilla extract in a small bowl. Stir until smooth. If icing is too thick, add more milk, one teaspoon at a time. Transfer icing to a pastry bag with a round tip or a disposable plastic bag with a small hole cut in the corner.

      Pipe a cross on top of each bun. 

    12. Store buns covered on the counter for up to two days.

      Freeze cooled buns for up to three months. To freeze gluten-free hot cross buns, allow them to cool completely. Place the buns in a freezer container or bag. If you need to layer the buns, place a piece of parchment paper between the layers.

      Freeze for up to three months. Thaw the buns at room temperature overnight before serving.

    Recipe Notes

    Baker’s Note: Step by step directions with full instructions are included in the blog post. If this is your first time making this recipe or you’re new to working with gluten-free yeast dough, I suggest reading it before making the recipe. It includes a lot of helpful tips for making these buns. Have fun!

    Note 1: This recipe was tested with Bob’s Red Mill 1:1 Gluten-Free Baking Flour. Using another flour might cause the recipe not to work as described.

    Note 2: The xanthan gum is an important ingredients, even though the flour blend already contains it. Without the additional xanthan gum, the dough is too sticky to knead and won’t rise as high. 

    Note 3: Cool the butter after melting for a minute or so. You don’t want to pour hot, melted butter into the dough. 

    Note 4: If your raisins are hard, soak them in warm water for 15 minutes before using. Then drain, pat dry, and use as directed. 

    How to Make the Best Gluten-Free Biscuits

    Baked gluten-free biscuits on a baking sheet.

    This gluten-free biscuit recipe makes light and tender biscuits! The addition of yogurt makes a dough that’s easy to work with and gives the biscuits a great flavor. Dairy-free and egg-free variations included.

    Baked gluten-free biscuits on a baking sheet.

    Terrific biscuits without gluten are possible. This recipe makes light and fluffy biscuits that you can shape with a cutter or drop from a spoon. Enjoy them with butter, jam, or served as part of biscuits and gravy.

    Why This Recipe Works

    • A gluten-free flour blend makes the biscuits tender and moist.
    • Cold butter helps the biscuits rise.
    • Yogurt provides a tangy flavor and makes a thick, easy-to-work-with dough.
    • Resting the dough lets the gluten-free absorb the liquids. This makes for soft and tender biscuits.

    Ingredients

    Here’s what you need to make a batch of these biscuits and what the ingredients do in the recipe. The list is pretty simple! You might already have them on hand.

    Gluten-free biscuit recipe ingredients on a counter. The ingredients are labeled on the image.
    • Gluten-Free Flour. I tested this recipe with Bob’s Red Mill Gluten-Free Baking Flour. Since gluten-free flour blends vary by brand, each blend produces different results. Use a blend that contains xanthan gum. If it doesn’t, add one teaspoon xanthan gum to the flour blend. Without it, the biscuits spread.
    • Butter. You need cold butter for this recipe. It’s what gives the biscuits their tender texture. You want the butter to feel cool to the touch but somewhat pliable. Cold, hard butter is difficult to work into the gluten-free flour.
    • Yogurt. Plain yogurt brings the dough together and brings a tangy flavor. Both Greek yogurt and plain yogurt work. For the best flavor, use a full-fat (whole milk) yogurt.
    • Egg. One egg adds flavor and richness. (This recipe can be made egg-free. See note below.)
    • Baking Powder. Gives the biscuits a beautiful rise.
    • Sugar. A little sugar encourages browning and keeps the biscuits moist.
    • Salt. Enhances the flavor. Use table salt, not flaky or Kosher salt for this recipe. Table salt mixes easily and evenly into the dough.

    Dairy and Egg-Free Variations

    This recipe is pretty flexible! If you need to replace the dairy or egg, here’s what you do and what to expect.

    Dairy-Free
    Replace the butter and yogurt with a dairy-free alternative. Be sure to use a dairy-free butter that’s suitable for baking. Dairy and gluten-free biscuits don’t brown as dark as those made with dairy. They’ll remain light brown when done.

    Egg-Free
    Omit the egg and increase the yogurt by two tablespoons. If the dough seems dry after mixing, add an additional tablespoon of yogurt. Egg and gluten-free biscuits are a little denser than those made with an egg.

    How to Make Gluten-Free Biscuits. Step-by-Step.

    Let’s take a look at how to make gluten-free biscuits. The recipe isn’t hard but here are the steps you want to pay close attention to when mixing the dough. The full recipe with ingredients and directions is shared below.

    The first four steps for mixing gluten-free biscuits. 1. Whisking the dry ingredients. 2. Adding cold cubed butter. 3. Butter mixed into the dry ingredients. 4. Yogurt and an egg sitting on top of the gluten-free dry ingredients.
    1. Whisk together the dry ingredients in a large bowl. 
    2. Add the cold butter. Cut it into cubes or grate it before adding it to the dry ingredients. 
    3. Mix in the cold butter. You can do this with your fingers or a pastry cutter. Mix until no large pieces of butter remain. 
    4. Add the yogurt and egg.
    Steps five and six for mixing gluten-free biscuit dough. 5. The crumbly dough in a glass bowl. 6. The dough kneaded until smooth and patted into a round.
    1. Stir until a dough begins to form. If the ingredients look dry, add a little more yogurt. Cover the dough and let it rest (sit in the bowl) for about 20 minutes. Resting the dough allows the gluten-free flour to absorb the liquid. This makes the dough easier to cut and gives it a nice soft texture when baked. 
    2. Dust your counter lightly with gluten-free flour. Turn the dough out onto the counter. and knead until smooth. If it starts to stick to your hands, dust your hands with gluten-free flour. Then pat the dough into a round. You want the dough to be about 1-inch thick.
    Gluten-free biscuit dough with four rounds cut out. A small 2-inch cutter sits off to the lower right side.
    1. Cut the dough into rounds with a lightly floured 2-inch round biscuit cutter. Re-roll the remaining dough and cut into rounds.  
    On left, gluten-free biscuit dough cut into a round being held. On right, baked gluten-free biscuit being held. The biscuit is golden brown and light.
    1. Place the biscuits on a parchment-lined baking sheet. It’s important not to press the dough down after cutting it. Simply cut the dough and pace the rounds onto the baking sheet. If you see layers in the biscuits, that’s great.
    2. Bake the biscuits until they’re golden brown. A pan takes about 15 minutes to bake. 
    Three baked gluten-free biscuits in a stack.

    Tips for the Best Gluten-Free Biscuits.

    Want perfect gluten-free biscuits? Follow these tips!

    • Use cold butter. As the biscuits bake, the water in the butter evaporates. This creates steam which helps lighten the biscuits. If the butter is warm, the flour absorbs it. This makes the biscuits dense and heavy.
    • Check the consistency of the dough. After mixing, feel the dough. If it seems dry, add a little more yogurt. If it seems too wet and sticky, add a little more gluten-free flour. 
    • Let the dough rest. Don’t skip resting the dough. The 20 minute rest makes for wonderfully light biscuits.
    • Cut the dough with a sharp cutter. If your cutter is dull, the dough presses together and won’t rise as nicely. 
    A gluten-free biscuit split in half topped with a pat of butter.

    How to Store and Freeze

    Biscuits taste best the day they are made. If you have biscuits left over, cover and store at room temperature. Warm them slightly before eating, either in a toaster oven, air fryer, or microwave. 

    Freezer Tips

    Bake the biscuits as directed. Let them cool on a wire rack and then place them in a freezer container. Freeze the biscuits for up to three months. When ready to eat, remove the biscuits from the freezer and thaw at room temperature. 

    Recipe originally shared March 2020. Last updated to include new photos and information March 2024.

    Baked gluten-free biscuits on a baking sheet.
    5 from 12 votes
    Print

    Gluten-Free Biscuit Recipe

    For the best gluten-free biscuits, follow these simple steps: use cold butter, let the dough rest, and bake the biscuits in a hot oven.

    Course bread
    Cuisine American
    Keyword biscuits, gluten-free biscuits
    Prep Time 15 minutes
    Cook Time 15 minutes
    Rest Time 20 minutes
    Total Time 50 minutes
    Servings 12 biscuits

    Ingredients

    • 2 ¼ cups gluten-free baking flour (11 ¼ ounces; 320 grams)
    • 2 tablespoons granulated sugar (1 ounce; 28 grams)
    • 1 tablespoon baking powder
    • ½ teaspoon salt
    • 6 tablespoons cold butter, cut into small pieces (3 ounces; 85 grams)
    • 1 cup plain yogurt, Greek or traditional, plus additional as needed (about 8 ounces; 226 grams)
    • 1 large egg

    Instructions

    1. Whisk gluten-free flour, sugar, baking powder, and salt in a large bowl.

    2. Mix the cold butter into the dry ingredients with your fingers or a pastry cutter until the butter is the size of peas.

    3. Add the yogurt and egg. Mix until absorbed. If dry gluten-free flour remains in the bottom of the bowl, add more yogurt, one tablespoon at a time. The dough should easily hold together. It shouldn't be dry or too soft and squishy.

      Cover the bowl and let the dough rest for 20 minutes.

    4. Adjust oven rack to middle position and heat oven to 400°F. Line a rimmed baking sheet with parchment paper.

    5. Dust your countertop with gluten-free flour. Turn dough out onto the counter and knead until smooth. Pat the dough into a round, about 1-inch thick. Cut into rounds using a 2-inch round biscuit cutter.

      Place dough onto the prepared baking sheet.

      Gather the remaining dough together, kneading and patting it into a round and cut out additional biscuits. Repeat. You should have 12 biscuits at the end.

    6. Bake until the biscuits are golden brown, about 15 minutes.

    7. Allow the biscuits to cool for 10 minutes before serving.

    8. Store leftover biscuits wrapped on the counter for up to two days. Or cool and freeze in a freezer container for up to three months.

    Recipe Notes

    Gluten-free flour. This recipe was tested with Bob’s Red Mill 1:1 Gluten-Free Baking Flour. Using a different flour might change the results. 

    Dairy-free. Replace the butter with an equal amount of cold dairy-free butter or shortening and the yogurt with a plain dairy-free yogurt. Some dairy-free yogurts contain sugar and starches which can change the texture of the final biscuits.

    Egg-free. Leave the egg out of the recipe and replace it with two tablespoons of additional yogurt.


    Gluten-Free Banana Cake Recipe

    Slice of gluten-free banana cake frosted with cream cheese frosting.

    This easy gluten-free banana cake recipe makes a cake that’s moist and tender. It’s a great way to use overripe bananas. Made with gluten-free flour, brown sugar, and melted butter. (Dairy-free variation included.)

    Slice of gluten-free banana cake frosted with cream cheese frosting.

    Let’s talk about gluten-free banana cake. The first thing you need to know is that it’s not banana bread. Think of it more like a buttery yellow cake with a lovely banana flavor. It’s moist, flavorful, and best of all, really easy to make. 

    Ingredients and Substitutions

    Here’s what you’ll need to make this gluten-free banana cake. The most important ingredient are the overripe bananas. They give the cake a wonderful flavor! The full recipe with amounts is at the bottom of the post. This explains what role the ingredients play in the recipe—and substitutions for dairy.

    Ingredients for gluten-free banana cake on the counter.
    • Ripe Bananas. Use bananas that are deep brown or very spotted.The riper the banana, the more flavor in the cake.
    • Gluten-Free Flour. I tested the recipe with Bob’s Red Mill’s 1:1 Gluten-Free Baking Flour. If you use a different blend, that doesn’t contain xanthan or guar gum, whisk a ½ teaspoon into the flour before using it.
    • Granulated and Brown Sugar. A combination of granulated and brown sugar sweetens the cake and keeps it light. Blending the two adds the perfect amount of flavor from the brown sugar and gives you a nice light texture. 
    • Butter. Butter brings a nice richness and flavor to the cake. After melting the butter, cool it for a minute or two before adding it to the batter. This prevents the heat from cooking the eggs. For a dairy-free substitute, use dairy-free butter or neutral oil, like canola or soy
    • Eggs. Three eggs give this cake lift and flavor. Use room-temperature eggs for the best results. I haven’t tested the recipe with an egg replacer. So I can’t say if one works. 
    • Milk. A little milk helps make the batter smooth. A dairy-free milk can be substituted for the milk. Full-fat coconut milk is not recommended. It’s too rich for this recipe.
    • Vanilla Extract. Two teaspoons of vanilla extract adds a nice flavor.
    • Baking Powder. The baking powder helps the cake to rise and gives it a nice “cakey” texture.
    • Salt. Salt enhances the flavors of the other ingredients. Use table (fine) salt. It blends easily into thebatter.

    Variations

    This cake tastes great as-is. It’s also wonderful with nuts, chocolate chips, or dried fruit. Here are some suggestions.

    • Nuts. Use chopped walnuts.
    • Chocolate Chips. Dark, milk, or white chocolate chips work.
    • Raisins or Dried Cranberries. If your raisins or dried cranberries are dry, cover them with warm water and soak for 15 minutes. Then drain and use in the recipe.
    • Spice:.Add two teaspoons of pie spice or ground cinnamon to the batter.

    How to Make a Gluten-Free Banana Cake

    After you gather all the ingredients, this is how you make the cake. You’ll need two mixing bowls for this recipe.

    Four images. 1. Mixing ripe bananas. 2. Mashed bananas, sugar, and brown sugar in a bowl. 3. Banana sugar mixture in a bowl. 4. Adding gluten-free flour to the banana-sugar mixture.
    1. Prep Your Oven and Pan. Preheat your oven to 350℉ and grease a 9×13-inch pan. This way, both the pan and oven are ready after you mix the batter.
    2. Mix the Dry Ingredients. Combine the gluten-free flour, baking powder, and salt.
    3. Mash the Bananas. In a large bowl, mash the bananas. Once they’re almost smooth, add the granulated sugar and brown sugar. Mix until the sugars are combined. Then add the melted butter and eggs. Stir until smooth.
    4. Add the Dry Ingredients. Add the whisked dry ingredients to the mashed banana mixture. Stir until the gluten-free flour is combined.
    Gluten-free banana cake batter in a glass bowl.
    1. Make the Batter. Add the milk and vanilla. Blend until the batter is combined and you no longer see any dry flour in the bowl. If you’re adding chocolate chips, nuts, or dried fruit, stir them in now.
    Side-by-side images. On left: gluten-free banana batter in pan. On right: baked cake.
    1. Spread the batter into the pan. Since the batter is thick, use the back of a spoon or a small spatula to get the batter into the corners of the pan.
    2. Bake. This cake takes about 30 minutes to bake. It’s done when a cake tester inserted into the center of the cake comes out clean.
    3. Cool and Frost. You can let this cake cool right in the pan. If you prefer removing it from the pan, let the cake cool for about 10 minutes before transferring it to a wire rack. Once the cake is completely cool, frost it. If you frost a warm cake, the frosting melts and runs off the cake.

    Storage Tips

    Store the cake in the refrigerator for up to five days.

    Freeze the cake for up to three months. You can frost it before or after freezing. The cake freezes great frosted. Be sure to let the cake cool before freezing.

    Recipe Questions and Answers

    Can I use a different gluten-free flour blend?

    All gluten-free flour blends behave differently, which can be frustrating. The recipe was tested with Bob’s Red Mill 1:1 Gluten-Free Baking Flour. Be sure to use a blend that contains xanthan or guar gum.

    Can I use frozen bananas?

    If you freeze your overripe bananas, this recipe is a perfect way to use them. When you’re ready to bake, thaw the bananas at room temperature and drain any excess liquid. Then follow the recipe as written.

    Can I use this recipe for cupcakes or muffins?

    To make gluten-free banana cupcakes, spoon the batter into a paper-lined muffin cup and bake until set, about 25 minutes. You should get about 24 cupcakes.

    If you want to make muffins, I suggest following my recipe for gluten-free banana muffins.

    I want to make a layer cake. Can I use this recipe?

    Yes! Bake the batter in two 8-inch greased round cake pans.

    Recipe originally shared in 2021. Last updated to include new photos and information March 2024

    Slice of gluten-free banana cake frosted with cream cheese frosting.
    4.86 from 7 votes
    Print

    Gluten-Free Banana Cake

    Easy gluten-free banana cake. Made with gluten-free flour, brown sugar, and melted butter, the cake is moist and tender. (Dairy-free variation included.)

    Prep Time 15 minutes
    Cook Time 30 minutes
    Total Time 40 minutes
    Servings 15 slices

    Ingredients

    Gluten-Free Banana Cake

    • 3 cups gluten-free flour (Bob's Red Mill 1:1 Gluten-Free Baking Flour, suggested) (14 ounces / 420 grams)
    • 2 ½ teaspoons baking powder
    • ½ teaspoon salt
    • 3 large very ripe bananas ( about 15 ounces/ 425 grams)
    • 1 cup granulated sugar (7 ½ ounces / 212 grams)
    • ¾ cup butter, melted (see note for dairy-free option) (6 ounces / 170 grams)
    • ½ cup packed brown sugar (3 ½ ounces/ 100 grams)
    • 3 large eggs (about 6 ounces / 170 grams out of shell)
    • ⅔ cup milk, regular or dairy-free (5 ½ ounces / 155 grams)
    • 2 teaspoons vanilla extract

    Cream Cheese Frosting

    • 8 ounces cream cheese, softened (226 grams)
    • ½ cup butter, softened (4 ounces / 113 grams)
    • 4 cups powdered sugar (16 ounces / 453 grams)
    • 1 teaspoon vanilla extract

    Instructions

    1. Preheat oven to 350℉. Grease a 9×13-inch cake pan with nonstick cooking spray.

    2. Whisk together gluten-free flour, baking powder, and salt in a small bowl. Set aside.
    3. Mash bananas in a large bowl until almost smooth. Use an electric mixer or fork to do this. Add the granulated and brown sugars. Mix until combined. Add the melted butter and eggs and mix until smooth. Mixture will be thin.

    4. Stop the mixer and add the whisked dry ingredients. Mix until combined. Add the milk and vanilla extract. Mix until a thick batter forms.

      Spread batter into the prepared pan.

    5. Bake until golden brown, about 30 minutes. A cake tester inserted into the center of the cake should come out clean.

    6. Cool cake in the pan. Once cake is cool frost with cream cheese frosting (recipe below) or your favorite gluten-free frosting.

    7. Store cake in the refrigerator for up to five days. Freeze the cooled and frosted cake for up to three months.

    For the Cream Cheese Frosting

    1. Mix together cream cheese and butter until light and fluffy. Add powdered sugar and vanilla extract. Mix until smooth. Spread on cooled cake.

    Recipe Notes

    Notes

    • Gluten-Free Flour Blend. The recipe was tested using Bob’s Red Mill’s 1:1 Gluten-Free Baking Flour. Using a different flour blend, might change the results. Use a blend that contains xanthan gum for best results. If your blend doesn’t contain xanthan gum, add ½ teaspoon before using. 
    • Dairy-Free. Replace the melted butter with an equal amount of either a dairy-free butter replacement or oil. And replace the milk with your favorite dairy-free milk.
    • Nuts. Stir ¾ cup chopped walnuts into the batter.
    • Chocolate Chips. Stir one cup of chocolate chips into the batter.
    • Spice. If you like cinnamon in your banana cake, stir 2 teaspoons ground cinnamon or pie spice into the batter along with the gluten-free flour.

    Gluten-Free Blondies

    Three gluten-free blondies in a stack.

    This gluten-free blondies recipe is made with gluten-free flour, brown sugar, butter, and vanilla. Simply make the batter, spread it into a pan, and bake. And since it’s so easy to make, it’s a great recipe for beginner gluten-free bakers.

    Gluten-free blondies cut into squares. One is stacked on top of the another to show the chocolate chips.

    What are Blondies Anyway?

    Most folks think of blondies as a “vanilla brownie” or a “blonde brownie”. Since it’s impossible for me to think about brownies without chocolate, that definition never worked for me. Instead, I think of them as a cross between a chocolate chip cookie bar and brown sugar fudge. 

    If you want something a little less rich and buttery, try my gluten-free chocolate chip bars. The flavors are similar but the texture is more cake-like.

    Gluten-Free Blondies: Ingredients and Substitutions. 

    Let’s take a look at what you’ll need to make a pan of these blondies. The full recipe with amounts is listed below.

    Gluten-free blondies ingredients on counter.
    • Gluten-Free Flour. The soft and delicate texture for these bars comes from a gluten-free flour blend. I tested the recipe with Bob’s Red Mill’s 1:1 Gluten-Free Baking flour. It contains xanthan gum. If your flour blend doesn’t add ¼ teaspoon. 
    • Brown Sugar. For a caramel-like flavor, use light brown sugar. For pronounced molasses flavor, use dark brown sugar. (Blondies pictured were made with light brown sugar.)
    • Butter. Melted butter ensures the blondes stay thick and dense. It also adds a lot of flavor.
    • Eggs. Provide structure, richness, and flavor. Use large eggs for the best results. 
    • Vanilla Extract. Three things make blondies taste like blondies: brown sugar, butter, and vanilla. While you can omit vanilla extract in many baking recipes, I suggest including it in these blondies for the best flavor. 
    • Baking Powder. A teaspoon of baking powder gives the bars a little lift without making them too cakey. 
    • Salt. Since blondies are sweet, salt helps balance the flavor. For the batter, use table (fine) salt. If you want to sprinkle salt over the top, use Kosher or a flaky-style salt. 
    • Nuts. (optional) Some folks wouldn’t dream of making blondies without nuts. And some folks wouldn’t dream of including them. I’ll leave it up to you! Add up to one cup of toasted, chopped pecans or walnuts.
    • Chocolate Chips. (optional) Add up to one cup of dark, milk, or white chocolate chips. If you want to use butterscotch chips, those are also great in blondies. As always make sure any baking chip you use is gluten-free.

    Dairy-Free Ingredient Swaps.

    • Butter. Replace the butter with your favorite dairy-free butter spread. I don’t recommend shortening or oil because they don’t add flavor to the bars.
    • Chocolate Chips. Use dairy-free chocolate chips. As with all ingredients, check the label to ensure the chips are gluten-free and dairy-free.

    How to Make Perfect Gluten-Free Blondies.

    This is a simple, one-bowl recipe—making it great for beginner gluten-free bakers.

    Four images. 1. Adding melted butter to brown sugar. 2. The butter and brown sugar whisked. 3. Adding eggs and vanilla. 4. The brown sugar-egg mixture blended until smooth.

    Mix the brown sugar with the melted butter and eggs. First, combine the brown sugar and melted butter. Whisk until it’s smooth. Then add the eggs and vanilla extract. Blend until it’s creamy and looks like a thick caramel sauce. 

    On left: stirring gluten-free flour into butter and egg mixture for gluten-free blondies. On right: adding chocolate chips to gluten-free blondie batter.

    Add the gluten-free flour. Stir in the gluten-free flour, baking powder, and salt. You can mix the batter with a wooden spoon, sturdy flexible spatula, or an electric mixer. Whichever you prefer.

    Stir in the chocolate chips and nuts. If you’re adding anything to these blondies, stir them in now.

    On left: gluten-free blondie batter in pan. On right: baked gluten-free blondies cooling in the pan.

    Spread into a pan. Line a 8×8-inch square pan with parchment paper. To keep them from sticking, lightly spray the pan with nonstick cooking spray.

    Spread the batter into the pan. 

    Cool the bars in the pan. Let these bars cool right in the pan. Then cut into squares.

    How to Store and Freeze.

    Three gluten-free blondies in a stack.

    Gluten-free blondies keep at room temperature for about three days. To store them, let them cool. Then place them in an airtight container or place them on a plate and cover with plastic wrap. 

    To freeze them, bake as directed. Let the blondies cool and cut into squares. Place them into a freezer container. If you need to layer the bars, place a piece of waxed paper or parchment paper between the layers. Freeze for up to two months. Thaw the blondies at room temperature.

    The recipe was originally posted in May 2018. Photos and information updated March 2024.

    Gluten-free blondies cut into squares. One is stacked on top of the another to show the chocolate chips.
    4.82 from 11 votes
    Print

    Gluten-Free Blondies

    One-bowl gluten-free blondie recipe. These are buttery, soft, and irresistible thanks to the brown sugar and butter.

    Course Dessert
    Prep Time 10 minutes
    Cook Time 35 minutes
    Total Time 45 minutes
    Servings 18 bars
    Calories 200 kcal

    Ingredients

    • 1 ½ sticks butter, melted (6 ounces; 170 grams)
    • 1 ¼ cups packed brown sugar, light or dark, see note (9 ounces; 255 grams)
    • 2 large eggs
    • 1 teaspoon vanilla extract
    • 1 ½ cups gluten-free flour. (Bob's Red Mill 1:1 Gluten-free Baking Flour recommended.) (7½ ounces; 212 grams)
    • 1 teaspoon baking powder
    • ½ teaspoon salt
    • 1 cup chocolate chips, optional (dark, milk, or white) (6 ounces; 170 grams)
    • 1 cup chopped pecans or walnuts, optional (3½ ounces; 100 grams)

    Instructions

    1. Preheat oven to 350°F. Line a 8×8-inch square pan with parchment paper. Let the parchment overhang the pan by about two inches. Lightly grease the pan with nonstick cooking spray.

    2. Stir together the brown sugar and melted butter until smooth in a large bowl. Add the eggs and vanilla extract. Mix until creamy and smooth.

    3. Add gluten-free flour, baking powder, and salt. Mix until the batter is thick and smooth. If using chocolate chips and/or nuts, stir them in now.

      Spread the batter into the prepared pan.

    4. Bake until the bars are golden brown and the top is shiny and slightly cracked, about 30 minutes.

    5. Let the blondies cool in the pan. They might sink in the middle as they cool.

      When cool, lift the bars out of the pan with the overhanging parchment paper. Cut into squares with a sharp knife. When cut, the bars might look underbaked. That's normal. They are very moist and buttery.

    6. Store in an airtight container at room temperature for up to four days. Freeze cooled bars in a freezer container for up to two months. If you need to stack the bars, place a piece of parchmene paper or waxed paper between the layers.

    Recipe Notes

    Gluten-Free Flour. Use a gluten-free flour blend that contains xanthan gum. If yours doesn’t whisk ¼ teaspoon into the flour before using.

    Brown Sugar. The terrific butterscotch flavor comes from brown sugar. For a caramel-like flavor, use light brown sugar. For pronounced molasses flour, use dark brown sugar. 

    Butter. Cool the butter slightly before adding it to the brown sugar. 

    Nuts. Toast nuts on a baking sheet in a 350°F oven for about 10 minutes. Remove nuts from the oven when they are golden brown and aromatic. Allow nuts to cool before chopping. 

    Dairy-Free Variation. For dairy-free bars, use a dairy-free butter and dairy-free chocolate chips. 

    How to Make Gluten-Free Chocolate Chip Cookies

    Gluten-Free chocolate chip cookies on a cooling rack.

    This gluten-free chocolate chip cookie recipe makes buttery and rich cookies. Thanks to the melted butter, they’re super easy and quick to make. It’s really the best chocolate chip cookie recipe! Dairy-free optional included.

    Gluten-Free chocolate chip cookies on a cooling rack.

    Why You’ll Love This Gluten-Free Chocolate Chip Cookie Recipe.

    Just like my gluten-free oatmeal cookie recipe, this is a simple cookie recipe to make. And there’s so much to love about it!

    • Beginner-friendly. You just mix the ingredients into a dough, scoop into cookies, and bake. It’s a perfect recipe for beginners. 
    • Flavorful. Brown sugar and vanilla extract give the cookies a deep flavor. 
    • Freezer-friendly! These cookies freeze beautifully. Which is nice when you crave a gluten-free cookie but don’t feel like baking. Just grab one from the freezer.

    Ingredients You Need

    Ingredients for gluten-free chocolate chip cookies on the counter.

    Here’s what you need to make these cookies along with what each ingredient does in the recipe. The full recipe, with amounts and step-by-step directions, is at the bottom of the post. Enjoy! 

    • Gluten-Free Flour. I tested this recipe with Bob’s Red Mill 1:1 Gluten-Free Flour blend. Using a different flour might change the results. 
    • Brown Sugar. For a classic chocolate chip cookie flavor, use light brown sugar. If you love molasses, use dark brown sugar. 
    • Granulated Sugar. Adds sweetness and makes the cookies crisp on the edges. 
    • Butter. Melted butter makes these cookies quick to make. Use salted or unsalted butter. 
    • Eggs. Two eggs bring the dough together and give the cookies a little lift. 
    • Chocolate Chips. Traditional “toll house”-style chocolate chip cookies use semi-sweet chocolate chips but you can use whatever you love. 
    • Baking Soda. A little baking soda helps the cookies to rise and enhances browning. 
    • Salt. Enhances all the other flavors. Use table salt. It mixes easily into the dough.

    Dairy-Free Variation

    Want to make these dairy-free? These are the swaps you need to make.

    • Replace the butter with a dairy-free butter-style spread. You can also use melted coconut oil. Gluten-free chocolate chip cookies made with coconut oil tend to be a little crisper than those made with butter.
    • Use dairy-free chocolate chips. Always check the ingredient label to ensure the chocolate chips are both gluten-free and dairy-free.

    How to Make the Best Gluten-Free Chocolate Chip Cookies.

    These cookies are easy to make. You simply mix the dough. Add your favorite chocolate chips and bake!

    Four steps for mixing gluten-free chocolate chip cookie dough. 1. Mixing the butter, sugar, and eggs. 2. The dough. 3. Adding the chocolate chips. 4. Scooping the dough.
    1. Combine the melted butter and sugars. Do this in a large mixing bowl. Mix until smooth. You can use a handheld or electric mixer for this. Next, add the eggs and vanilla extract. Blend until thick and creamy. 
    2. Add the dry ingredients. Stir in the gluten-free flour, baking soda and salt. The dough will be thick. 
    3. Stir in the chocolate chips. Add your chocolate chips and, if you’re using them, nuts. Stir until the chocolate chips are mixed throughout the dough. 
    4. Scoop the cookies. Drop the dough onto a parchment-lined baking sheet. You want about a tablespoon of dough per cookie. I like to use a cookie scoop for this step. It makes perfect cookies every time!
    5. Bake. Bake the cookies in a preheated oven until the edges are set. A pan takes about 12 minutes. 
    6. Cool. Let the cookies cool on the pan for about 5 minutes and then transfer them to a wire rack to cool completely. 
    Gluten-free chocolate chip cookie dough on a pan.

    Tips for Success.

    • Let the melted butter cool a little. After melting the butter, let it cool for a few minutes before you use it. This way it won’t accidentally cook the egg. 
    • Use your favorite chocolate. For the very best gluten-free chocolate chip cookie, use a chocolate you love. This means you can use a combination of dark and milk chocolate chips. You could use chopped chocolate. Or all white chocolate chips. It’s up to you! 
    • Chill the Dough. The longer the dough sits, the better the cookies. This is because resting the dough gives the gluten-free flour a chance to absorb the liquid in the dough. So after mixing, you can chill this dough in the refrigerator for up to 24 hours. 
    Gluten-free chocolate chip cookies. One cookie is broken in half.

    Frequently Asked Questions.

    What’s the best gluten free flour for chocolate chip cookies?

    I like Bob’s Red Mill 1:1 Gluten-Free Baking Flour. It makes cookies with a really nice texture. 

    Are chocolate chips gluten-free?

    Always check the ingredient label on your bag to ensure your chocolate chips are gluten-free before using.

    What does parchment paper do? Do I need to use it?

    Parchment paper is one of my favorite baking tools! It keeps cookies from sticking to the pan without the hassle of having to grease it.

    If you don’t have parchment, you can lightly grease your pan with nonstick cooking spray. Don’t use butter or the bottom of the cookies can burn.

    Gluten-free cookies baked on a greased pan spread more than those baked on parchment.

    Storing Leftovers

    Store them on the counter.

    Let the cookies cool completely. Then store them in an airtight container on the counter for up to five days. 

    Or freeze them for later. 

    If you’d like to freeze these, bake the cookies as directed. Allow them to cool completely. Place them in a freezer container, I like to put a piece of parchment between the layers. Freeze the cookies for up to three months. 

    How to freeze gluten-free cookie dough. 

    Having gluten-free cookie dough in the freezer makes it a snap to bake a batch of cookies quickly. 

    1. Prepare the dough as directed. 
    2. Scoop into balls. 
    3. Place the dough balls onto a cookie sheet. 
    4. Freeze for two hours or until the dough is firm. 
    5. Transfer the dough to a freezer container.

    How to Bake Frozen Gluten-Free Cookie Dough.

    1. Remove the cookie dough from the freezer. Place on a parchment-lined baking sheet. 
    2. Heat oven to 350℉. Heating the oven after removing the dough from the freezer allows the dough to thaw slightly.
    3. Bake cookies until set. They usually take a few more minutes when baked from frozen. Cookies baked from frozen dough don’t spread as much as cookies made from room-temperature dough.

    Other Gluten-Free Cookie Recipe to Try.

    Love cookies? Me too. Here are some other yummy recipes to try.

    • Gluten-Free Sugar Cookies. Easy recipe for roll and cut cookies.
    • Gluten-Free Monster Cookies. So many good things in one recipe!
    • Gluten-Free Shortbread Cookies. A perfect recipes for a classic cookie.
    • Gluten-Free Jam Thumbprints. These simple cookies are so tasty!
    Gluten-Free chocolate chip cookies on a cooling rack.
    5 from 1 vote
    Print

    Gluten-Free Chocolate Chip Cookies

    These gluten-free chocolate chip cookies are crispy, buttery, and really easy to make. (Dairy-free option included.)

    Prep Time 15 minutes
    Cook Time 12 minutes
    Total Time 27 minutes
    Servings 60 cookies

    Ingredients

    • 1 cup butter or dairy-free spread, melted and slightly cooled or (8 ounces; 226 grams)
    • 1 cup brown sugar (7 ½ ounces; 212 grams)
    • ½ cup granulated sugar (3 ½ ounces; 100 grams)
    • 2 large eggs (about 4 ounces; 113 grams out of shell)
    • 2 teaspoons vanilla extract
    • 2 ¼ cups gluten-free flour (11 ¼ ounces; 318 grams)
    • 1 teaspoon baking soda
    • ½ teaspoon salt
    • 1 (12-ounce) bag chocolate chips

    Instructions

    1. Adjust oven rack to the middle position. Preheat oven to 350°F. Line two baking sheets with parchment paper.

    2. In a large bowl, combine melted butter with the brown and granulated sugar. Mix until smooth. Add eggs and vanilla extract. Stir until smooth.

      Add the gluten-free flour, baking soda, and salt. Mix the dough until a soft dough forms. Add chocolate chips. Stir to combine.

    3. Drop dough, about one tablespoon each, onto prepared baking pan. Bake until edges are set, about 12 minutes.
    4. Cool cookies on the pan for a few minutes and then transfer to a wire rack to cool completely. Store cookies in an airtight container for up to 5 days.

    Recipe Notes

    Gluten-free flour. This recipe was tested with Bob’s Red Mill 1:1 Gluten-Free Flour blend. Using a different flour blend can result in different results. 

    Dairy-Free Option. Replace the melted butter with a dairy-free spread and the chocolate chips with dairy-free chocolate chips.

    Brown Sugar. Light or dark brown sugar can be used. Dark brown sugar gives the cookies a stronger molasses flavor and darker color.


    Gluten-Free Banana Pancakes

    A stack of gluten-free banana pancakes on a plate topped with maple syrup, banana slices, and butter.

    This gluten-free banana pancake recipe makes pancakes that taste like banana bread—in pancake form. They’re fluffy, light, and packed with flavor. Just like my classic gluten-free pancake recipe, they’re easy-to-make.

    A stack of gluten-free banana pancakes on a plate topped with maple syrup, banana slices, and butter.

    I’ve never met a banana-flavored baked good I didn’t like. From gluten-free banana muffins to gluten-free banana cake, I love them all. So today we’re making gluten-free banana pancakes! These taste like the perfect combination of a fluffy pancake and a slice of warm banana bread. 

    The key to this recipe is using two really overripe bananas. The browner and spottier the bananas, the better! They’re really the star of these pancakes. The natural sweetness combines with gluten-free flour and a little brown sugar to make the tastiest stack of pancakes ever. I like to serve these with a generous drizzle of syrup and a thick pat of butter. 

    Ingredients and Substitutions

    Gluten-free banana pancake ingredients on the counter.
    • Gluten-Free Flour. I tested the recipe with Bob’s Red Mill 1:1 Gluten-Free Flour Blend. Using a different flour blend might change the way the recipe works.
    • Overripe Bananas. It’s important to use very overripe bananas for these pancakes. The riper the banana, the sweeter and more flavorful. 
    • Milk. Makes the batter smooth and creamy. Both traditional and dairy-free milk works in the recipe. 
    • Egg. One egg adds protein and structure. For egg-free variation, use your favorite egg-replacer or a flax egg.
    • Butter or Oil. A little melted butter or oil lends richness to the pancakes, making them nice and tender. 
    • Brown Sugar. The combination of overripe bananas and brown sugar gives these pancakes a gentle sweetness. 
    • Baking Powder. Gives the pancakes a light and fluffy texture. 
    • Salt. Enhances all the other flavors. Use fine (table) salt. It blends easily into the batter.
    • Cinnamon. (optional) A little ground cinnamon goes great with the banana flavor. It’s totally optional. If you don’t love cinnamon, skip it. 

    How to Make Gluten-Free Banana Pancakes. 

    You’ll need two bowls and a hot griddle to make these gluten-free pancakes. Here are the steps for making a perfect batch every time.

    The four steps for mixing gluten-free banana pancake batter. 1. Mashing the bananas. 2. The banana puree mixed with brown sugar. 3. Dry ingredients in a bowl. 4. Dry and wet ingredients in a bowl. The mixture isn't blended.

    Make the Batter. 

    Start this recipe by mashing the overripe bananas until they’re almost smooth. You want it to look like a lumpy banana puree. Then stir in the brown sugar and let the mixture sit for a few minutes. This gives the sugar time to melt.

    In another bowl, whisk together the gluten-free flour, baking powder, salt, and cinnamon. 

    Add the remaining ingredients and stir until a batter forms. It’s fine if there are some lumps in the batter. 

    Gluten-free banana pancake batter in a bowl with an orange spatula.

    Let the batter rest for 5 minutes. This gives the gluten-free flour a chance to absorb the liquid. If the batter seems too thick after the rest, stir in a little milk. 

    Cook the Pancakes.

    Cooking gluten-free banana pancakes on a griddle. 1. Ladling batter onto griddle. 2. Pancakes cooking. 3. Flipping the pancakes. 4. Three brown pancakes on the griddle.

    Heat a griddle or nonstick pan over medium heat. Grease it lightly with oil. This is important. These pancakes love to stick to the pan. So a light coating of oil is important. 

    Spoon the batter onto the griddle. Cook the pancakes for about two minutes. When you see bubbles appear all over the surface of the batter, flip the pancake. Don’t press the pancake down with your spatula after flipping. This will make it dense and heavy. Just flip it and leave it alone. 

    Cook for another minute or so or until the pancakes are brown on both sides.

    How to Keep Pancakes Warm Before Serving. 

    If you want everyone to eat at the same time, keep these pancakes warm while you cook the entire batch. To do this, heat your oven to 200℉. Place the cooked pancakes onto a parchment-lined baking sheet and keep them warm in the oven for up to 30 minutes.

    Storing and Reheating Leftovers.

    These pancakes keep really well. Store any leftover pancakes in the refrigerator for up to three days. Or freeze them. Place them in a freezer bag, separating each pancake with a piece of waxed or parchment paper to keep them from sticking. Freeze for up to three months. 

    Reheating.

    Reheat the pancakes in a toaster oven or air fryer until warm. You can also microwave them on low heat. 

    A stack of gluten-free banana pancakes on a plate topped with maple syrup, banana slices, and butter.
    5 from 1 vote
    Print

    Gluten-Free Banana Pancakes

    This gluten-free banana pancake recipe makes pancakes that taste like banana bread–in pancake form. They’re fluffy, light, and packed with flavor.
    Prep Time 10 minutes
    Cook Time 5 minutes
    Total Time 15 minutes
    Servings 9 pancakes

    Ingredients

    • 2 medium ripe bananas
    • 3 tablespoons brown sugar (1 ½ ounces; 42 grams)
    • 1 ¼ cups gluten-free flour, Bob’s Red Mill 1:1 Gluten-Free Baking Flour suggested, see note (6 ¼ ounces; 177 grams)
    • 2 teaspoons baking powder
    • ½ teaspoon salt
    • ½ teaspoon ground cinnamon
    • ¾ cup milk (6 ounces; 170 grams)
    • 2 tablespoons melted butter (1 ounce; 28 grams)
    • 1 large egg
    • 1 teaspoon pure vanilla extract

    Instructions

    1. Place bananas in a small mixing bowl. Mash until almost smooth with a fork, potato masher, or handheld mixer. Add the brown sugar and stir to combine.
    2. In another mixing bowl, whisk together the gluten-free flour, baking powder, salt, and cinnamon. Add the milk, melted butter, egg, vanilla extract and mashed banana mixture. Stir until a batter forms. It’s fine if some lumps remain.
    3. Heat a nonstick frying pan or griddle over medium heat, or turn an electric griddle to 375°F. Lightly grease the pan or griddle with oil. The pan is ready when a drop of water bubbles quickly on the surface and evaporates (disappears) immediately.
    4. Spoon batter, approximately ¼ cup, onto the griddle. Cook for approximately 3 minutes. Flip the pancakes when bubbles appear all over the surface of the pancake and begin to pop. The pancake should begin to look almost dry. Flip and cook for another 1 to 1 ½ minutes.
    5. To keep warm, preheat the oven to 200℉. Place cooked pancakes on a parchment-lined baking sheet.

    6. Serve with butter and syrup, if desired.

    Recipe Notes

    Gluten-Free Flour: This recipe was tested with Bob’s Red Mill 1:1 Gluten-Free Baking Flour. Using another gluten-free flour will change the recipes. If you use a blend that doesn’t contain xanthan gum, whisk 1/4 teaspoon into the flour before using.

    Gluten-Free Pigs in a Blanket

    Gluten-free pigs in a blanket on a white platter with ketchup and mustard in small bowls off to the side.

    These gluten-free pigs in a blanket are super tasty. The recipe makes a homemade pastry that tastes like a cross between a biscuit and pie dough. The best part, besides the taste, is how easy they are to make. Simply mix the dough, wrap the mini-hot dogs and bake.

    Gluten-free pigs in a blanket on a white platter with ketchup and mustard in small bowls off to the side.

    Pigs in a blanket are usually made with canned crescent dough or store-bought puff pastry. But if you’re gluten-free, these two options don’t work. RIght now, canned gluten-free crescent dough isn’t available and gluten-free puff pastry can be really hard to find. 

    But that doesn’t mean that pigs in a blanket are off limits! You just need to make some homemade pastry to wrap around the piggies. 

    Serve them as either a snack, appetizer, or main course. That’s what I usually do. I bake a tray of these and serve it alongside a big green salad. 

    Ingredients You’ll Need.

    Here’s what you’ll need to make a batch of these pigs in a blanket. (The full recipe with amounts is included at the bottom of the post.)

    Ingredients for gluten-free pigs in blanket on the counter.
    • Hot Dogs. You can either use gluten-free cocktail wieners (mini hot dogs) and regular hot dogs cut into small pieces. 
    • Gluten-Free Flour. This recipe was tested with Bob’s Red Mill 1:1 Gluten-Free Flour blend. Using a different gluten-free flour might cause the recipe not to work.
    • Butter. Use cold butter for the dough.  
    • Milk. Helps the dough come together and adds a nice flavor.
    • Eggs. One egg is used in the dough. The other is brushed on the pastry before baking. This helps the pigs in a blanket to brown..
    • Baking Powder. Helps the pastry to rise. 
    • Sugar. One teaspoon of sugar helps the dough to brown. Feel free to leave it out if you’d like.
    • Salt. Since hot dogs contain a good amount of salt, you only need a little in the dough for flavor.

    Variations.

    1. Cheesy. Cut a cheese slice into small pieces. Place it under the hot dog before you wrap it with the pastry. 
    2. Spicy. Place a sliced jalapeno under the hot dog before wrapping. 
    3. Seasoned. Sprinkle some poppy seeds or everything bagel seasoning on the dough before baking.

    How to Make Gluten-Free Pigs in a Blanket. 

    This is such a fun recipe to make! There’s something I just love about rolling the mini hot dogs with pastry. The first step is making the gluten-free dough. Take your time when mixing it. It’s important to get the texture right. You don’t want the dough too dry or too wet.

    Four images showing how to mix gluten-free pigs in a blanket dough.

    Prepare the dough.

    1. Whisk together the gluten-free flour with the baking powder, sugar, and salt.
    2. Add the cold, cubed butter.
    3. Work the butter into the gluten-free flour mixture until no large pieces remain. Then stir in the milk and egg. Knead the mixture until a dough forms. If it seems dry, add a little more milk. If it’s too sticky to knead, add a little more gluten-free flour.
    4. Cut the dough into four pieces.
    Three images showing the steps for rolling and cutting pastry then wrapping a hot dog for gluten-free pigs in a blanket.

    Wrap the Dogs.

    • Then roll one piece of dough into an 8×5-inch long rectangle.
    • Cut it into eight 1-inch thick strips. 
    • Wrap the dough around the hot dog. This is the fun part!
    Unbaked gluten-free pigs in a blanket on a baking sheet.

    Place the hot dogs, seam side down, on a parchment lined baking sheet. This keeps the dough from unwrapping as they bake. 

    When you’re done, brush each one with a little whisked egg.

    Note: This recipe makes enough dough for about 40 mini hot dogs. Since hot dog packages vary, you might have a little dough left over.

    Bake until Brown.

    A tray of baked gluten-free pigs in a blanket.

    Bake these until the pastry is golden brown and the hot dogs are hot. A pan takes about 18 minutes to cook.

    Air Fryer Variation. 

    You can bake these in an air fryer. Preheat your air fryer to 350℉ and bake the pigs until the pastry is brown. (Full air fryer directions and time are included in the recipe below.)

    How to Make These In Advance. 

    You can make these a day in advance. Just wrap the hot dogs with the pastry. Then cover them and refrigerate. When you’re ready to serve, preheat the oven and bake until brown. 

    You can also freeze them. Place the wrapped hot dogs onto a bake tray. Freeze, uncovered, for two hours or until hard. Then transfer them to a freezer bag or container. Bake them from frozen in a preheated oven. Frozen pigs in a blanket take a few extra minutes to bake. 

    Storing and Reheating Leftovers.

    If you have leftover pigs in a blanket, transfer them to an airtight container and store for up to 3 days.

    Reheat them in the microwave or in a 325℉ air fryer until hot.

    Note: This recipe was originally shared in 2016. It was updated in 2024 to include new photos and a gluten-free flour blend.

    Gluten-free pigs in a blanket on a white platter with ketchup and mustard in small bowls off to the side.
    5 from 2 votes
    Print

    Gluten-Free Pigs in a Blanket

    These pigs in a blanket are wrapped in a homemade gluten-free pastry. Serve them as a snack, appetizer or as a main course. Be sure to sure gluten-free cocktail wieners or hot dogs.
    Prep Time 30 minutes
    Cook Time 18 minutes
    Total Time 48 minutes
    Servings 8
    Author Elizabeth

    Ingredients

    • 2 cups Bob's Red Mill 1:1 Gluten-Free Baking Flour, see note (10 ounces; 283 grams)
    • 2 teaspoons baking powder
    • 1 teaspoon granulated sugar
    • ¼ teaspoon salt
    • ¼ cup cold butter, cubed (2 ounces; 57 grams)
    • ½ cup plus additional milk as needed (4 ounces; 113 grams)
    • 1 large egg
    • 1 (16 ounce) package gluten-free cocktail wieners or 12 full size hot dogs cut into three pieces.

    Topping

    • 1 large egg
    • 2 teaspoons water

    Instructions

    1. Preheat oven to 400ºF. Line a baking sheet with parchment paper.
    2. Whisk together gluten-free flour, baking powder, sugar, and salt.
    3. Add the butter, and using your fingers or a pastry cutter, work it into the gluten-free flour mixture until no large pieces remain. The mixture should be coarse, with tiny pebbles of butter distributed thoroughly throughout.
    4. Stir in milk and 1 egg. Milk until a dough forms. If the dough is dry and won’t hold together, add a splash (about 1 tablespoon) more milk until the dough holds together.

    5. Dust your counter with gluten-free flour. Knead the dough a few times on the counter and then pat into a disk. Tip: To keep the dough from sticking, dust both the dough and your hands with a little gluten-free flour.

    6. Cut the dough into four pieces. Roll one piece into an 8×5-inch long rectangle. Then cut it into eight 1-inch thick strips.
    7. Wrap the dough around the hot dogs. Place the hot dogs, seam side down, on a parchment lined baking sheet. Repeat with the remaining dough until all the hot dogs are wrapped in pastry.

    8. Whisk the egg and water together in a small bowl. Brush the egg mixture on the pastry.
    9. Bake for about 18 minutes, until the dough is light golden brown and the hot dogs are hot. Remove from pan and serve hot.
    10. Store leftovers covered in the refrigerator for up to three days.

    Recipe Notes

    Gluten-Free Flour. This recipe was tested with Bob’s Red Mill 1:1 Gluten-Free Baking Flour. Using a different flour might change how the recipe works. Be sure to use a gluten-free flour that contains xanthan gum. 

    Air Fryer Directions. Preheat air fryer to 350℉. Bake until the pastry is brown, about 8 minutes. Air fry these in batches. You don’t want to crowd the basket or tray. 

    Storing Leftover. Cover leftovers and store in the refrigerator for up to three days. Reheat in the microwave or air fryer until warm. 

    Gluten-Free Onion Rings

    Gluten-free onion rings, along with ketchup and ranch dressing, on a baking sheet.

    This gluten-free onion ring recipe makes homemade rings that are light, crispy, and so flavorful. They’re perfect as a side dish or as a snack. And thanks to the gluten-free flour, the batter only takes a few minutes to make.

    Gluten-free onion rings, along with ketchup and ranch dressing, on a baking sheet.

    There’s nothing quite like a crunchy, freshly fried onion ring. Like homemade gluten-free mozzarella sticks, these are a fried treat that’s worth making at home. They’re great served as an appetizer, snack, or alongside your favorite burger or gluten-free fish fry. 

    What you need to make gluten-free onion rings.

    Ingredients for gluten-free onion rings.

    For the full list of ingredients and amounts, please see recipe below.

    • Onions. These can be made with yellow onions or with sweet onions, like Vidalias or Walla Walla onion. Sweet onions tend to be larger and make for nice, big onion rings. 
    • Gluten-Free Flour. I like Bob’s Red Mill 1:1 Gluten-Free Flour Blend. It makes for a light coating. Using a different flour blend might give you different results. 
    • Cornstarch. Dusting the onion rings with cornstarch helps the batter to stick and keeps the rings from being greasy.
    • Milk and Egg. The combination of milk and an egg makes an onion ring batter that browns nicely. For a dairy-free and egg-free batter, replace the milk and egg with seltzer or gluten-free beer.  
    • Seasonings. Garlic powder, black pepper, and paprika add flavor to the batter. 
    • Baking Powder. Helps lighten the batter.
    • Sugar. Adding a tablespoon of sugar is optional. It helps the batter to brown and brings out the sweetness of the onions–without making the rings taste sugary sweet. 
    • Salt. Enhances all the other flavors. Before serving, you can also sprinkle on additional salt.
    • Oil for frying. You’ll need to fill a Dutch oven about 1-inch full with oil.

    How to Make Gluten-Free Onion Rings.

    It’s a little bit of a process to make homemade onion rings. Here are the steps—along with some tips to ensure your onion rings come out perfect every time.

    Step One: Cut the Onions.

    Removing the thin membrane from an onion slice.

    First cut the ends of your onion and remove the papery skin. Then slice the onions into about ½ inch-thick slices. 

    Separate the onion slices into rings by pushing out the layers. At this point, you might notice a thin layer clinging to each onion. If it’s hanging off the onion ring, remove it. This membrane can make it hard for the batter to stick to the slices and it can burn during frying.

    Step Two: Make the Batter.

    Mix the gluten-free batter together until it’s smooth. For a thick coating on your onion rings, use the amount of milk called for in the recipe. If you prefer a thin coating, add a little additional milk. The thinner the onion ring batter, the lighter the coating. 

    After mixing, let the batter sit for at least 15 minutes. This gives it time to thicken. This is a good time to set up for frying. Fill your Dutch oven with oil. Line a baking sheet with paper towels, and place the cornstarch on a plate. 

    Step Three: Heat Your Oil.

    Fill a Dutch oven or deep fryer with about an inch of oil. You don’t want your pot more than ⅓ full. If you’re using a deep fryer, fill it as directed by the manufacturer.

    Heat the oil to 375°F. It’s important to use a thermometer for this step. You don’t want to overheat the oil.

    Step Four: Coat the Onion Rings.

    When the oil is at the right temperature, it’s time to coat and fry the rings.

    Coating onion rings in cornstarch.

    First, coat the onion slices in corn starch. You can do a few rings at a time. Or you can coat them all at the same time. It’s up to you.

    Letting gluten-free batter drip off an onion ring.

    Then, one at a time,  dip each ring through the batter. I like to use a fork for this step. Let any excess batter drip off the onion slice.

    Three onion rings frying in a pot of oil.

    After coating the ring with the batter, carefully place it into the hot oil. The oil will bubble quickly when you do this. 

    Fry for about a minute or so, then carefully turn the rings and fry until they’re golden brown. It only takes about three minutes total. You can fry as many onion rings as your pot will hold. For me, this is about three to four large rings at a time. You don’t want to crowd the pot of oil or the rings will stick together.

    Remove the rings from the hot oil and place on a paper towel-lined baking sheet. Repeat with the remaining rings and batter. 

    Gluten-Free Onion Ring Tips.

    Fried gluten-free onion rings on a baking sheet.
    • Batter Thickness. Aim for batter that’s about the thickness of pancake batter. If it’s too thick, add additional milk, one tablespoon at a time. 
    • The Best Oil for Frying. Fry the rings in canola or vegetable oil. 
    • Control the Oil Temperature. Be sure to monitor the oil temperature. You want the oil at 375 degrees F, no hotter. 
    • Work in Batches. It’s best to batter and fry a few onion rings at a time. If you batter the rings and place them on a plate, the batter can run off. 
    • Season with Salt Immediately. You want to season the onion rings As soon as you remove the onions from the hot oil. 
    Gluten-free onion rings, along with ketchup and ranch dressing, on a baking sheet.
    Print

    Gluten-Free Onion Ring Recipe

    These homemade gluten-free onion rings are light, crispy, and so flavorful. They’re perfect as a side dish or as a snack. Dairy and egg-free variation included in the note.
    Prep Time 20 minutes
    Cook Time 20 minutes
    Total Time 40 minutes
    Servings 4 people

    Ingredients

    For the Onion Ring Batter

    • 1 cup Bob’s Red Mill 1-to-1 Gluten-Free Baking Flour (5 ounces; 142 grams)
    • 1 tablespoon granulated sugar, optional, see note
    • 1 teaspoon baking powder
    • 1 teaspoon paprika
    • ½ teaspoon garlic powder
    • ½ teaspoon salt
    • ½ tsp ground black pepper
    • ¾ cup milk, plus more as needed (6 ounces; 170 grams)
    • 1 large egg

    For Frying

    • Canola Oil

    For the Coating

    • ½ cup cornstarch (2 ounces; 56 grams)
    • 2 medium yellow onions or 1 large sweet, vidalia or Walla Walla onion, cut into 1/2 inch rings
    • salt, for seasoning

    Instructions

    1. Make the Batter. Whisk together gluten-free flour, granulated sugar, baking powder, paprika, garlic powder, salt, and black pepper. Add milk and egg. Mix until a batter forms. It should be as thick as pancake batter. If it’s too thick, add more milk, one tablespoon at a time. (For a thin onion ring coating, add 1/4 cup additional milk).

    2. Heat the Oil. In a large pot or Dutch oven over medium-high heat, heat about one inch of oil to 375°F. Don't fill your pot more than ⅓ full.

    3. Line a large plate or baking sheet with paper towels. This is where you will set the onion rings after you fry them.

    4. Coat and Fry the Rings: Place the cornstarch onto a plate or in a bowl. Coat the onion rings in cornstarch. Then dip the rings, one at a time, into the batter. Allow most of the batter to drip off the onion slice.

    5. Immediately after coating, carefully place the onion ring into the hot oil. Batter and fry about three or four rings at time.

      Fry for 2 to 3 minutes or until golden brown. Turn the rings over once so they brown on each side.

    6. Remove the rings from the hot oil with a metal strainer or tongs. Place them onto the paper towel lined baking sheet. Sprinkle with salt.
    7. Repeat until the onions are done. Be sure to monitor the oil temperature throughout the frying process.
    8. To Keep the onion rings warm: Place them into a 200℉ on a baking sheet while you fry the rest of the rings.

    Recipe Notes

    Gluten-Free Baking Flour: This recipe was tested with Bob’s Red Mill 1:1 Gluten-Free Baking Flour. Using a different flour might change the rings. 

    Sugar: The sugar is optional. It adds a nice sweetness to the rings and helps the batter to brown. 

    Dairy-Free Variation: Replace the milk with an equal amount of gluten-free beer or unflavored seltzer water. 

    Egg-Free Variation: Replace the egg with a ¼ cup gluten-free beer or unflavored seltzer water. 

    Dairy and Egg-Free Variation. Use 1 cup gluten-free beer or unflavored seltzer water. 

    • « Go to Previous Page
    • Page 1
    • Page 2
    • Page 3
    • Page 4
    • Page 5
    • Interim pages omitted …
    • Page 20
    • Go to Next Page »

    Primary Sidebar

    Get Recipes Delivered to Your Inbox! (Free Weekly Newsletter!)


    Elizabeth Barbone

    I'm Elizabeth. Welcome to GlutenFreeBaking.com --- a judgment-free baking space. Here you'll find easy recipes, product reviews, and other good stuff that makes gluten-free living easy and a lot more fun!

    Read More About Elizabeth →

    • Facebook
    • Instagram
    • Pinterest

    Foods You Miss the Most

    • A stack of gluten-free pancakes topped with maple syrup and butter on a plate.
      The Best Gluten-Free Pancakes
    • Gluten-free chocolate chip cookies on a cooling rack.
      Gluten-Free Chocolate Chip Cookies
    • Loaf of Baked Gluten-Free Sandwich Bread on Red Cutting Board.
      How to Make the Best Gluten-Free Sandwich Bread: An Easy Recipe for Everyone!
    • Gluten-free flour tortillas on plate.
      How to Make the Best Gluten-Free Flour Tortillas

    Footer

    ↑ back to top

    Terms

    • Privacy Policy
    • Terms & Conditions
    • Disclaimer
    • Accessibility Statement

    Follow Us

    • Facebook
    • Instagram
    • Pinterest

    About

    • Contact
    • About

    Copyright © 2026 Gluten-Free Baking