• Skip to primary navigation
  • Skip to main content
  • Skip to primary sidebar
Gluten-Free Baking logo
  • Home
  • Recipes
  • About
    • About Me
    • Contact
    • My Cookbooks
    • Work with Me
  • Nav Social Menu

    • Facebook
    • Instagram
menu icon
go to homepage
search icon
Homepage link
  • Home
  • About
  • Recipes
  • Contact
×
Home

How to Make Paleo Cut Out Sugar Cookies

Oct 2, 2015 · Leave a Comment

Gluten-free cut out cookies in the shape of a star, tree, and round.
 
Paleo Cut Out Sugar Cookies on a baking sheet.
 
Let’s discuss something important! Cookies! (said in the voice of the cookie monster, of course.)
 
Most of the year, the humble chocolate chip cookie wins my heart. It’s delicious, easy to make, and contains chocolate. What more could you ask for? Then the calendar flips to December and I don’t care about chocolate chip cookies. I’m all about cut-out cookies and gingerbread boys.
 
Being all about cut out and gingerbread cookies has lead to a bit of a problem. My, um, massive cookie cutter collection. Right now, the collection is over 100 cutters and growing. But you know what? Even though I hoard love those cutters, I tend to use my mom’s old copper cutters each Christmas. They’re the ones you see in the photos. And they are the cutters she used when she made holiday cookies.
My mom used to bake dozens and dozens of cookies from the day after Thanksgiving right up to Christmas week. Her cut-out cookies were legendary. Everyone got a package. Her friend? Got a package of cookies. The mailman? Got cookies. The lady who worked at the grocery store who she said hello to each Tuesday? You guessed it. She got cookies. During December my mom’s car always smelled like cookies. It was the best.
 
So when I set out to create a cut out cookie recipe for my new cookbook, it was my mom’s recipe that served as the inspiration.
 
To make all those cookies, my mom’s recipe needed to be easy since she’d crank out several batches at a time. Her method went something like this: measure out the flour, salt, and baking powder. (These cookies were not gluten-free.) Cream together shortening (Yes, back in the day she used shortening. #NoJudgement) and sugar in a large bowl. Add an egg. Add the flour. Chill. Roll. Bake. Done.
 
That was it.
 
The question was: could grain-free cut out cookies be this easy?
 
(spoiler: yes)
 

Paleo Cut Out Cookies: The Flour

My mom had it easy. She baked with wheat flour. This meant she’d throw a bag of all-purpose flour into her cart at the grocery store, probably buying whatever was on sale, and not give it a second thought. Grain-free baking means we give the “flour” a lot of thought. For these cookies, I knew I wanted to use almond flour. Made from finely ground blanched almonds, almond flour bakes up surprisingly like wheat flour, especially in recipes like cookies or brownies. The thing about almond flour is that it tastes like almonds. This isn’t a bad thing. It just is what it is.

The other thing about almond flour is that, since it’s made from ground almonds, it doesn’t have the soft mouthfeel that grain-based flours bring to recipes. When I tried cut-out cookies made with 100% almond flour, I liked them. They just didn’t taste like cut-out cookies. They were missing the sandy crumb that all good cut-out cookies have.

Enter: tapioca starch.

When you combine an equal amount of tapioca starch with finely ground almond flour, you end up with a dough that’s a dream to work with. It rolls out without breaking, holds the shape you cut with the cookie cutter without spreading into a huge blob during baking, and, the very best part, it tastes like a traditional cut-out cookie. Somehow this cookie tastes buttery without containing a drop of dairy!
 
So while there are many cookie recipes that do really well without the addition of starch, this isn’t one of them. For the best taste and texture, pull out that bag of tapioca starch. (Oh, and tapioca starch is sometimes called “tapioca flour.” They are the same thing. No worries!)

Paleo Cut Out Cookies: The Sugar

But the flour and starch can’t do everything on it’s own. It needs some help from our friend sugar.

To our bodies, sugar is sugar. All those claims about some sugars containing extra nutrients are, to me, a little misleading. Sure there are trace nutrients in unrefined sugar, that’s true. However, you’d have to eat so much of those sugars to get any nutritional benefit that you’d make yourself sick, which kind of defeats the purpose.

While our bodies think sugar is sugar, our baking does not. There are two types of sugar in the baking world: dry sugar and liquid sugar. For cookies, dry sugar works best. It doesn’t bring any additional liquid to the dough. And that’s what we want. Cut out cookies don’t benefit from extra moisture. In fact, when a cookie dough is too wet, it spreads during baking.

I prefer the taste and look of evaporated cane juice for my cut out cookies. It’s light in both flavor and color. You can also use coconut sugar. Since coconut sugar is so dark, these cookies when made with coconut sugar look kind of like gingerbread cookies when baked. That’s fine, I just want you to know that before you make them. 🙂


Paleo cut out sugar cookies in the shape of a tree.
 
Ah, a cookie that holds its shape. That’s what we want!
 

Paleo Cut Out Cookies: The Other Ingredients. 

Now that we’ve talked about the two most important ingredients, the flour and sugar, let’s take a quick look at the rest of the ingredients.

Egg

One egg helps to hold everything together. It also adds flavor and a subtle richness. I haven’t tested this recipe egg-free. If I do, I’ll let you know how it goes!

Coconut Oil or Butter

Since almond flour brings so much fat with it, we only need 1/4 cup of coconut oil or butter. If you are using coconut oil, make sure it’s soft but not melted. Unlike butter or vegetable shortening, coconut oil turns REALLY brittle when cold. It’s hard to cream brittle fat! Here’s what I do: if the coconut oil is cold and hard, I warm it gently in the microwave for about 10-15 seconds. Any more than that and the oil melts. We don’t want that! You want the oil soft but not melted. When you cream it together with the sugar, you don’t want any large lumps of coconut oil to remain. If you see any large lumps of coconut oil, reach into the bowl and break them up either with your fingers or a fork.

If your diet includes dairy, use butter in place of the coconut oil.  I like to use grass-fed unsalted butter. But any butter will do! Be sure it’s at room temperature before using.

Water

Without gluten to hold things together, the dough needs a little nudge to come together and play nice. Water does the trick! One tablespoon of room temperature water helps bind the ingredients into a dough without causing it to spread.

Vanilla Extract

Vanilla adds flavor. I think it partners so nicely with the almond flavor. If you don’t like flavor of vanilla (gasp!), go ahead and omit it.

Baking Powder

Too much baking powder causes cut out cookies to puff and lose their shape. Too little and you get hard cookies. For these cookies, the “just right” amount is 1/2 teaspoon. Most commercial baking powder contains corn starch. However, it’s easy to make your own! Here’s my recipe.

Salt

A little salt helps to enhance the flavor of the cookies. Use recommend table or fine sea salt. Kosher or coarse salt tends to be too coarse for baking.

Gluten-free cut out cookies in the shape of a star, tree, and round.
Print

Paleo Sugar Cookies

The dough should just be at room temperature before rolling. If the dough cracks as you roll, that means it’s too cold. If it sticks to the counter, it’s too warm.
Prep Time 1 hour 20 minutes
Cook Time 10 minutes
Total Time 1 hour 30 minutes
Servings 20 cookies
Author Elizabeth Barbone from the Word's Easiest Paleo Baking Book

Ingredients

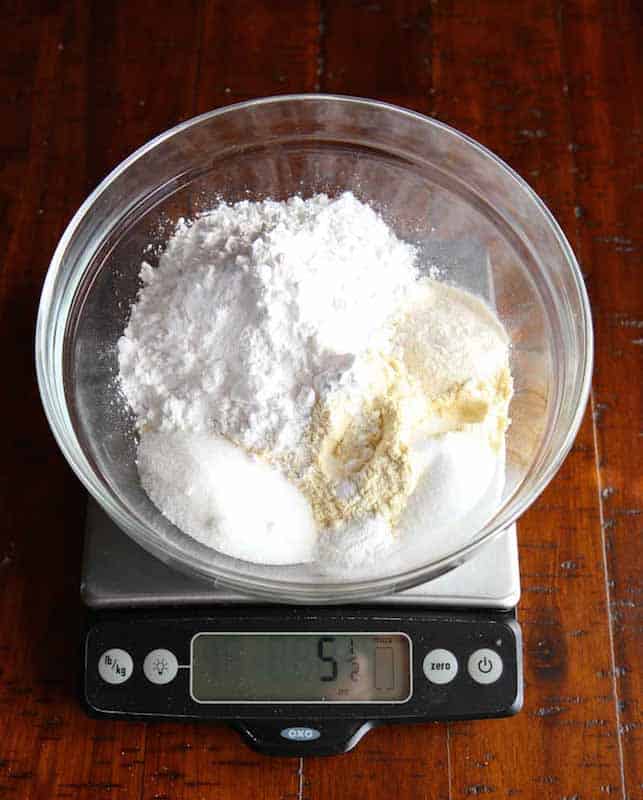
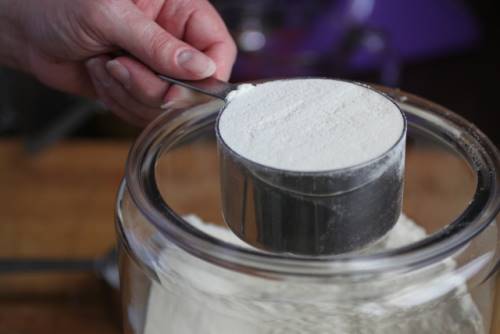
  • 113 grams (1 cup) finely ground almond flour
  • 113 grams (1 cup) tapioca starch
  • 1/2 teaspoon baking powder , homemade or grain-free store-bought
  • 1/2 teaspoon salt
  • 85 grams (1/2 cup) evaporated cane juice or coconut sugar
  • 57 grams (1/4 cup) coconut oil, solid, or unsalted butter, softened
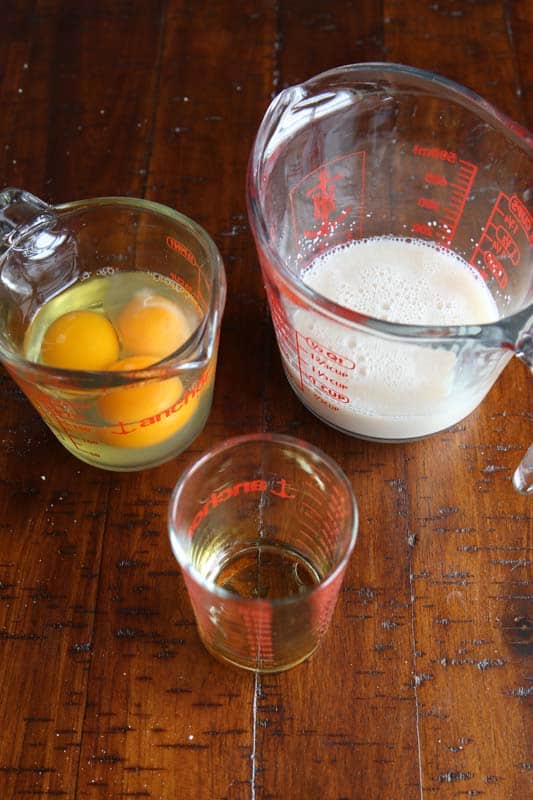
  • 1 large egg (about 50 grams out of the shell)
  • 1 tablespoon water
  • 1 teaspoon vanilla extract

Instructions

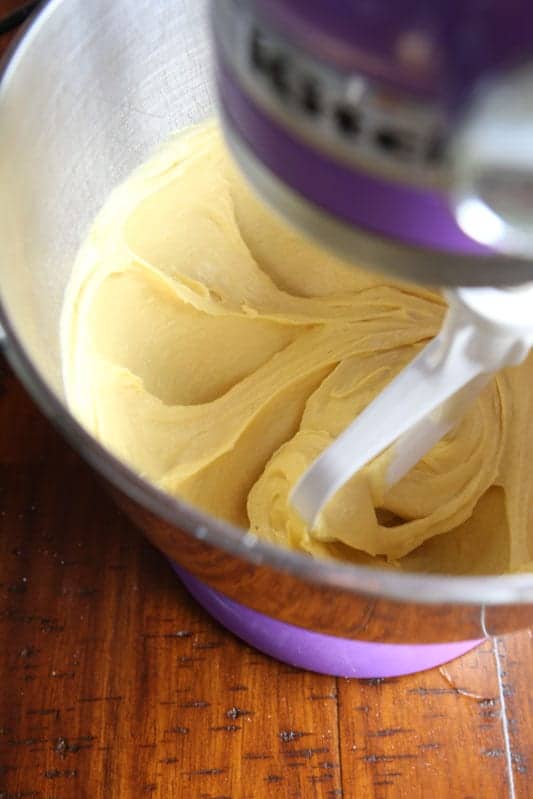
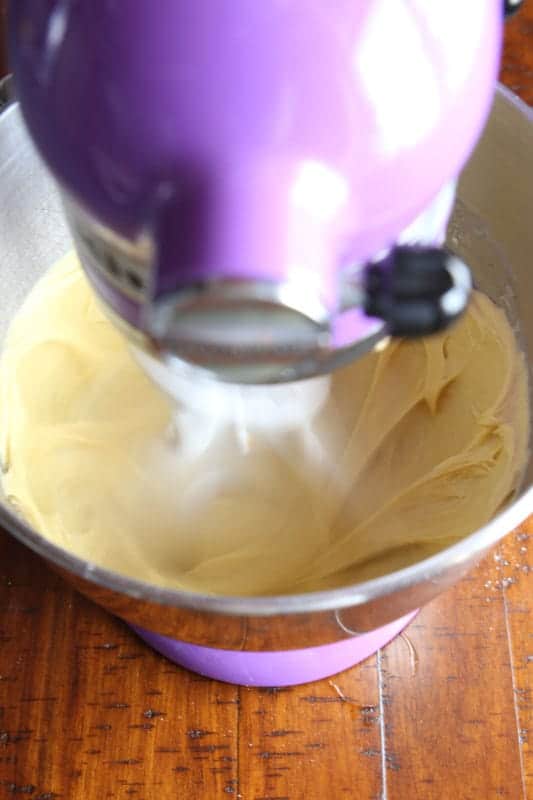
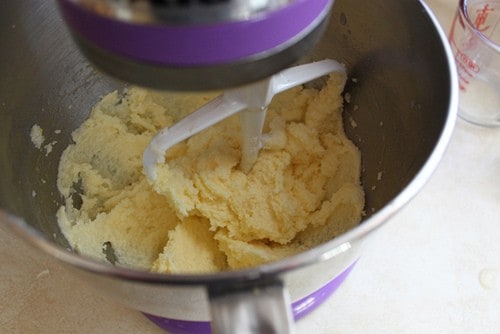
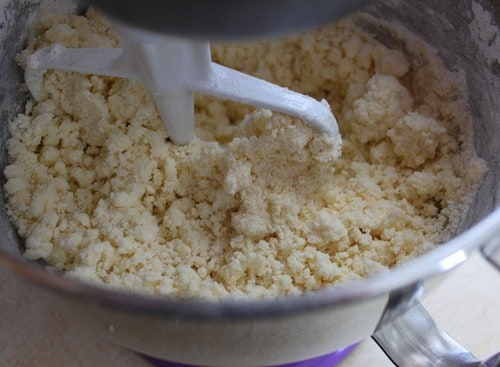
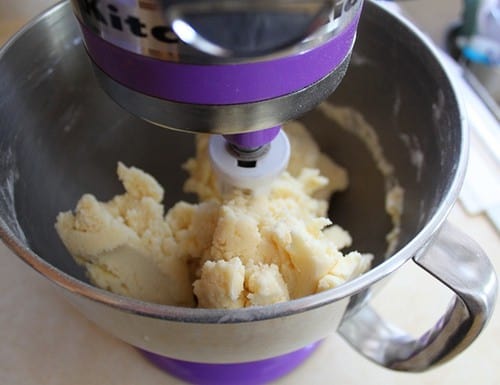
  1. Whisk the almond flour, tapioca starch, baking powder, and salt together in a small mixing bowl. Combine the evaporated cane juice and coconut oil in a medium mixing bowl. Use a handheld mixer set on medium speed to beat them until a thick paste forms. If there are any large lumps of coconut oil, stop the mixer and squeeze the paste together with your hand, or break up the lumps with a fork. Add the egg and mix until combined. Stop the mixer and add the dry ingredients, vanilla, and water. Mix until a dough forms.
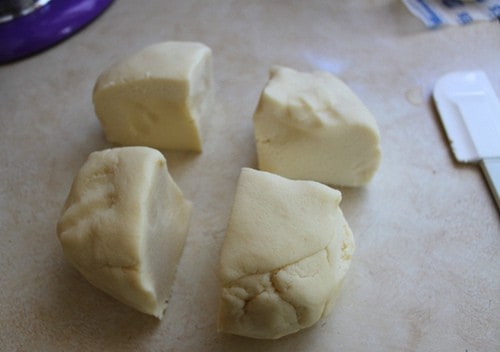
  2. Turn the dough out onto the counter. Knead gently a few times. Wrap the dough in plastic wrap and chill for 1 hour.
  3. Adjust an oven rack to the middle position and preheat the oven to 325F. Line a rimmed baking sheet with parchment paper.

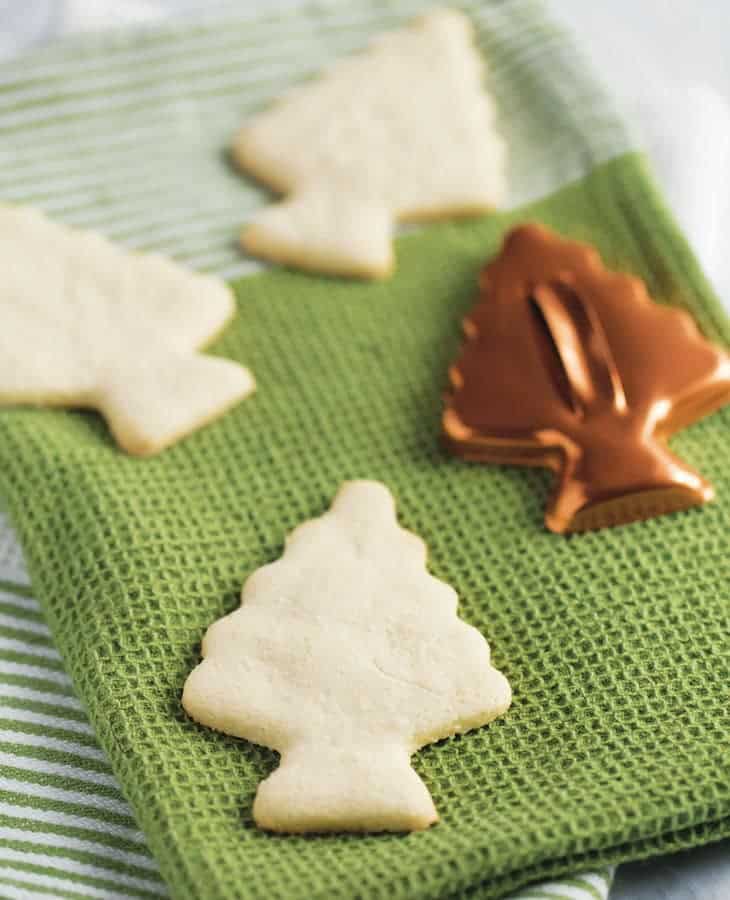
  4. Allow the dough to sit outside the refrigerator for about 10 minutes. Cut the dough in half and sprinkle your counter with a little tapioca starch. Roll out the dough about 1/4-inch thick. Cut into shapes and place on prepared baking sheet about 2 inches apart.

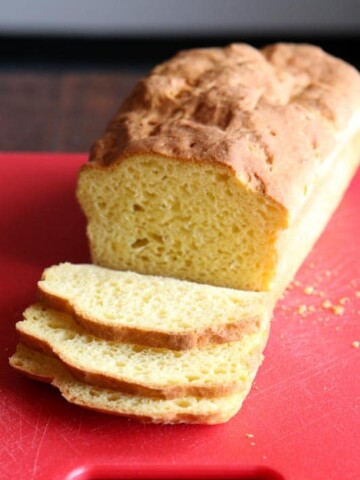
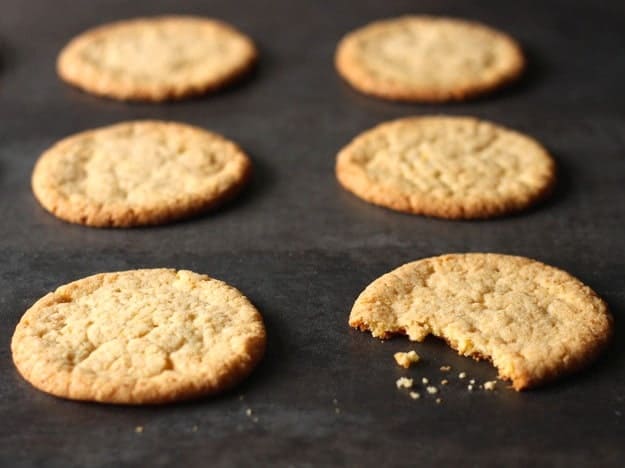
  5. Bake until set and golden brown, about 10 minutes for 4-inch cookies.
  6. Allow the cookies to cool on the pan on a wire rack for 5 minutes, then transfer the cookies directly to the rack to cool completely.
  7. Allow the baking sheet to cool. Reroll scraps and repeat with the remaining dough.


Gluten-Free Black and White Cookies

Oct 1, 2015 · Leave a Comment

Gluten-Free Black and White Cookies

Gluten-Free Black and White Cookies

Black and white cookies, the popular New York City treat, are also found in bakeries in upstate New York with one big difference: around here they’re often iced with buttercream instead of poured fondant. I can almost hear some black and white cookie purists saying, “That’s heresy! Buttercream icing does not belong on a black and white cookie!” To that I say, “Regional cuisine FTW!”

One area of common ground between the upstate/downstate black and white cookies is the size. These are big cookies. You need about a half cup of batter per cookie to achieve the classic size of a black and white cookie. Of course, you don’t need to make huge cookies. Diminutive black and white cookies are cute–and really easy to eat. If you prefer small cookies, reduce the amount of batter you use per cookie. For smaller cookies, watch the first pan to determine the correct baking time for the cookies. (I found that two tablespoons of batter took about 15 minutes.)

Bowing to my upstate roots, this recipe uses buttercream to finish the cookies. For a neat divide between the black and white of the cookie, first ice half the cookie with vanilla buttercream and then ice the remaining half with chocolate. Chocolate buttercream neatly covers the vanilla icing where the two meet.


Gluten-Free Black and White Cookies
Print

Gluten-Free Black and White Cookies

Prep Time 25 minutes
Cook Time 25 minutes
Total Time 50 minutes
Servings 14 large cookies
Author GlutenFreeBaking.com

Ingredients

For the Cookies

  • 2 cups white rice flour (8 ounces; 226 grams)
  • 1/2 cup cornstarch (2 ounces; 56 grams)
  • 1/2 cup sweet rice flour (2 ounces; 56 grams)
  • 1 1/2 teaspoons baking powder
  • 3/4 teaspoon xanthan gum
  • 3/4 teaspoon salt
  • 1 1/2 sticks butter or margarine, softened (3/4 cup; 6 ounces; 170 grams)
  • 1 1/2 cups granulated sugar (10 1/2 ounces; 297 grams)
  • 2 large eggs (about 3 1/2 ounces; 100 grams)
  • 3/4 cup milk (6 ounces; 170 grams)
  • 2 teaspoons vanilla extract
  • 1/2 teaspoon lemon extract

For the Buttercream

  • 1 stick butter, at room temperature (1/2 cup; 4 ounces; 113 grams)
  • 2 cups confectioners' sugar (8 ounces; 226 grams)
  • 1/4 cup milk, plus additional milk to adjust consistency (2 ounces; 56 grams)
  • 2 tablespoons cocoa powder (3/8 ounces; 11 grams)

Instructions

  1. Preheat oven to 350°F. Line rimmed baking sheet with parchment paper.
  2. Whisk together white rice flour, cornstarch, sweet rice flour, baking powder, xanthan gum, and salt. Set aside.
  3. In bowl of stand mixer, cream together butter and sugar for one minute. (Use medium speed with a stand mixer, or high speed with a hand mixer.) Add eggs one at a time. Mix for about 25 seconds between each egg addition. After the last egg is added, stop mixer. Scrape sides and bottom of bowl. Turn mixer back on to medium speed and mix for an additional 30 seconds.
  4. Add half the dry ingredients to butter-egg mixture. Blend for 30 seconds. Add half the milk and mix for 30 seconds. Repeat with dry ingredients and milk. Adding the extracts along with the last addition of milk.
  5. Drop batter, about 1/2 cup each, onto prepared baking sheet. Space cookies about 3 inches apart.
  6. Bake for 20-25 minutes or until golden brown and puffy. Remove cookies from the baking sheet and place on a wire rack to cool.
  7. While the cookies cool, prepare the buttercream. Cream together confectioners' sugar and butter. Add milk, cream until fluffy. Divide icing into two bowls. Add cocoa powder to half of the buttercream. Stir until smooth. If needed, adjust the consistency of the chocolate icing with additional milk.
  8. Spread cooled vanilla buttercream over half of each cookie and chocolate over other half. Depending on how generous you are with icing your cookies, you might have some icing left over.


Gluten-Free Whole Grain Oatmeal Cookies

Sep 30, 2015 · 3 Comments

Gluten-Free Whole-Grain Oatmeal Cookies on a paper towel.

Gluten-Free Whole-Grain Oatmeal Cookies

Recently I stopped by a friend’s home as she was baking oatmeal cookies. The thick batter she dropped onto baking sheets looked absolutely full of oats. The recipe called for three cups of rolled oats to only one cup of flour. Now that‘s an oatmeal cookie. She described the flavor: “a bowl of sweet oatmeal but in cookie form.” I went home to create a gluten-free version.

Lately, I’ve been baking more whole-grain and rice-free gluten-free recipes; so I used sorghum flour and oat flour to replace the one cup of all-purpose wheat flour. For an added nutty flavor, I threw in two tablespoons of ground flax.

Once baked, these cookies were just as my friend described. Sweet but with plenty of oats to balance everything out. If you want them less sweet, reduce the sugar by a quarter of a cup; any less sugar and the recipe doesn’t work.

Besides using gluten-free flour, I also changed one other thing about the recipe. I didn’t add raisins (because I don’t like ’em) or chopped nuts (because I’m allergic). Instead, I added chocolate chips to the dough. Add whatever nuts or dried fruit you love. This dough handles about one and half cups of “add ins” without falling apart. This is slightly less than the wheat-version because our dough lacks the gluten structure and can turn crumbly if you add too many nuts or dried fruits to it. And if you don’t like anything in your oatmeal cookies, don’t add anything. Thanks to all those whole oats, the cookies are flavorful and delicious on their own.

Gluten-Free Whole-Grain Oatmeal Cookies on a paper towel.
4 from 1 vote
Print

Gluten-Free Whole Grain Oatmeal Cookies

Prep Time 15 minutes
Cook Time 20 minutes
Total Time 35 minutes
Servings 48
Author GlutenFreeBaking.com

Ingredients

  • 3/4 cup sorghum flour (3 ounces; 85 grams)
  • 1/4 cup gluten-free oat flour (3/4 ounce; 21 grams)
  • 2 tablespoons ground flax (2/3 ounce; 18 grams)
  • 1 teaspoon salt
  • 1 teaspoon baking powder
  • 3/4 teaspoon ground cinnamon
  • 1/4 teaspoon ground nutmeg
  • 1/8 teaspoon ground cloves
  • 2 sticks butter, softened (1 cup; 8 ounces; 226 grams)
  • 1 cup dark brown sugar (7 1/2 ounces; 212 grams)
  • 1/2 cup turbinado sugar (3 3/4 ounces; 110 grams)
  • 1 large egg (about 1 3/4 ounces; 50 grams, out of shell)
  • 2 teaspoons vanilla extract
  • 3 cups gluten-free oats (10 1/2 ounces; 297 grams)
  • 1 1/2 cups chocolate chips (9 ounces; 255 grams)
  • 1 cup raisins (5 1/4 ounces; 148 grams)

Instructions

  1. Adjust oven rack to middle position. Preheat oven to 325°F. Line two baking sheets with parchment paper. Set aside.
  2. In medium bowl, whisk together sorghum flour, oat flour, ground flax, salt, baking powder, ground cinnamon, ground nutmeg, and ground cloves. In bowl of stand mixer fitted with paddle attachment, combine butter and sugars. Cream on medium speed until thick paste forms, about 2 minutes. Stop mixer and scrape down sides and bottom of bowl. Add egg and vanilla. Turn mixer on to medium speed and blend until light and fluffy, about 1 minute. Stop mixer. Scrape down bottom and side of mixer. Mix for 1 additional minute. Stop mixer. Add whisked dry ingredients and oats. Mix until thick dough forms, about 1 minute. Turn off mixer. Add chocolate chips. Turn mixer on to low. Mix until combined, about 30 seconds.
  3. Using a tablespoon measure, drop heaping tablespoons of dough onto prepared baking sheet. Lightly press down dough with palm on your hand but don’t flatten cookies. Bake 1 tray at a time until golden brown, about 20 minutes. Cool for five minutes on baking pan. Transfer cookies to wire rack to cool completely. Repeat, baking second batch on cool baking sheet, until all dough is used. Store cooled cookies in sealed container for up to 1 week.


How to Start a Blog: Two Essential Keys for Creative Blogging

Sep 25, 2015 · Leave a Comment

Listen to the MUSTN’TS, child,
      Listen to the DON’TS
      Listen to the SHOULDN’TS
The IMPOSSIBLES, the WON’TS
      Listen to the NEVER HAVES
Then listen close to me-
      Anything can happen, child,
ANYTHING can be

—Shel Silverstein
This post contains affiliate links. If you use the links to purchase the books recommended, GlutenFreeBaking.com earns a commission.

Welcome: How to Start a Blog

Oy. Each week, usually on Facebook, I see a post that proclaims, “blogging is dead!” At the same time, many friends tell me that they’d love to start a blog but don’t know how.

Here’s the good news:

#1. Blogging is not dead. Blogs give us a creative outlet to express ourselves. To thrive, I think we need creative outlets. Think of blogging the same way you think of painting, writing, or any other art. It’s not going away and it’s not dead.

#2. If you want to learn how to blog, you can! This series will teach you how to start a blog. No experience needed. We’ll mix tech talk with ideas about creativity. And I’ll share all the things I’ve learned about blogging—and the things I wish I’d known when I began.

Speaking of beginning, are you ready? Let’s go!

The First Key to a Successful Blog: Knowing Why You Want to Blog

Want a successful blog?

Answer this question: I want to blog because___________________________________.

Sounds like a simple question, doesn’t it? Yet I find that many bloggers have trouble with it. Serious trouble. Some struggle to admit to themselves why they want to blog. Let me help you with this: no one but you needs to know why you’re blogging.

While you will tell everyone what you blog about, you don’t need to tell them why you blog. Perhaps you’re blogging as a path out of depression or because your second grade teacher told you that you sucked at writing and you want to prove her wrong.  Maybe you want to earn enough money from blogging so that your husband can retire. This is no one’s business but yours.

But it is your business. You need to know why you want to blog. Notice that we haven’t even talked about the subject for your future blog. There’s a reason for this. Honestly, I wish someone had mentioned this to me when I first started: to create something, no matter what the subject or format, it helps if you take the time to understand why you want to do it. 

Any creative endeavor requires commitment. At first, it’s fun. You can’t wait to blog. You want to blog. You NEED to blog. And then…you hit a dry patch. You feel like no one is reading your stuff. You aren’t sure if you want to continue. If you are clear about why you started blogging in the first place, it will go a long way toward encouraging you to continue when the newness of blogging wears off. Trust me.

Before I start most projects, I sit myself down and ask “why” I’m doing it. The times when I haven’t done this have ended….badly. One time I drove 8+ hours to give a baking class for free to a group. Now, understand, I teach baking classes. I even teach them for free. That wasn’t the problem. The issue was that I wasn’t clear why I was teaching this particular class, other than the leader asked me. She showed up late. They never promoted the class. Something like five people turned up and I resented the entire experience.

Oh, and there was that time I wrote for a very popular organization. I did it because several people in my life encouraged me to do it. I never took the time to ask myself why I wanted to do it. Over time, my pieces lost focus and I hated sitting down to write each week. HATED IT.

In contrast, when I’m clear about why I’m doing something, I tend to enjoy it. Even when it’s hard work or puts a squeeze on my schedule. The last book I wrote is a great example of this. My publisher hired me to take 30 photos for the book. I decided that I wanted to photograph each recipe. It would be my offering to the book. This meant that each day, for about six weeks, I baked and photographed my way through the book. For me, photography doesn’t come easy. Heading down into my tiny makeshift photo studio, I’d remind myself that why I was doing the project. I wanted readers to see a picture of what they were making. Even though I struggled with the photos, I never thought about quitting. I’d put on some music (thank God for Pandora!) and get to work.

I created a very simple ritual  for discerning why I want to do something. I turn off everything. I get quiet for a few minutes and ask myself out loud, “Why do you want to do this?” Then I write down all the reasons that come up. Something magical happens when you actually write down your thought. I get serious about my work when I think on paper.

The hardest part of this practice for me (this is so embarrassing to admit!) is getting my ass in the chair and doing it. It’s easy to talk to friends about an idea for a project. It’s easy to think about. Getting myself to sit down, get quiet, and clear? That I’ll sometimes avoid at all costs! Clean my room? Sure! Reorganize my spices? YES!  Author Steven Pressfield calls the feeling of not wanting to get in the chair to work “resistance”. In this book, “The War of Art” (affiliate link) he talks about the fear that comes with just getting starting. That fear of asking ourselves why we want to do something and then, by god, doing it.

“Are you paralyzed with fear? That’s a good sign. Fear is good. Like self-doubt, fear is an indicator. Fear tells us what we have to do. Remember one rule of thumb: the more scared we are of a work or calling, the more sure we can be that we have to do it.”
― Steven Pressfield

I’d love to tell you that once you sit down, it’s easy and that you zip through the list, straighten the papers on your desk, and get to work. Only…it’s not easy. Often when we sit down and get quiet with our creativity, some really toxic, negative voices start talking to us. They whisper (or shout) things like:

  • your work won’t be good enough.
  • someone else has already done this and they’ve done it better than you ever will.
  • if people see you, they’ll make fun of you. What would your [fill in the blank] think if s/he read this? You should be ashamed of yourself!
  • you can’t learn the technology! You can hardly use your phone!
  • remember what XXXX said about you in school? They were right!

Do any of those reasons sound familiar? I bet they do. Most of us have some wounds, serious wounds around our creativity. Here are some things to ponder when those negative voices start yammering.

  • It might not be good enough at first. And that’s okay! You have permission to be a beginner. You have permission to create. You don’t need to be perfect. No one is keeping score. In my opinion doing terrible work is better than doing nothing at all. In fact, for years (and years and years) my blog was a hot mess. I still showed up. I’m proud of that. Accept that your work in the beginning might not be perfect and love yourself in spite of that fact. Oh, and listen to what Ira Glass had to say about being a beginner.

    Dealing with this fear? Remember: Allow yourself to be a beginner. no one starts off being excellent. 

  • Someone probably has done whatever you want to do. So what? You haven’t done it! Take the picture. Write the story. Post the recipe. We haven’t heard from you and your voice matters. How many times have you read something that resonated with you? What if the person who created it has stopped themselves and said, “Eh. This has already been done.” My god. The world would be a boring place!

    Dealing with this fear? Remember: Comparison is the thief of joy.


  • People might not like your work. Honestly, if you are going to put stuff out into the world, some people won’t like it. Think of, oh, every comment thread on every internet post that’s ever existed. I wish I could offer you some magic solution. They only solution is to not put your work into the world. And that’s a terrible solution. Know this: criticism of your work hurts but you get used to it. Over time, you learn how to deal with it. It’s the price you pay for showing up.  For specific information on dealing with the fear of being seen, read Brené Brown Brown’s book, “Rising Strong.” (affiliate link)

    Dealing with this fear? Remember: Do what you feel in your heart to be right – for you’ll be criticized anyway.― Eleanor Roosevelt


  • Tech “stuff” is learnable! People share a lot of fear with me when it comes to learning the tech side of blogging. While there is a learning curve, the tools you need to blog are pretty easy to learn. (If you are scoffing at that, hang on! We will do these things together!)  Really, everything you need to know about running a blog is google-able. You CAN learn all the technical know-how that you need. There are videos, podcasts, and, of course, blogs to help with this. Don’t let the a fear of the tools stop you.

    Dealing with this fear? Remember: Learning is not attained by chance. It must be sought for with ardor and attended to with diligence.” – Abigail Adams.


  • Discouragement hurts. So many people don’t allow themselves to fully come into being because someone hurled a discouraging comment their way. Discouragers visit us all. As you know, I have food allergies. When I was a culinary student, one of my instructors said, “There’s no place for someone like you in this field. You’re like a turned off radio. We’re broadcasting good information but you can’t pick up on it because you are allergic to everything. Don’t waste my time by asking me questions. I’m here for the students that can actually do something with what I’m teaching.” Just sharing that story makes my stomach twist into knots. It takes a great deal of bravery to overcome discouragement. I know it hurts. And I know that you can work through it and put your voice into the world. We are all waiting to hear from you.

    Dealing with the pain of past discouragement? Remember: At any given moment, you have the power to say, “This is not how my story is going to end.” 


Now it’s time to discover why you want to blog!

Creative Blogging Practice #1

tools: paper and pen/pencil. crayons & markers optional.
time required: 10 to 30 minutes. 

Grab a piece of paper and something to write with. Use a pen or pencil or, if you feel like it, crayons and markers. You want this to feel fun. It’s not homework!

Shut off anything that makes noise and will distract you. (read: put the phones, tablets, etc. away. But finish reading this first. 🙂 )

Close your eyes and breathe. Give yourself a minute or two in silence.

As yourself out loud, “Why do I want to blog?”  (This might feel silly. Whisper to yourself if that feels better.)

Write down everything. You could write simple words, phrases, or long paragraphs. Whatever feels right is right!

After you finish, look at your paper(s). Read it over. Circle the ideas that mean the most to you.

Done! Be sure to save this and look at it when you need some self-lead inspiration.

Creative Blogging Practice #1: Extra Joy

Create something beautiful with your “Why.” Perhaps print it out in a pretty font and frame it or paste the paper into a journal only you will see.


The Second Key to a Successful Blog: What Do You Want to Blog About?

Once you know why and understand that fear might pop before you even begin, it’s time to think about what you want to blog about! The interesting thing about exploring why you want to blog is that sometimes it changes what you want to blog about. Maybe when you started you thought you wanted to blog about one thing and now you know you really want to write about something else. That’s so great! Or maybe doing the “why” exercise helped to further solidify the idea that’s bounced around in your head for a long time.

Let’s say you want to start a beer blog. Awesome! Beer is great! People love beer. They LOVE it. 

Some topics your beer blog could cover:

  • beer reviews
  • the history of brewers
  • microbreweries
  • the beers of your region.
  • foreign beers
  • the history of beer cans.
  • a specific brewery. (Seriously, you could blog all about the long forgotten history of the, I don’t know, Schlitz brewery. (Are they even around? Seriously, I have no idea.)
  • beer and food pairings
  • beer and cider
  • fruity beers
  • IPAs
  • gluten-free beers
  • seasonal beers.
  • all the beers found at Walt Disney World’s EPCOT (Not kidding. Someone does this and they do it well.)

You get the point. The list is endless. If you try to cover all of those topics, your blog probably won’t be as great as if you focus on one subject. When starting a blog, it’s better to focus on a niche and expand as your blog grows than try to cover everything right from the start. For the beer blog, it would be best to pick one of the topics and focus on it. A general beer blog? Meh. A beer blog that focuses on beer and food pairings? That’s a blog I want to read! And that’s how you nail your niche.

Gone are the days where individual bloggers need to post many times a day. Now, focusing on one topic and covering it well is where it’s at.

Creative Blogging Practice #2

tools: paper and pen/pencil.
time required: 10 to 30 minutes. 

Note: this activity is very similar to the first practice. There’s a reason for this. In this activity, you’ll explore your topic. It’s the companion piece to the first. 

Spend a few minutes in silence. Shut off your phone. Turn off music. Just sit there. Close your eyes and breathe.

Brainstorm the topic you want to cover in your blog. Write down everything you think you’d like to cover on your blog. Don’t censor yourself. Write everything down. Try to be both general and specific.

Review the list. Cross out any subjects you don’t love. Circle what feels like the main subject for you.

Write down at least fifteen possible blog subjects based on that topic. (If you can’t think of fifteen, your subject might be too narrow.)

Answer this question: I blog about_________________________. Evaluate how that sounded to your ear. (If you can’t answer that question easily, start over at step one until you can!)

Done! Save this list! We will use it in an upcoming lesson.

That’s All For Now!

Now that you know why you want to blog and what you want to blog about, next week we’ll do a deep dive into the technical side of setting up a WordPress blog! See you then!

5 Ingredient Gluten-Free Peanut Butter Cookies

Sep 23, 2015 · 4 Comments

Gluten-Free Flourless Peanut Butter Cookies on a white platter.

Gluten-Free Flourless Peanut Butter Cookies on a white plate.

Occasionally I suffer from a bit of culinary stubbornness. Take these flourless peanut butter cookies, for example. For years people told me that I needed to try them. But the simple combination of peanut butter, sugar, an egg, and baking soda didn’t sound good to me. It sounded like a potential hot mess. So my culinary stubbornness kicked in, reminding me that I already had a gluten-free peanut butter cookie recipe I liked—and it contained flour, like a good cookie should.

Recently, however, I went to make a batch of peanut butter cookies and realized I was out of sweet rice flour. On a whim, and almost begrudgingly, I decided to finally try the flour-free recipe. I stirred together one cup of peanut butter, one cup of brown sugar, one egg, and one teaspoon of baking soda. The batter looked weird, thick and shiny. “These won’t taste like cookies. They’ll probably taste like peanut butter blobs.”

I was so wrong. The cookies baked up crisp and crunchy. And much to my surprise, let me tell you, they tasted very similar to my beloved peanut butter cookie recipe. I couldn’t tell they didn’t contain flour, and neither could anyone else.

Since the cookies were so good, I played around with a few batches. I added mini-chocolate chips to one, chopped roasted peanuts to another, and topped a few with jam. The only variation that didn’t quite work were the ones topped with jam. They baked up with super soft centers under the jam and about an hour after baking, the jam began to leak through the cookies.

 Even though it took a long time, I’m glad my stubbornness didn’t win out. This easy cookie recipe can be whipped up in minutes.


Gluten-Free Flourless Peanut Butter Cookies on a white platter.
5 from 2 votes
Print

Impossible Gluten-Free Peanut Butter Cookies

These flourless peanut butter cookies bake up thin and crisp. The simple batter welcomes variations. To the batter, consider adding 1 cup of mini chocolate chips, 1 cup toasted, chopped peanuts, 1/2 cup shredded coconut or 1 cup chopped dried fruit, such as dried cranberries.
Prep Time 10 minutes
Cook Time 10 minutes
Total Time 20 minutes
Servings 24 cookies
Author GlutenFreeBaking.com

Ingredients

  • 1 cup dark brown sugar, packed (7 1/2 ounces; 212 grams)
  • 1 teaspoon baking soda
  • 1 cup smooth or creamy peanut butter (9 1/2 ounces; 270 grams)
  • 1 large egg (about 1 3/4 ounces; 50 grams, out of shell)
  • 1 teaspoon vanilla extract

Instructions

  1. Preheat oven to 350°F. Line two rimmed baking sheets with parchment paper. In small bowl, rub together dark brown sugar and baking soda. Add peanut butter, egg, and vanilla extract. Stir together with wooden spoon until smooth. Batter will be thick.

  2. Drop rounded tablespoons onto prepared baking sheet. Cookies spread during baking; space about two inches apart. Using the tines of a fork, press down lightly and make a crosshatch design on top of each cookie. Bake until cookies puff and settle, about ten minutes. Cookies should be lightly golden brown.
  3. Allow cookies to cool on the pan for ten minutes. After ten minutes, transfer to a wire rack to cool completely. Repeat with remaining dough. Store cookies in airtight container on the counter for up to four days.


The BEST Gluten-Free Whoopie Pies

Sep 23, 2015 · 5 Comments

Gluten-Free Whoopie Pie on a plate.

Gluten-Free Whoopie Pies

The BEST Gluten-Free Whoopie Pies. Period.

As someone who grew up near New England (whoopie pie territory) I always felt that packaged chocolate snack cakes, like Suzy Q’s, were a poor imitation of the whoopie pie. When I want chocolate cakes sandwiched together with sweet, creamy icing, nothing but a whoopie pie will do.

This recipe makes traditional chocolate whoopie pies. The cakes are large, dense, and not too sweet. The filling—made from marshmallow Fluff, sugar, and butter—brings just the right amount of sweetness to the cake.

Since whoopie pies occasionally suffer from dryness, I use dark brown sugar in the recipe. It keeps the cakes moist while still retaining a dense, cakey texture.

As for the size, you’ll notice that the recipe calls for about ¼ cup of batter for each cake. WARNING: this makes large whoopie pies. Feel free to reduce the amount of batter for smaller ones. For really tiny ones, use just a tablespoon of batter per cake and reduce the baking time. Keep your eye on the first batch to get the timing right.

Gluten-Free Whoopie Pie on a plate.
5 from 2 votes
Print

Gluten-Free Whoppie Pies

Prep Time 25 minutes
Cook Time 18 minutes
Total Time 43 minutes
Servings 12 whoopie pies
Author GlutenFreeBaking.com

Ingredients

For the Cakes

  • 1 cup finely ground white rice flour (4 ounces; 113 grams)
  • 1/2 cup sweet rice flour (2 ounces; 46 grams)
  • 1/2 cup Dutch-process cocoa powder (regular cocoa powder works as well but the finished cakes won't be as dark.) (1 1/2 ounces; 42 grams)
  • 1/2 cup tapioca starch (2 ounces; 46 grams)
  • 1 1/4 teaspoons baking soda
  • 1 teaspoon salt
  • 1/2 teaspoon xanthan gum
  • 1 stick unsalted butter, room temperature (1/2 cup; 4 ounces; 113 grams)
  • 1 cup dark brown sugar, packed (7 1/2 ounces; 212 grams)
  • 1 large egg (1 3/4 ounces; 50 grams)
  • 1 teaspoon vanilla extract
  • 1 cup buttermilk (8 ounces; 226 grams)

For the Filling

  • 1 stick unsalted butter, softened (1/2 cup; 4 ounces; 113 grams)
  • 1 (7 1/2 ounce) jar marshmallow crème (I used Marshmallow Fluff)
  • 3/4 cup confectioners’ sugar (3 ounces; 85 grams)
  • 1 teaspoon vanilla extract

Instructions

  1. For the Cakes: Center oven rack to middle position and preheat oven to 350°F. Line a baking sheet with parchment paper and set aside.

  2. In small mixing bowl, whisk together white rice flour, sweet rice flour, cocoa powder, tapioca starch, baking soda, salt, and xanthan gum.
  3. Fit stand mixer with paddle attachment. In bowl of stand mixer, cream together butter and brown sugar until butter-sugar paste lightens slightly, about one minute. (Use medium high-speed on a stand mixer. If using a handheld mixer, use high speed.) Turn off mixer. Scrape down sides and bottom of bowl. Add egg and vanilla extract. Turn mixer back on. Cream until egg is thoroughly incorporated, about one minute. Scrape down bottom and sides of bowl. Mix for 15 seconds.
  4. Add 1/3 of the dry ingredients. Mix until combined. Add half the buttermilk. Mix until batter is smooth. Add another 1/3 of the dry ingredients. Mix until combined. Add remaining buttermilk. Add remaining dry ingredients. Mix batter until smooth and thick, about 30 seconds.
  5. Scoop six mounds of batter, about 1/4 cup each, onto prepared baking sheet. Space cookies several inches apart as they spread during baking.
  6. Bake until cookies are set and spring back to the touch, about 18 minutes.
  7. Remove pan from oven. Allow cookies to cool on pan for one minute. Using a metal spatula, transfer cookies to wire rack to cool. Repeat with remaining batter.
  8. While cookies cool, make filling. (method below) Sandwich cooled cookies together with icing.
  9. For the Filling: In medium mixing bowl, cream together butter and confectioners’ sugar until light and fluffy, about 30 seconds. (Use high speed on a handheld mixer or medium-high speed on a stand mixer.)

  10. Add marshmallow crème and vanilla. Mix until fluffy.


Gluten-Free Travel: Old Orchard Beach Maine.

Sep 22, 2015 · 2 Comments

White house on beach.

White house on beach.

Gluten-Free Travel: Old Orchard Beach Maine
Or How I went to Maine and ate on the cheap! 

Remember those “What I did on my summer vacation” reports in elementary school? This is my grown-up version!

First a few confessions:

  • This trip happened after Labor Day, the unofficial end of summer. So was it still a summer vacation? I say YES!
  • I didn’t do much. Which was AMAZING.
  • I’m one of those crazy people who swim in the ocean in Maine even when the water temperature hovers around 60°F. And I love it!

Here’s the thing, the end of 2014 and all of 2015 have been crazy-busy for me. I wrote and photographed my upcoming paleo book, I relaunched this website, and I did a major clean out and reorganization of several rooms in my house. (I found phone bills from, ahem, 2004 neatly filed away. Those are now gone!)

I needed a break.

In the middle of August, out of the blue, I looked at my calendar and said to Greg, “Let’s go to Maine.” I found that the rates of hotels were a wee bit higher than I’d expected but still within a range that I felt comfortable spending. When traveling, I like a room with a kitchenette. I’m allergic to so many things that it’s easier–and safer—to cook for myself on vacation. There were only a handful of rooms with kitchen in the greater Portland area. I booked a room at the Scarborough Residence Inn for $159 per night–before tax. I sat back and looked forward to my vacation.

And then I lost my mind.

See, I love finding a good deal. I LOVE IT. Did I mention that I love it? Because I do! I’m not someone who gets excited about how much you spent on something. I’m the friend that gets excited when you tell me how much you saved. During the weeks leading up to the trip, I’d visit hotel booking sites looking for a better deal than I’d gotten at the Residence Inn. Each day price of hotel rooms in Maine went up. Many sold out.

Boo! It looked like I was out of luck.

Then, on the Thursday before we left, I remembered a little motel that my parents stayed in when they’d visit Maine: The Gull. I wondered if it was still around. A quick poke on the internet told me that not only was it around but it had expanded to include an Inn and Apartments. Oh! Exciting!

The only thing? You couldn’t check rates online. You had to gasp pick up the phone and call. I know. Crazy, right? For some reason, even though most things in Maine were booked solid, I had a good feeling about this.

Me: “Hi! I know it’s last minute but do you have any availability for this upcoming week?”

Motel Guy: (sound of pages being flipped.) “Hmmm….it looks like I only have one room left. It’s a King with a kitchenette. Does that work?” 

Me: (doing the happy dance in my chair.) “Yes. That sounds good. How much?”

MG: $90.00 per night.

Me: (internally: oh my god. oh my god. OH MY GOD.) “Perfect! I’ll take it!”

He wrote down all my information and that was it. No email confirmation. No nothing. I canceled my reservation at the Residence Inn and prayed that when we showed up at the Gull that we’d have a room.  (Yes, I’m a worrier. Why do you ask?)

I texted Greg that I’d saved us $80 per day and that I was the best wife EVER. He texted back and corrected my math: “$69 per day. Still awesome.”

Hrump. Greg rarely finds a hair he won’t spilt. #lovehim #precise.

I texted back. “Until the other place, this one is right on the beach. We don’t have to pay to $10 each day to park at the beach. So $80 a day.” Out of character for Greg, he didn’t quibble about the $1.00.

A few minutes before we arrived at the motel, I started to worry. What if it was terrible?  You know what they say about a deal to good to be true. Visions of a terrible room danced in my mind. I tried to push those thoughts away. They whispered anyway: old mattress. dark room. bed bugs. I’m a terribly fun and optimistic person! My mind on the other hand often goes rouge.


The Gull Motel Sign.

After a six hour drive, we pulled into the motel. It looked…nice. Really nice! The town of Old Orchard Beach, which has a bit of a carnival feel, was mostly closed. Not that it would have mattered. The Gull is located at the end of the “strip”, away from the rides and other noise. When we checked in, the nice man at the desk looked up our reservation in a book. He found us. (I gave my worry a small kick under the table.)

And then…


Gull Motel hotel room key.

He handed us a key. A KEY! When was the last time you were handed a key to a hotel room? Awesome, right? The office was so clean and airy that my worry faded a bit. We headed upstairs to our room. I held my breath.


Hotel room kitchen.

Oh my god….


Small hotel room. Light shines through door. Television on stand.

It.was.AMAZING. The room was so bright and airy.


Wood ceiling in hotel room.

It had vaulted ceilings, a table for two, and a kitchenette. I know the room looks dark in this photo. Sorry about that! It really wasn’t a dark room at all. There was so much sun shining in from the windows and doors. Lovely.


Watercolor painting on wall of hotel room.

High ceilings. Comfy bed. Woo-HOO!

Spoiler alert: the stay at the Gull was fantastic. It was full, or almost full, the entire time we were there and we didn’t hear a peep from the other guests. Each day, our room was cleaned and it was spotless. If you are looking for a place to stay in Maine, I can’t recommend the Gull highly enough. All those crazy fears I had were just that: fears.


Hotel parking lot. Ocean in the distance.

I stepped out onto the balcony. And this is what I saw.


American flag on pole. Ocean in the distance.

The ocean. Right there. Like, RIGHT THERE. For $90.00 a night. Can you even??


Flower pots line a beach walk.

After unpacking, we walked down to the beach. It look less than one minute.


Beach sand.

Ahhhhhhh….that’s the good stuff.


Weathered tree on beach.


Bench Dedication on Old Orchard Beach.
Donal Nicholas Allan. March 3, 1948 to November 4, 2012. “Daddy, you loved being on this great beach! Cherished memories of you forever!” 60 years Montreal to Maine! Lobsters, sand dollars, crabs, and the Sandbar. RIP XOXO Love your children, Hason, Chad, Candace, and Curtis.


Bench dedication on Old Orchard Beach Maine.
Come Sit and Enjoy the Sun, Sand, and Sea that Mary Rommell Loves. Happy Birthday 2012

Benches dedicated to loved ones dotted the beach. We’d sit on one each morning and enjoy our coffee.

Beach stones and sea glass.

I picked up free souvenirs. Including a piece of sea glass.

We spent much of the week reading on the beach. Ahhhh.

And we ate. We ate really well. The cost? Less than $40 per day for both of us. Somedays it was even less!

Here’s what we did.

First, a few disclaimers:

  • My style of eating on this vacation was very casual. I wasn’t looking for anything other than…food? (and lobster. More about that in a minute.)
  • Yes. I know that my breakfast and lunches were boring. That’s fine with me. For me, not every meal needs to be gourmet experience.
  • We don’t have children. I have no idea if how we ate would work for folks with kids.
  • We didn’t eat in restaurants at all. That saved us a ton of money.

Gluten-Free Breakfast: Vacation Edition

Each day for breakfast, I ate a Greek yogurt. Some days I threw a banana into the mix. Oh, and a coffee. Of course.

Gluten-Free Lunch: School Lunch Throwback

For lunch, I went old school. As in elementary school. I ate a peanut butter sandwich on Udi’s bread with an apple. On a few days, I went wild and added potato chips to the mix. I can’t even begin to tell you how much I enjoyed this. At home, I rarely, if ever, eat a peanut butter sandwich. Sitting on the beach, eating my peanut butter sandwich while watching the ocean felt magical.

Gluten-Free Dinner: Lobster, Lobster, and More Lobster

Dinner was a different story. Kind of.

Day One 

We were tired from the drive. So I ordered two gluten-free pizzas from Uno’s. They had an online coupon. You ordered one pizza and got the second for $5.00.

Total cost: $16.99. 

Day Two

The only day it rained! We headed to the grocery store and picked up a package of organic salad greens, a bottle of dressing, and a rotisserie chicken.  Done!

Total cost: $12.97

Day Three

It was time for lobster! Earlier this year, I made lobster rolls. So good. So easy. And, dare I say it? I found I preferred the lobster roll to a hot lobster dinner. You simply take lobster meat, mix it with mayo and lemon juice. Slap it into a buttered roll and call it dinner.  At home, this means buying lobster, steaming it, allowing it to cool, and then removing the lobster from the shell. It’s a bit of work. But totally worth it!

Not in Maine!


Bayley’s Lobster Pound

We headed to Bayley’s. On previous trips to Maine, we’d seen the place but had never shopped there. Mistake.

Bayley's Lobster pound sign and parking lot.

See how it says 100th anniversary? Yeah. There’s a reason for that.

Jumbo hard shell lobsters in tank.

They sell lots of lobsters. You want a fresh lobster? They have it.

You want a steamed lobster? They’ve got it.

You want to eat a lobster out back on their porch? You’re good.

Lobster meat in deli display tray.

But this is what I came for: picked lobster meat. All of the lobster awesomeness and none of the work. It was $39.95 per pound.

Deli pans of shrimp and tiny shrimp.

They also sold shrimp. I didn’t buy any because…lobster.

Bayley's lobster pound business card.

Funny thing, if you were to close your eyes, you would NOT know you were standing in the middle of a seafood store. Bayley’s is clean. Very, very clean.

Large preserved lobster in glass case.


Fresh, Hand-Picked Lobster Meat $39.95

Reason #4563 why I’ve pondered moving to Maine.

Lobster meat in small plastic container.

That’s 8 ounces of fresh lobster right there. YUM.


Gluten-free Lobster roll.

This was SO DARN GOOD.

Total Cost for two Gluten-Free Lobster Rolls: approx. $25.oo.
That includes the lobster meat, two Udi’s gluten-free hot dog buns, mayo, and 1/3 of a large lemon.

Day Four

Leftovers! We finished the half a chicken. I chopped it up and put it on the remaining salad greens. Done.

Total Cost: $0.00 

Day Five and Six

Lobster Rolls. Yes. We totally ate lobster rolls three times on this trip. It was GLORIOUS. And so very, very easy. (recipe is below.)

Total Cost (per day) $25.00

That’s how we ate in Maine. I brought up a batch of snickerdoodles and, like I said, we picked up a bag or two of potato chips. I’m sure there are a few other things that I’m not thinking of, like fruit and other vegetables but that was pretty much what we ate. We ate really simply and really well.


Colorful birdhouses on a lobster trap.


Portland, Maine

It wasn’t all beach time and food. It was mostly beach time and food. 🙂

One morning, we headed to Portland, Maine for a couple of hours.

It’s such a pretty city!

LeRoux Kitchen sign in downtown Portland, Maine.

If you love to cook, you must visit LeRoux.

: “Picking five favorite books is like picking the five body parts you'd most like not to lose.” Neil Gaiman.

If you love to read, stop by Sherman’s. (If you love to do both, stop by each place. #Duh) 🙂

The Blue Lobster canvas bag.


Gluten-free sign over wine display.

Portland Maine has lots of gluten-free beer options. This was only part of the selection offered at the Craft Beer Cellar.

Stonewall Kitchen gluten-free baking mixes.

Even Stonewall Kitchen sells gluten-free products!

No Double dipping sign.

And they remind people not to be a gross.

Whoopee Pie shirt.


Taste the World's Best Cheddar Cabot Cheese sign.


Cabot Cheese even has it’s own store! If you love cheese, visit here, please!

Our Farmers Thanks You! Sign at Cabot cheese store.


Cheese samples on display.


Maine t-shirt for sale.


Freeport, Maine

And a trip to Maine isn’t complete without a visit to LL Bean. It’s only about 45 minutes from Old Orchard Beach. Or the time it takes to drink a coffee and have a good conversation.

Sunlight at LL Bean headquarters.

LL Bean’s flagship store is an experience.

Barrel of stuffed toy lobsters. Barrel of stuffed toy moose.


LL Bean magnets on display for sale.

I love magnets!

Cookbooks on display at LL Bean store.

They even have a coffee shop adjacent to a little bookstore.

LL Bean boot made of chocolate.

That’s a peanut butter and chocolate version of their classic “Bean Boot.”

Taxidermy moose at LL Bean flagship store.


Taxidermy animals at LL Bean flagship store.

They have animal displays. Odd but charming.

Lilacs in bloom in Freeport, Maine.

Outside of the LL Bean complex, there are other shops, Bridgham and Cook, a shop dedicated to all things British, is by far my favorite.

Really, however, our trip was about this…

Blue sky and an empty beach in Old Orchard Beach, Maine.

And this

Blue sky with empty beach.


And, of course, this.

Sandy beach with blue sky. Two benches on the beach.

It was just what I needed.

Places to Visit

The Gull Motel, Inn, Cottages and Apartments
89 West Grand Avenue
Old Orchard Beach, Maine 04064
Phone: 207-934-4321
http://www.gullmotel.com/

Bayley’s Lobster Pound
9 Avenue 6
Scarborough, ME 04074
Phone: (207) 883-4571
http://www.bayleys.com/

Lois Natural Foods
152 U.S. 1 #15
Scarborough, ME 04074
(207) 885-0602
http://www.loisnatural.com/

LeRoux Kitchen
161 Commercial St
Portland, ME
Phone:(207) 553-7665
http://www.lerouxkitchen.com

Stonewall Kitchen
182 Middle Street
Portland, ME 04101
Phone: 207.879.2409
http://www.stonewallkitchen.com/portlandstore.html

Abacus Gallery
44 Exchange St, Portland, ME 04101
Phone:(207) 772-4880
http://www.abacusgallery.com/

LL Bean Flagship Store
95 Main Street
Freeport, ME 04032
1-877-755-2326
http://www.llbean.com/

Royal River Natural Foods
443 US Route 1
Freeport, ME 04032
(207) 865-0046
http://www.rrnf.com/


White house on beach.
Print

Gluten-Free Lobster Rolls

This recipe for gluten-free lobster rolls is more of a guide than a specific recipe. Here the lobster is the star. Just add enough mayo to hold things together and adjust seasonings as needed.
Prep Time 5 minutes
Total Time 5 minutes
Servings 2 generous lobster rolls
Author GlutenFreeBaking.com

Ingredients

  • 1/2 pound lobster meat
  • mayonnaise
  • fresh lemon
  • salted butter melted
  • 2 Udi's gluten-free hot dog bun

Instructions

  1. Gently chop lobster into bite-sized pieces. Take your time, so you don't break the lobster meat up too much.
  2. Place the lobster meat into a medium bowl. Add a generous dollop of mayo. Start with about three tablespoons. Add a squeeze of lemon juice. Stir together. The lobster meat should be faintly coated with mayo. You don't want the meat drowning in mayo. Set the lobster mixture aside.
  3. Brush each side of the hot dog rolls generously with butter. Remember that butter is an essential ingredient to the rolls. Don't skimp.
  4. Heat a nonstick frying pan over medium-heat. Place the buns, butter-side down, into the pan. Toast until golden brown, about three minutes. (This time will vary. Don't walk away from the rolls.)
  5. Remove the rolls from the pan and allow them to cool slightly.
  6. Taste the lobster mixture. Adjust the mayo and lemon juice as needed. Add salt and pepper to taste. (I rarely add either. I don't like the kick of the pepper and the lobster and mayo bring enough salt to the rolls.)
  7. Spoon lobster mixture into the rolls. Really pile it on!
  8. Enjoy!


How to Make the Best Gluten-Free Sandwich Bread: An Easy Recipe for Everyone!

Sep 21, 2015 · 552 Comments

Loaf of Baked Gluten-Free Sandwich Bread on Red Cutting Board.

Want soft, delicious gluten-free sandwich bread? Then this recipe is for you! It’s easy to make and comes out perfectly every time.

Loaf of Baked Gluten-Free Sandwich Bread on Red Cutting Board.

The Best Gluten-Free Sandwich Bread Recipe: Easy, Delicious, and Soft! 

Ah, gluten-free sandwich bread. It’s more than a bit of a pain, isn’t it? The pre-made loaves, while light and tender, are expensive and often filled with holes. Homemade recipes save you money but are often dense–and depending on the recipe dry or gummy.

With these problems, what’s a gluten-free eater to do? My advice: don’t give up on sandwich bread!

I’ve baked my own gluten-free sandwich bread for over a decade. In fact, there’s recipes for sandwich bread in both of my cookbooks. But while I love these recipes, I wanted to make a bread that was light and soft. Kind of like–dare I say it?–Udi’s bread but without the holes and the high price tag!

For about six months or so I’ve been working on this recipe. To be honest, I ate way too much bread and butter during these months. That’s the sacrifice I had to make, I guess. 😉 Finally, FINE-AH-LEE, I have a gluten-free bread recipe that’s easy to make, soft in texture, doesn’t fall apart, and tastes great. Oh, and it’s dairy-free, corn-free, and rice-free to boot. I LOVE this bread.

Let’s talk about how to make it. (BTW, I have a lot to say about how to make gluten-free bread. If you just want the recipe, I suggest you scroll down. Way down. Yeah, way, way down. #BakingTeacher #IHeartBreadAndICanNotLie)


How to Make Gluten-Free Sandwich Bread: The Dry Ingredients

Gluten-free flours in a mixing bowl for gluten-free sandwich bread.

Millet Flour

When I set out to make a soft gluten-free bread, I started by looking at the flours and starches I used in previous recipes. Unlike wheat-based bread, which can be made with only flour, water, salt and yeast, gluten-free bread requires a blend of flours and starches.  My original bread recipes both use brown rice flour. At the time (old timey gluten-free baker alert!), it was hard to find any gluten-free flours other than rice flour. Using brown rice flour made sense. Today we have lots of other options.

After giving it some thought, I narrowed it down to two flours: millet flour and sorghum flour. Both are tasty and relatively inexpensive.  I ended up using Bob’s Red Mill’s millet flour. Have you used millet? I’m in love with it. While brown rice flour can lend a somewhat gritty texture to recipes, millet reminds me of wheat flour. It’s soft. And it contains more fiber than rice flours! Yup! Cup for cup, millet offers twice as much fiber as brown rice flour. A soft texture and twice the fiber? Awesome!

Next up…starch!

Tapioca Starch

Since I was rethinking the flour, I also wanted to rethink the starch. In my first cookbook, Easy Gluten-Free Baking, my sandwich bread used corn starch. In my second, How to Cook Gluten-Free,I used potato starch. For this recipe, it’s all about the tapioca starch.

You might be wondering why you need starch at all. Good question! Wheat and other grains contain a starch called amylopectin. It’s part of their makeup. When combined with a liquid and heated, this starch gelatinizes. It thickens and almost turns jelly-like.  If you’ve ever made a stovetop pudding, you’ve seen this happen. One minute the pudding is thin, the next it thickens. This is good news for gluten-free bakers. Without the stretch of gluten, starch helps hold bread together.

Even though grain contains starch, it’s not enough to make a soft sandwich bread. Enter: added starch. Without tapioca starch, this loaf turns out dense and heavy. In the future, we’ll made some rustic bread. Those don’t always need added starch. This loaf does.

The reason I reached for tapioca starch for this recipe is because it adds an almost gluten-like stretch to recipes. Notice I said “almost”. There’s no 1:1 replacement for gluten. It bakes up lighter than both corn starch (which can get a little heavy) and potato starch (which is light but doesn’t add much stretch).

Xanthan Gum

Ah, xanthan gum. (deep breath) Usually the follow-up question to, “Elizabeth, how do I make bread?” is “Why do I need to use xanthan gum?”

Simply put, you need xanthan gum because  gluten isn’t present in the dough. Gluten, which comes from the Latin word for “glue”, provides elasticity and strength to traditional wheat-based doughs. If you’ve ever kneaded dough or watched someone throw pizza dough over their head, you’ve witnessed the stretchiness of gluten in action. Without this rubber band-like protein, gluten-free bread dough lacks the essence of what gives bread structure.

Enter xanthan gum.

While I wouldn’t go as far as calling xanthan gum a gluten replacement, it does prevent gluten-free bread from collapsing in on itself. Made from a microorganism called xanthomonas campestris, xanthan gum becomes very viscous and sticky when combined with water. It doesn’t have the same rubber band-like properties of gluten but it does a good job providing structure to gluten-free breads. If you accidentally omitted it from this recipe, you would have a very short, very dense loaf of bread.

Sugar

There’s a wee bit of sugar in this recipe. It helps feed the yeast and helps the crust to brown. Even though it’s only two tablespoons, there’s a big difference in color and flavor between a loaf made with the sugar and one made without. Feel free to use turbinado (Sugar in the Raw) sugar if you prefer.

Salt

Ah, salt! The amount of salt in a bread recipe seems quite small, doesn’t it? There’s only one teaspoon in the entire recipe. However, salt is an essential ingredient in bread dough. It helps enhance flavor, it controls yeast growth (more about this in a sec), and it helps the crust to brown. If you forget to add salt to a bread recipe, the bread will taste flat and the texture won’t be right.

For this recipe, use table salt, not Kosher salt or sea salt. They don’t measure the same (You need to use 1 1/4 teaspoons of Kosher salt to replace the table salt) and sometimes coarse Kosher salt doesn’t fully dissolve in the bread dough.

One other note about salt: when salt is in direct contact with yeast, it will kill the yeast. Never, ever add salt to your water-yeast mixture. You want to add the salt to the flour mixture and whisk everything together. This distributes the salt and keeps the yeast happy. And happy yeast is happy bread!

Baking Powder

What’s baking powder doing in a yeast bread recipe?! I know. I know. Another ingredient to measure (I’m sorry!). During testing of the bread recipe in “How to Cook Gluten-Free”, I wanted the loaf to have a little more rise. Increasing the yeast didn’t provide the lift I wanted. So I tried adding a little baking powder. PERFECT. Since it worked so well, I borrowed the idea for this recipe. It still works great. Commercial baking powder is double acting. This means it releases gas in the bowl when it comes in contact with liquid and then again in the oven when it gets hot. Adding a little lift during mixing and at the start of baking seems to give the yeast a little more room to do it’s thing.

Instant Yeast

The star of the show! Yeast! (woo-hoo!) For some reason yeast makes people nervous. I understand. Unlike other leaveners, like baking powder and soda, yeast is alive. It needs a little bit of special care. Not a lot of care, just a little.

The main thing is water temperature. For yeast to work, you want your water temperature between 105°F and 115°F. For the best results, grab an instant thermometer and take the temperature of the water. At around 120°F, the yeast begins to die and at 140°F, thermal death point kicks in and the yeast totally dies. (#RIPYeast).

For this recipe, I like to use “Quick Rise” yeast. Depending on the brand, this might be called Rapid Rise, Fast Acting, or Highly Active Yeast. This yeast is dried in smaller particles than traditional Active Dry Yeast. Technically, you don’t even need to dissolve it in water. You can add it directly to your dry ingredients, whisk everything together, and go. I prefer dissolving it in water. It’s up to you. If you decide to add your yeast directly to your dry ingredients, increase your water temperature to 120°F.

“Elizabeth! You just said that yeast begins to die at 120°F! Have you lost it?!?”

First, thank you for paying attention. Second, I might have lost it. I can’t keep track of these things.  😉 AnyWAY, about that temperature. It’s higher because the yeast is never in direct contact with the water.

Lastly, water temperature and keeping yeast away from salt is all fine and good. But you need to start with yeast that’s still fresh. I don’t mean cakes of fresh yeast, that’s a different product. I mean check the expiration date on the packet! If it’s expired, toss it and get some new yeast!

BAKER’S NOTE: Is All Yeast Gluten-Free? 

Answer: no. While “Saccharomyces cerevisiae” (that’s baker’s yeast to you and me) is a fungus and is naturally gluten-free, some packaged yeast is NOT gluten-free. Always check the label. As of this writing, Red Star’s Platinum yeast was NOT gluten-free. All of their other products are gluten-free. Read those labels!

How to Make Gluten-Free Sandwich Bread: The Wet Ingredients

Measuring cup with eggs. Measuring cup with yeast mixture. Measuring cup with oil.

Now it’s time to talk about what holds everything together, the wet ingredients!

Water

As written, the recipe calls for only 3/4 cup of water. To measure the water, use a liquid measuring cup or weigh the water (more on that below). As mentioned above, water temperature is key to bread baking. Use water that’s around 110°F. If you want to make a rich loaf of sandwich bread, replace the water with milk. Heat the milk to the same temperature as the water. When milk is used, the loaf bakes up slightly darker and has a creamier taste than a loaf made with water.

Eggs

Eggs add fat and flavor to this bread. They also add moisture. Unfortunately, this bread doesn’t do well egg-free. If you look at the photo of this bread, you can see it’s really yellow. That’s because I used local eggs and the yolks were BRIGHT yellow. Did I mention they were bright? When this bread is made with store bought eggs (something I use a lot of the time!), it won’t bake up so yellow. Also, if you prefer a less rich bread, omit the egg yolks and use only egg whites.

BAKER’S NOTE: If you buy your eggs from a local farmer, weigh them before you use them as the size tends to vary. An egg, out of shell, should weight about 50 grams.

Oil

Two tablespoons of fat help to soften the texture of this bread. For this bread, any liquid oil, like olive, canola, or vegetable, works.

How to Make Gluten-Free Sandwich Bread: Measuring

Digital kitchen scale.

Measuring Dry Ingredients

Successful baking relies heavily on successful measuring. An error in measuring ingredients can cause a recipe to flop.

You have two good options for accurate measuring:

Measuring by Weight

Using a kitchen scale is the most accurate way to measure ingredients. Simply place a bowl on the scale, zero the scale (sometimes called “tare”) and add the ingredients. Zero the scale after adding each ingredient. For this recipe it looks like this: zero —>weigh the millet flour —> press zero—->add the tapioca starch. Done! The rest of the dry ingredients are small and are measured with nested measuring spoons. More on that in a sec.

Measuring by Volume

If you prefer to use measuring cups and spoons, that’s fine. While some claim that it won’t work, I disagree. If you take care when measuring your ingredients, you will be successful. In fact, when I started writing gluten-free cookbooks, few home cooks owned kitchen scales. My entire first baking book relies on volume measures and the recipes work for thousands of bakers.

Measuring flour for gluten-free sandwich bread.

Here’s how to measure ingredients with a dry measure.

1. Select a set of nested measuring cups. (Prefer metal to plastic. Over time, they won’t warp.)

2. Spoon flour or starch into the cup. Overfill slightly.

3. Level the cup with something straight, like a chopstick or the back of a butter knife.

BAKER’S NOTE: Don’t confuse nested measuring cups with a liquid measuring cup. You don’t want to measure dry ingredients in a liquid measuring cup.

Measuring Small Ingredients: Tablespoons and Teaspoons

Small ingredients are best measured by volume. Many kitchen scales aren’t accurate enough to measure a half teaspoon of salt. For small ingredients use a set of nested measuring spoons. I prefer metal as plastic or those “slider” measuring spoons tend to be less accurate.

For small ingredients, you can dip the spoon right into the ingredients, overfill slightly and then level with something straight.

Measuring Liquid Ingredients

Liquid Measuring Cup.
photo courtesy Pyrex.

For the water and oil, use a liquid measuring cup, like the one shown above. Fill the cup and squat down to eye level to make sure you have two cups of water. Holding the cup in the air or looking down at it can result in inaccurate measuring. If you are unable to squat down to eye level, Oxo makes an angled measure cup that can be viewed accurately from above.

How to Make Gluten-Free Sandwich Bread: Mixing

Mixing gluten-free sandwich bread dough.

Without gluten to hold everything together, gluten-free bread dough looks very different from traditional bread dough. Instead of forming a smooth dough ball, it looks like a thick, sticky cake batter.


Mixing gluten-free sandwich bread dough in a stand mixer.

The easiest way to mix this thick dough is with a stand mixer. I use a KitchenAid mixer fitted with a flat paddle attachment. With gluten-free bread, you want to ditch the dough hook. It doesn’t mix gluten-free bread well. The paddle attachment, in contrast, does a great job chugging through our dough. Mix on medium-high speed for about three minutes.

If you don’t own a stand mixer, worry not! You can use a handheld mixer for the job. Again, I like my KitchenAid hand mixer for this job. I’ve found other mixers can’t handle the dough. If fact, over the years, I’ve had several readers tell me that they burnt out the motors of their handheld mixers while making gluten-free dough. Yikes!


Gluten-free sandwich bread dough on mixer attachment.

Mix the dough until it’s smooth. You don’t want any dry flour hanging around the bottom of the bowl. Use a flexible spatula to clear around the little bump at the bottom of the KitchenAid mixer.

Gluten-free bread dough in greased loaf pan.

For this loaf, I use a Chicago Metallic loaf pan. It’s a little smaller than a traditional 9×5 bread pan. In fact, it’s 8-1/2″ by 4-1/2″ by 2-3/4″. If you are going to go to the trouble of making homemade bread, I’d strongly suggest you use this pan. It works GREAT. You end up with a loaf of bread about the size of Udi’s. This is smaller than traditional wheat bread but without gluten, smaller is sometimes better for gluten-free bread.

If you don’t want to invest in new pans, that’s fine! Just know that when this bread is baked in a 9×5 inch pan, it won’t rise as high because the pan is larger than the Chicago Metallic pan.

No matter what pan you use, be sure to spray the pan with non-stick cooking spray before adding the dough.


Gluten-free bread dough in loaf pan covered with plastic wrap.

Cover the bread with a piece of plastic wrap that you’ve sprayed generously with non-stick cooking spray. This dough is soft. If you don’t spray the plastic wrap, the dough sticks to it.


Gluten-free bread dough risen in loaf pan.

After an hour or so, the dough should have doubled in size. Don’t let it over-rise. While it seems like the higher the rise, the higher the bread, this isn’t true. When dough rises too high, it can collapse during baking. Once the dough doubles, it’s ready to go.

The best place to allow dough to rise is on the counter. If your kitchen is very cold, throw the pan in the oven (be sure the oven is off). You don’t need to find a special spot for the bread. I know some people place their pan of bread on top of the fridge. Um, I don’t remember the last time I dusted the top of my refrigerator. There’s no way I’m putting food up there. 🙂

If you remember that rise time is an estimate, you’re all set. Sometimes bread dough rises fast (usually in the summer) and sometimes it takes its time (usually in the winter.) If after 90 minutes nothing has happened, check to see if you forgot to add the yeast. Occasionally issues with yeast happen but it happens fairly rarely, especially if you follow the directions about yeast above.

How to Make Gluten-Free Sandwich Bread: Baking, Cooling, and Storage!

Finally! It’s time to bake! Yay!

It’s important to preheat your oven before you bake your bread. Something magical happens during the first few minutes of bread baking: the yeast goes into a hyperactive phase. As the temperature of the dough rises, the dough rapidly converts sugars (from the starches in the flour) into carbon dioxide. At the same time, the water in the dough turns to steam. This boost of carbon dioxide and steam help the dough to rise. Oven spring can account for an additional 10% rise.

And then…it all stops. When the temperature reaches 120°F, the yeast hits its thermal death point and dies off. No more rise occurs after this point.

Digital thermometer in gluten-free bread. Thermometer reads 211 degrees F.

Taking the Temperature

I find it difficult to judge exactly when a loaf of bread has baked all the way through. There’s nothing more disappointing than spending time baking a loaf of bread only to find out that the very center of the bread is under baked. Thankfully there’s a simple solution to this problem: take its temperature. Yup, just like you’d do for a turkey at Thanksgiving!

Stick an instant read thermometer into the center of the loaf. Don’t poke the edges of the bread, the temperature is hotter there and won’t tell you if the center has baked.

The bread should reach 210°F or above. This is slightly higher than the temperature for wheat dough but I’ve found that once gluten-free bread hits 210° F, it’s done.

 Cooling

Gluten-free sandwich bread cooling on a wire rack.

When the bread comes out of the oven, it’s done baking, right? Wrong! It’s almost done baking. Carryover baking occurs because the loaf is so hot. How hot? The loaf is steaming hot and it’s this steam that can cause problems for the gluten-free baker. Remember our friend xanthan gum? It loves to suck up water and it doesn’t stop doing this after baking. You want to ensure that the steam can escape from the baked loaf. If it doesn’t, the xanthan gum and starches can “grab” onto it. This leads to a gummy loaf of bread and soft crust.

To prevent a gummy loaf, remove the loaf from the baking pan and place it on a wire rack to cool. If the bread cools in the pan, the steam gets trapped and the loaf gets soggy, especially on the bottom.

Cutting

Gluten-free Sandwich bread sliced on red cutting board.

Once the bread is cool (or almost cool if you are impatient), it’s time to cut it. Use a serrated knife. Let me say that again, use a serrated knife. A smooth-blade knife will squish the bread. Lots of people ask me how to slice straight pieces of bread. Um….this is one that I can’t help with. They sell bread-cutting guides if this is an issue for you.

Slice of gluten-free sandwich bread.

 Storage

After doing all that work, you don’t want your loaf to get moldy or stale, right? Right!

Bread tastes best the day it’s baked. You can store it on the counter for a day or two. But if you know you aren’t going to eat an entire loaf in a day, here’s what I recommend: allow the loaf to cool, slice, place a piece of waxed paper or parchment between the slices, and slide the whole thing into a freezer bag. When you want a piece or two of bread, remove the bread from the freezer. You can either thaw at room temperature or microwave for 15 seconds.

BAKER’S NOTE: Never store bread in the refrigerator. It stales very quickly in the fridge. Either store bread on the counter overnight or freeze it.

Are you ready to make bread? Yeah, I thought so! Here’s the recipe. Enjoy it!

Shop the Recipe

The following are affiliate links. When you use them to shop, GlutenFreeBaking.com earns a commission.
Digital Scale
Liquid Measuring Cup
KitchenAid Stand Mixer
Bread Pan
Rubber Spatula
Oven Thermometer
Digital Thermometer

Loaf of Baked Gluten-Free Sandwich Bread on Red Cutting Board.
4.9 from 134 votes
Print

How to Make the Best Gluten-Free Sandwich Bread

Easy gluten-free sandwich. Makes a loaf that's tender and tasty! 

Prep Time 1 hour 30 minutes
Cook Time 45 minutes
Total Time 2 hours 15 minutes
Servings 12 slices
Calories 129 kcal
Author GlutenFreeBaking.com

Ingredients

  • 3/4 cup warm water, about 110° F (6 ounces; 170 grams)
  • 1 packet instant/rapid rise yeast (2 1/4 teaspoons; 7 grams)
  • 1 1/2 cups millet flour (6 ounces; 170 grams)
  • 1 cup tapioca starch (4 ounces; 113 grams)
  • 2 tablespoons granulated sugar (1 ounce; 28 grams)
  • 2 teaspoons xanthan gum
  • 1 teaspoon table salt (not Kosher salt)
  • 1/2 teaspoon baking powder
  • 3 large eggs , whisked (about 5 ounces; 150 grams total, out of shell)
  • 2 tablespoons olive or vegetable oil
  • 1 teaspoon apple cider vinegar
  • *if desired , replace the eggs with 3 large egg whites.

Instructions

  1. Whisk together water and yeast in a small bowl. Allow to stand for five minutes.
  2. In the bowl of a stand mixer, combine millet flour, tapioca starch, granulated sugar, xanthan gum, salt, and baking powder. Whisk to combine. Fit the stand mixer with the flat paddle attachment. Add the yeast mixture, eggs, oil, and vinegar. Mix on medium speed until smooth. Dough will be thin.
  3. Spray an 8-1/2" by 4-1/2" by 2-3/4" loaf pan with nonstick cooking spray. Spread dough evenly into the pan. Spay a piece of plastic wrap with nonstick cooking spray and place plastic wrap loosely on the pan. Allow dough to double in size. This takes about one hour.
  4. When dough has doubled in size, preheat oven to 350°F. Remove plastic wrap from the top of the pan.
  5. Bake until the internal temperature of the bread reaches 210°F, about 45 minutes. (If the crust gets too dark before the internal temperature reaches 210°F, place a piece of foil onto the bread. This prevents the crust from burning.)
  6. Remove bread from the oven and allow to cool for two minutes. Transfer bread to a wire cooling rack to cool completely.
  7. When cool, slice into pieces with a serrated knife.
  8. Store bread on the counter for up to three days or freeze sliced bread, wrapped in freezer wrap with waxed paper between each slice, and placed into a freezer container, for up to six weeks.

Recipe Notes

This easy recipe for gluten-free sandwich bread contains no corn, dairy, or soy. Be sure to use an 8-1/2" by 4-1/2" by 2-3/4" pan like this one by Chicago Metallic. If you don't have this pan, use a 9x5-inch pan. Bread baked in a 9x5-inch pan will bake up shorter than bread baked in an 8 1/2 x 4 1/2-inch pan.


Apple Cider Doughnut Pancakes

Sep 19, 2015 · 4 Comments

Apple Cider Doughnut Pancakes on a plate coated with granulated sugar.

Apple Cider Doughnut Pancakes

Gluten-Free Apple Cider Doughnut Pancakes or Cravings are the Mother of Invention!

Lately I’ve been craving an apple cider doughnut but, honestly, I’ve been too busy to fry a gluten-free batch. Then last weekend, right before making a batch of pancakes, a culinary “a ha” moment stuck. Why not make apple cider doughnut pancakes?

Adapting the pancake recipe was so simple that I can’t believe I never thought of this before. I just used apple cider in place of milk, added cinnamon and nutmeg, and coated the finished pancakes with cinnamon-sugar (some melted butter helped the cinnamon-sugar stick). The result? AMAZING!

Sure, they aren’t doughnuts but they’re some of the fluffiest pancakes you’ll eat, and the faint apple taste was enough to satisfy my cider doughnut craving. Until I have time to make the doughnuts.

Allergen-Notes

Dairy: The pancake recipe is dairy-free. However, I use butter on the finished pancakes to help the cinnamon-sugar mixture stick to the pancakes. If you are dairy-free, use a dairy-free margarine or spread to replace the butter.

Eggs: To replace the eggs, add 3 tablespoons ground flax meal to the dry ingredients and increase the cider to 1 1/4 cups. If the batter seems too thick, add an additional 1/4 cup of cider.

Apple Cider Doughnut Pancakes on a plate coated with granulated sugar.
5 from 1 vote
Print

Apple Cider Doughnut Pancakes

Prep Time 15 minutes
Cook Time 4 minutes
Total Time 19 minutes
Servings 4
Author GlutenFreeBaking.com

Ingredients

  • 1 cup white rice flour (4 ounces; 113 grams)
  • 1/2 cup sweet rice flour (2 ounces; 56 grams)
  • 1/2 cup cornstarch (2 ounces; 56 grams)
  • 1/4 cup granulated sugar (1 3/4 ounces; 50 grams)
  • 1 tablespoon baking powder
  • 1 teaspoon ground cinnamon
  • 1/2 teaspoon salt
  • 1/4 teaspoon nutmeg
  • 1/4 teaspoon xanthan gum
  • 2 large eggs (about 3 1/2 ounces; 100 grams)
  • 1 cup apple cider (8 ounces; 226 grams)
  • 1/4 cup vegetable oil (1 3/4 ounces; 50 grams)
  • 1 teaspoon vanilla extract

For Serving

  • Butter
  • Cinnamon-sugar* about two tablespoons
  • To make cinnamon-sugar combine 1/2 cup of granulated sugar with one tablespoon ground cinnamon

Instructions

  1. In a medium bowl, whisk together white rice flour, sweet rice flour, cornstarch, baking powder, ground cinnamon, salt, xanthan gum, and ground nutmeg. Add eggs, cider, vegetable oil, and vanilla extract ingredients. Pour the wet ingredients over the dry ingredients and whisk until smooth.
  2. Lightly oil a flat griddle pan. Heat griddle over medium-high heat. Pour batter, approximately 1/4 cup, onto griddle. Batter should "sizzle" when it hits the pan.
  3. Flip pancakes when bubbles appear all over the surface of the pancake and begin to pop, about two minutes. (The batter should look almost dry). Cook another 1-1 1/2 minutes.
  4. Spread warm pancakes with butter and sprinkle generously with cinnamon-sugar mixture.


Gluten-Free Chocolate Chip Cookies for Two

Sep 15, 2015 · 5 Comments

Gluten-Free Chocolate Chip Cookies on wire rack.

Four gluten-free chocolate chip cookies on a cooling rack.

Gluten-Free Chocolate Chip Cookies for Two or Now’s a Great Time to Bake Some Cookies

I don’t think there’s ever a bad time for cookies but sometimes, even when the cookie craving strikes, I’m just not in the mood to bake an entire batch. While I often keep a stash of homemade dough in the freezer—scooped and ready to bake—sometimes that stash runs out. Enter: the mini-batch cookie recipe.

A few days ago, a reader sent me an e-mail saying, and I quote: “Please, please, please, PLEASE convert this recipe to gluten-free.” There was no description just a link to the Budding Bakeress’ blog. I clicked on the link. It was for a recipe that made just four chocolate chip cookies! Brilliant! I had to make a gluten-free version.

The recipe makes only four cookies like the original but I’ve tweaked a few things. I swapped butter for shortening because that’s what I like in my chocolate chip cookies. (See below if you are dairy-free.) And I reduced the amount of sugar for two reasons: the original cookies were a little sweet, and my gluten-free cookies kept spreading. Cutting back on the sugar solved both the sweetness problem and the spreading problem.

Although this recipe yields a small batch of dough, it makes full size cookies. If you’d prefer to make mini-cookies, reduce the cookies from one tablespoon of dough to one teaspoon. Bake these diminutive cookies for four minutes and then check them. You want them to be golden brown. Adjust baking time as needed.

Gluten-Free Chocolate Chip Cookies for Two: Allergen Notes

Dairy-Free

Replace the butter with shortening and add 1/2 teaspoon additional egg.

Egg-Free

Replace the egg with 1 teaspoon ground flax and 2 teaspoons hot water. Whisk mixture together, allow to stand, and use as you would the egg.

Gluten-Free Chocolate Chip Cookies on wire rack.
5 from 1 vote
Print

Gluten-Free Chocolate Chip Cookies for Two

Prep Time 15 minutes
Cook Time 10 minutes
Total Time 25 minutes
Servings 4 cookies
Author GlutenFreeBaking.com

Ingredients

  • 3 tablespoons white rice flour (3/4 ounce; 21 grams)
  • 3 tablespoons sweet rice flour (3/4 ounce; 21 grams)
  • 1 teaspoon cornstarch
  • 1/8 teaspoon baking soda
  • 1/8 teaspoon salt
  • 2 tablespoons dark brown sugar
  • 1 teaspoon granulated sugar
  • 2 tablespoons softened butter (1 ounce; 28 grams)
  • 1 tablespoon beaten egg
  • about two tablespoons chocolate chips more or less to taste

Instructions

  1. Preheat oven to 350°F. Line baking sheet with parchment paper. In small bowl, whisk together white rice flour, sweet rice flour, cornstarch, baking soda, and salt. In another small bowl, cream together sugars and butter until a thick paste forms. (Use a wooden spoon or handheld mixer. This batch is too small for a stand mixer.) Add the egg. Beat until smooth. Add dry ingredients. Mix until a dough forms. Add chocolate chips. Stir to combine.
  2. Scoop dough, about one generous tablespoon each, onto prepared baking sheet. Bake until golden brown, about 10 minutes. Remove pan from oven. Allow cookies to cool on the pan for two minutes. Using a metal spatula, transfer cookies to a wire rack to cool completely.


Gluten-Free Pumpkin Scones (Starbucks Copycat Recipe)

Sep 14, 2015 · Leave a Comment

Gluten-Free Pumpkin Scones on a wire rack.

Gluten-Free Pumpkin Scones on a wire rack. Scones are iced with vanilla icing and drizzled with a spice glaze.

Gluten-Free Pumpkin Scones or Thank Goodness for Friends! 

Earlier this month, someone asked me to create a gluten-free version of Starbucks’ pumpkin scones. I jotted the suggestion down on my to-do list and promptly forgot about it, as I’m prone to do during the holidays. Then, right in the middle of the holiday busyness, our kitchen required some work. This meant I was without an oven for about a week. My friend kindly offered her kitchen, so I looked at my to-do list for a recipe that I could easily make in someone else’s kitchen. The pumpkin scones jumped out at me.

At home, I prepped all the ingredients. I cut butter into a combination of millet, sorghum, and white rice flours, and then I threw a can of pumpkin, a carton of half and half, and an egg into a tote bag. I was ready to make scones!

While talking to my friend (probably complaining about my lack of an oven), I mixed the scone batter together and popped them into her oven. About fifteen minutes later, the scones were ready.

Just as Starbucks does, I finished them with a vanilla glaze and a light drizzle of pumpkin glaze. Not only does this extra step make them visually appealing, but it adds a nice touch of spicy sweetness. The scones were tender and flavorful and, best of all, the whole process proved incredibly easy.

The simplicity of this recipe makes it ideal for the busy holiday season. When your house fills with guests and you want to make something that doesn’t require too much work, these scones are perfect. The night before baking, prepare the dry ingredients and measure out the wet ingredients. In the morning, simply add the wet ingredients and bake. While the scones are baking, mix together the two simple glazes. In about an hour, you’ll have pumpkin scones ready to hit the table. Even if the table’s at your friend’s home because your kitchen is out of service!

Gluten-Free Pumpkin Scones on a wire rack.
Print

Gluten-Free Pumpkin Scones

Author GlutenFreeBaking.com

Ingredients

For the Scones

  • 1 cup millet flour (4 ounces; 113 grams)
  • 1/2 cup sorghum flour (2 ounces; 56 grams)
  • 1/2 cup white rice flour (2 ounces; 56 grams)
  • 1/2 cup granulated sugar (3 1/2 ounces; 10 grams)
  • 1 tablespoon baking powder
  • 1/2 teaspoon salt
  • 1/2 teaspoon xanthan gum
  • 1/2 teaspoon ground cinnamon
  • 1/2 teaspoon ground nutmeg
  • 1/4 teaspoon ground cloves
  • 1/4 teaspoon ground ginger
  • 6 Tablespoons butter, cold, cut into tablespoon-size pieces (3 ounces; 85 grams)
  • 1 cup pumpkin puree (9 1/2 ounces; 269 grams)
  • 3 tablespoons half and half (1 1/2 ounces; 42 grams)
  • 1 large egg (about 1 3/4 ounces; 50 grams, out of shell)

For the Vanilla Glaze

  • 1 cup powdered sugar (4 ounces; 113 grams)
  • 3 tablespoons half and half (1 1/2 ounces; 42 grams)
  • 1 teaspoon vanilla extract

For the Pumpkin Glaze

  • 1 cup powdered sugar (4 ounces; 113 grams)
  • 2 tablespoons pumpkin puree (1 ounce; 28 grams)
  • 2 tablespoons half and half (1 ounce; 28 grams)
  • 1/4 teaspoon ground cinnamon
  • 1/8 teaspoon ground nutmeg
  • pinch ground ginger
  • pinch ground cloves
  • nonstick cooking spray

Instructions

  1. Preheat oven to 425°F. Line rimmed baking sheet with parchment paper. In large bowl, whisk together millet flour, sorghum flour, white rice flour, granulated sugar, baking powder, salt, xanthan gum, cinnamon, nutmeg, cloves, and ginger. Using your hands or a pastry cutter, cut butter into dry ingredients until no large pieces of butter remain. Mixture should resemble a coarse cornmeal.
  2. In small bowl, whisk together pumpkin puree, half and half, and egg. Add to dry ingredients. Stir until a wet dough forms. Turn dough out onto prepared making sheet. Spray top of dough lightly with nonstick cooking spray. Using your hands, pat the dough into a circle about 1/2-inch thick. Use a sharp knife and cut the dough into 8 or 12 wedges.
  3. Bake until golden brown, about 18 minutes. Remove pan from oven. Quickly cut wedges again. Sometimes they stick together during baking. Allow scones to cool on the pan.
  4. Prepare the vanilla glaze Stir together powdered sugar, half and half, and vanilla together in a small bowl. The glaze should flow easily from a spoon. If it doesn't add an additional teaspoon of half and half to the glaze. Place a wire cooling rack over a piece of parchment paper. Spoon the glaze evenly over the cooled scones. Allow to glaze to harden. Prepare the pumpkin glaze. In small bowl, stir together powdered sugar, pumpkin puree, half and half, cinnamon, nutmeg, ginger, and cloves. Glaze should be thick. Transfer glaze to a piping bag. Drizzle glaze over each scone. If you don't have a piping bag, place glaze into a plastic sandwich bag and snip one of the corners to make a bag or thin glaze with half and half and drizzle from a fork onto scones.


Pumpkin Cheesecake Brownies

Sep 13, 2015 · Leave a Comment

Pumpkin Cheesecake Brownies

Gluten-free Pumpkin Cheesecake Brownie on a white plate.

Gluten-Free Pumpkin Cheesecake Brownies (and a recipe for Pumpkin Spice Latte Milkshakes!)

Of course, candy makes Halloween sweet but there’s nothing quite like a homemade baked treat. These gluten-free pumpkin cheesecake brownies are beloved by kids of all ages—especially by those too old to trick or treat*.

These brownies are ridiculously easy to make. Just prepare one box of gluten-free brownie mix and top it with a pumpkin cheesecake mixture. I used Betty Crocker’s brownie mix to make these brownies. Use whatever gluten-free brownie mix you love–as long as it makes one 8×8-inch square pan of brownies.

For the cheesecake, you combine cream cheese (regular or low fat), canned pumpkin, an egg, some sugar, and pumpkin spice. That’s it! Simply spread the cheesecake mixture on the brownie batter and swirl both batters together lightly with a knife. Pop the pan into a preheated oven and in about forty minutes, you’re rewarded with a rich treat that’s worthy of any holiday.

Although they’re hard to resist, these brownies taste better the day after they’re made.  Allow the brownies to cool, cut into squares, and chill overnight. If you can’t wait to serve them, be sure to allow them to cool before serving. Right out of the oven, the cheesecake filling is soft and difficult to cut.

By the way, you’ll have a little canned pumpkin left after you make these brownies. So I included a recipe for a pumpkin spice latte milkshake. Think of the milkshake as a thick and creamy version of your favorite pumpkin spice latte!

*Speaking of trick or treat, be sure to check that the candy your child receives on Halloween is safe for his or her gluten-free diet.

Pumpkin Cheesecake Brownies
Print

Mix it Up: Pumpkin Cheesecake Brownies

Prep Time 15 minutes
Cook Time 45 minutes
Total Time 1 hour
Servings 16 bars
Author GlutenFreeBaking.com

Ingredients

For the Brownie Base

  • nonstick cooking spray
  • 1 (16 to 17 ounce) box gluten-free brownie mix
  • 2 large eggs (about 3 1/2 ounces; 100 grams)
  • 1 stick unsalted butter, melted and cooled (1/2 cup; 4 ounces; 113 grams)

For the Swirl

  • 6 ounces cream cheese, regular or low-fat neufatel cheese (3/4 cup; 170 grams)
  • 1 cup pumpkin puree (9 1/2 ounces; 269 grams)
  • 1 large egg (1 3/4 ounces; 50 grams)
  • 1/4 cup granulated sugar (1 3/4 ounces; 50 grams)
  • 2 teaspoons pumpkin pie spice

Instructions

  1. Preheat oven to 350 degrees F. Spray a 8x8x2-inch square pan with nonstick cooking spray. Set aside.
  2. Prepare the Brownie Base: Combine brownie mix, eggs, and melted butter in a medium mixing bowl. Mix, either with a wooden spoon or electric mixer, until smooth. Spread 3/4 of brownie batter into the bottom of prepared pan. Set remaining batter aside.

  3. Prepare the Swirl: Cream the cream cheese until smooth in a small mixing bowl. Add the pumpkin and mix until smooth. Add the egg, granulated sugar, and pumpkin spice. Mix until smooth and well combined.

  4. Spread pumpkin cheesecake mixture over brownie base. Drop remaining batter, about one tablespoon each, over pumpkin cheesecake topping. Gently drag a knife through the brownie base and cheesecake topping to marble.
  5. Bake until a knife inserted into the center of the brownies comes out clean, about 45 minutes.
  6. Remove pan from oven and place on a wire rack to cool. Chill overnight, cut into bars, and enjoy. Store leftover brownies covered and in the refrigerator for up to four days.
Pumpkin Cheesecake Brownies
Print

Pumpkin Spice Milkshake

Love pumpkin spice coffee? Then this tasty milkshake is for you!
Prep Time 5 minutes
Total Time 5 minutes

Ingredients

  • 1 cup gluten-free coffee ice cream
  • about 3/4 cup leftover canned pumpkin
  • 1/2 cup milk
  • 3/4 teaspoon pumpkin pie spice

Instructions

  1. Combine all ingredients in a blender. Blend on medium speed until smooth. Divide between two glasses and enjoy!


Gluten-Free Pumpkin Whoopie Pies

Sep 8, 2015 · Leave a Comment

Gluten Free Pumpkin Whoopie Pies

Gluten Free Pumpkin Whoopie Pies

Gluten-Free Pumpkin Whoopie Pies or Why Do I Put Things Off? 

A while ago (okay, several years ago), my husband saw a display of pumpkin whoopie pies in a bakeshop. His response? “You should make a gluten-free version.” My response? “I’ll put it on my list.” And that’s just where those gluten-free pumpkin whoopie pies remained.

I’m not sure why I resisted baking them. I think I believed that whoopie pies should be chocolate, not pumpkin. Silly, I know. Each fall, he’d gently suggest I make a batch and each fall I didn’t. Until now.

Of course, you know how this story ends. Now I’m kicking myself for waiting so long to make them. In fact, I think I like pumpkin even better than the traditional chocolate version. (My husband might have smirked when I told him this. But he was eating a whoopie pie at the time. So I can’t be sure.)

But enough about how I was wrong! Let’s talk about the pies! As with traditional chocolate whoopie pies, these gluten-free pumpkin whoopie pies are made by sandwiching two dense cakes  together with a light, creamy center. Which brings me to….

The Filling

Most chocolate whoopie pies are held together with a filling made from butter and classic Marshmallow Fluff. I love that filling. It’s light and sweet and perfect. 

For pumpkin whoopie pies, however, I wanted to do something different.  (And, if you are egg-free, you’ll love this change.) I decided to make the filling with whipped cream cheese. Yes! As you can imagine, cream cheese filling complements these pies perfectly.

Egg-Free and Gluten-Free Pumpkin Whoopie Pies

Replace the two eggs with 2 tablespoons ground flax meal and 1/4 cup hot water. Whisk together the flax and water and allow it to stand for five minutes. Add as you would the egg.

Dairy-Free and Gluten-Free Pumpkin Whoopie Pies

For the Cakes

Replace the butter with a solid dairy-free shortening
(like Crisco or Spectrum vegetable shortening) or lard. Use as directed. A liquid oil can be used to replace the butter; however, I found the cakes spread when made with oil and had a very moist—almost muffin-like texture—instead of the dense cake-like texture I prefer in a whoopie pie.

For the Filling

Use a dairy-free cream cheese.

Baker’s Note:

How to Make Smaller Gluten-Free Pumpkin Whoopie Pies

Traditional whoopie pies are BIG. If you’d like a smaller treat, scoop batter, about 2 tablespoons each, onto prepared baking sheet. Reduce baking time from about 20 minutes to about 12. Check the cakes after eight minutes.

Gluten Free Pumpkin Whoopie Pies
Print

Gluten-Free Pumpkin Whoopie Pies

Prep Time 40 minutes
Cook Time 20 minutes
Total Time 1 hour
Servings 12 whoopie pies
Author GlutenFreeBaking.com

Ingredients

For the Gluten-Free Whoopie Pies

  • 1 cup cup white rice flour (4 ounces; 113 grams)
  • 1/2 cup sweet rice flour (2 ounces; 56 grams)
  • 1/2 cup cornstarch or potato starch (2 ounces; 56 grams)
  • 1 teaspoon baking powder
  • 1 teaspoon baking soda
  • 1 teaspoon ground cinnamon
  • 1/2 teaspoon salt
  • 1/4 teaspoon xanthan gum
  • 1 stick unsalted butter, softened (1/2 cup; 4 ounces; 113 grams)
  • 1 cup granulated sugar (7 ounces; 198 grams)
  • 2 large eggs (about 3 1/2 ounces; 100 grams, out of shell)
  • 1 cup pure pumpkin puree (9 1/2 ounce; 269 grams)
  • 1 teaspoon vanilla extract

For Vanilla Marshmallow Filling

  • 1 stick unsalted butter, at room temperature (1/2 cup; 4 ounces; 113 grams)
  • 1/4 cup vegetable shortening (1 5/8 ounces; 46 grams)
  • 3/4 cup powdered sugar (3 ounces; 85 grams)
  • 1 (7 1/2 ounces) jar marshmallow crème (I used Marshmallow Fluff)
  • 1 teaspoon pure vanilla extract

For Cream Cheese Filling

  • 6 ounces cream cheese, softened (3/4 cup; 170 grams)
  • 1 stick unsalted butter, softened (1/2 cup; 4 ounces; 113 grams)
  • 2 cups powdered sugar (8 ounces; 226 grams)
  • 2 teaspoons milk
  • 1 teaspoon vanilla extract

Instructions

  1. Preheat oven to 350°F. Line a baking sheet with parchment paper. Set aside. In medium bowl, whisk together dry ingredients. In large bowl, or bowl of stand mixer, cream together butter and sugar until thick paste forms, use medium high speed. With the mixer running, add eggs in a slow and stream. Stop mixer. Scrape down the sides and bottom of the bowl. Turn mixer on, mix to combine, about 30 seconds.
  2. Add half the dry ingredients. Mix until thoroughly incorporated. Stop mixer. Add pumpkin and vanilla extract. Turn mixer on to medium. Mix until combined. Once again, turn off mixer. Add remaining dry ingredients. Turn on mixer, mix until a thick batter forms.
  3. Drop batter, about 1/4 cup each, onto prepared baking sheet. Whoopie pies spread during baking. Be sure to space each cake about two inches apart. Bake until cakes are golden brown, aromatic, and firm to the touch, about 20 minutes.
  4. Remove pan from the oven. Allow cakes to cool on the pan for five minutes before transferring the cakes to a wire rack to cool completely. (Use a metal spatula to transfer the cakes.)
  5. While cakes cool, prepare the filling. For the marshmallow filling: In a medium bowl, cream together the butter and vegetable shortening until light and fluffy. (Use high speed on a handheld mixer or medium-high speed on a stand mixer.) Add the powdered sugar and beat until combined. Add the marshmallow creme and vanilla extract. Mix until fluffy. For the cream cheese filling: Cream together cream cheese and butter in a medium bowl until light and fluffy, about 45 seconds. Add powdered sugar, vanilla, and milk. Mix to combine. Filling should be fluffy. It it's too thick, add another teaspoon of milk to thin.


Baked Gluten-Free Pumpkin Doughnuts

Sep 7, 2015 · 2 Comments

Gluten-Free Baked Pumpkin Doughnuts on a white napkin.

Gluten-Free Baked Pumpkin Doughnuts on a white napkin.


Gluten-Free Pumpkin Doughnuts or Rethinking Fall Favorites

For me, the official doughnut of fall is the apple cider doughnut. But recently, a sign flapping outside my local Dunkin’ Donuts made me reconsider. It showed a pumpkin doughnut sitting next to a pumpkin latte. The pumpkin latte didn’t interest me; the doughnut did. Sadly, Dunkin’ Donuts doesn’t sell gluten-free pumpkin doughnuts. If they did, that doughnut would have been in my hand seconds after I turned into the parking lot.

Since I could’t buy a pumpkin doughnut, I headed home and decided to make a batch. Instead of pulling out the fryer, I decided to give my doughnut pan a workout and bake a batch of pumpkin doughnuts. Since I’d never made pumpkin doughnuts before, I headed over to King Arthur Flour’s site. Sure enough, they had a recipe for baked pumpkin doughnuts. The recipe wasn’t gluten-free, but it was dairy-free. And it looked good. Time to convert it to gluten-free!

Going from Gluten-Filled to Gluten-Free

First I replaced the all-purpose flour with gluten-free millet and oat flours. I left everything else in the recipe alone. The doughnuts tasted great, but they were a little too rich. The oil and eggs muted the delicate flavor of the pumpkin. For the next batch, I reduced the vegetable oil from a half cup to one-third of a cup. I also got rid of one of the eggs. These changes made the batter a little dry. On the third try, I borrowed an idea from my pumpkin bread recipe: I added a little orange juice to the batter.

All these little changes added up to a big improvement in texture and flavor. The doughnuts were moist and could taste the pumpkin and the spices.

Batch number two also taught me that tossing the doughnuts in sugar while they’re still warm isn’t the best idea. The doughnuts tended to break. However, if you bury the warm doughnuts in a bed of cinnamon-sugar, well, that’s a different story. The sugar sticks and the doughnuts don’t fall apart.

While I’m not giving up my beloved apple cider doughnuts this fall, they’ll need to share the title of the “official doughnut of fall” with these tasty gluten-free pumpkin doughnuts.

Shop the Recipe

The links below are affiliate links. GlutenFreeBaking.com earns a commission when you use the links to shop.

Doughnut Pan

Gluten-Free Baked Pumpkin Doughnuts on a white napkin.
Print

Baked Gluten-Free Pumpkin Doughnuts

Baked, not fried, these gluten-free pumpkin doughnuts are easy to make and are a perfect fall treat!
Prep Time 25 minutes
Cook Time 18 minutes
Total Time 43 minutes
Servings 18 doughnuts
Author GlutenFreeBaking.com

Ingredients

For the Doughnuts

  • Nonstick cooking spray
  • 1 1/4 cups millet flour (6 1/4 ounces; 177 grams)
  • 1 1/4 cups granulated sugar (8 3/4 ounces; 248 grams)
  • 3/4 cup gluten-free oat flour (2 1/2 ounces; 70 grams)
  • 1 1/2 teaspoons pumpkin pie spice
  • 1 1/2 teaspoons baking powder
  • 1 teaspoons salt
  • 1/4 teaspoon xanthan gum
  • 1 (15 ounce) can pumpkin puree
  • 2 large eggs (about 3 1/2 ounces; 100 grams)
  • 1/3 cup vegetable oil (2 1/3 ounces; 66 grams)
  • 1/4 cup orange juice (2 ounces; 56 grams)

For the Cinnamon-Sugar

  • 1 cup granulated sugar (7 ounces; 198 grams)
  • 2 teaspoons ground cinnamon

Instructions

  1. Preheat oven to 350°F. Spray a doughnut pan with nonstick cooking spray. Set aside.
  2. For the Doughnuts: In large bowl, whisk together millet flour, granulated sugar, oat flour, pumpkin pie spice, baking powder, salt, and xanthan gum. In small bowl, stir together pumpkin, eggs, vegetable oil, and orange juice until smooth. Pour pumpkin mixture over dry ingredients and whisk until no lumps remain.

  3. Bake until doughnuts spring back to the touch, about eighteen minutes. Turn doughnuts out onto a wire rack to cool. Repeat with remaining batter. Place warm doughnuts in sugar mixture.
  4. For the Cinnamon-Sugar Topping: In a 9-inch square pan, stir together granulated sugar and ground cinnamon. Place doughnuts in sugar mixture. Carefully turn over. Allow doughnuts to cool in the sugar. When cool, shake off excess sugar. Store doughnuts, covered, on the counter for up to three days.


20 Recipes You’ll Want to Make For Labor Day

Sep 2, 2015 · Leave a Comment

Gluten-Free Tomato Tart on a wire rack. The tart is topped with shredded basil.

Gluten-Free Tomato Tart on a wire rack. The tart is topped with shredded basil.

(sniff) Summer. It’s ending. (sob) Soon garden-ripe tomatoes, fresh corn, and long days will be just a memory. Before summer fades, here are 20 recipes to enjoy before fall arrives.


In No Special Order, 20 Gluten-Free Recipes for Labor Day Weekend


Zucchini Bread

Gluten-Free Zucchini Bread on wood cutting board.


Is your garden pumping out zucchini? Make this classic zucchini bread. And if your garden isn’t over producing, head to a farmers’ market or ask a friend. Someone has too much zucchini. Trust me.

Get the recipe: Gluten-Free Zucchini Bread

Waffle BLTs

Gluten-Free Waffle BLT on a white plate.

A BLT on a waffle? Yup! You know you want one! The basil mayo, by the way, adds such a nice touch of summer.

GET THE RECIPE: Gluten-Free Waffle BLTs

Classic Corn Chowder

Gluten-Free Corn Chowder in a bowl.


Thick and creamy, this classic gluten-free corn chowder finishes with a spicy kick.

GET THE RECIPE: Gluten-Free Corn Chowder

Corn-Scallion Pancakes

Gluten-Free Corn Scallion Pancake.


Looking for an easy side dish? These corn-scallion pancakes are you for! Studded with corn and scallions they make a great side to about any dinner!

GET THE RECIPE: Gluten-Free Corn-Scallion Pancakes 

Tomato Tart

Gluten-Free Tomato Tart on a wire rack. The tart is topped with shredded basil.


How good are tomato tarts? SO GOOD! This one hides caramelized onions beneath the tomatoes and boasts a rosemary-parmesan crust. If you love tomatoes, you must try this one!

GET THE RECIPE: Gluten-Free Tomato Tart

Simple Shortcakes

Gluten-Free Shortcake, split and topped with strawberries and a drizzle of cream.


Here’s a simple dessert: find local berries and make these shortcakes. Split and top with the berries and a little heavy cream. Done!

GET THE RECIPE: Gluten-Free Shortcakes

Cornmeal Cake

Gluten-Free Cornmeal Cake on cooling rack.


Question: what’s gluten-free, dairy-free and goes perfect with the last of the summer berries? Answer: This cornmeal cake!

GET THE RECIPE: Cornmeal Cake


Corn Cookies

Momofuku Milk Bar's Corn Cookies on a baking sheet. One cookie has a bite taken out of it.

Remember Cap’n Crunch cereal from your pre-gluten-free days? These cookies taste the cereal. Only better. And buttery. Try these. Trust me!

GET THE RECIPE: Corn Cookies


Corn Dogs

Gluten-Free Corn Dogs in a red basket.


Gluten-free corn dogs. Need I say more?

GET THE RECIPE: Corn Dogs


Funnel Cakes

Gluten-free funnel cake dusted with powdered sugar on paper towel.


Light and crunchy these are almost as fun to make as they are to eat. Almost.

GET THE RECIPE: Gluten-Free Funnel Cakes


Classic Blueberry Cobbler

Gluten-Free Blueberry Cobbler in glass pan.


A light biscuit-style crust sits over juicy and sweet blueberries in this classic cobbler recipe.

GET THE RECIPE: Classic Gluten-Free Blueberry Cobbler


Texas Cobbler

Gluten-Free Texas Cobbler in small white bowl.


Another cobbler recipe? Yes! Yes! This cobbler has a cake-like topping. It’s so good! (It’s just not super pretty. But who are we to judge?)

GET THE RECIPE: Texas-style Blueberry Cobbler


Chocolate Chip Cookie Dough Ice Cream

Gluten-free chocolate chip cookie dough ice cream in container.


Make a cone, head outside, and enjoy the summer night. Sounds good, right? I agree!

GET THE RECIPE: Gluten-Free Chocolate Chip Cookie Dough Ice Cream


Berry Muffins

Gluten-free multi-berry muffins.


A long holiday weekend calls for at least one lazy breakfast. These muffins, along with a great cup of coffee, make for a perfect morning!

GET THE RECIPE: Gluten-Free Berry Muffins


Gluten-Free Blueberry and Ricotta Pancakes

Gluten-Free Blueberry Ricotta Pancakes on a plate.

Nooooooooooo. Blueberry pancake mornings are almost over. Boo! This recipe adds ricotta to the pancakes. So much yum!

GET THE RECIPE: Gluten-Free Blueberry Muffins


Blueberry Pie

Gluten-Free Blueberry Pie cooling on a wire rack.


A warm slice of classic blueberry pie? It doesn’t get much better than that!

GET THE RECIPE: Classic Blueberry Pie


Peanut Butter Pie

Gluten-Free Peanut Butter Pie.


You only need five simple ingredients to make this over-the-top summer pie. (And it’s no bake!)
GET THE RECIPE: Peanut Butter Pie


S’More Pie

Gluten-Free S'more pie.


All the goodness of s’mores with no campfire required!

GET THE RECIPE: Gluten-Free S’more Pie


Graham Crackers

Gluten-Free Graham Cracker s'mores.


If you do have a campfire, then you must make classic s’mores. You must!

GET THE RECIPE: Gluten-Free Graham Crackers


Gluten-Free Fresh Pasta

Fresh Gluten-Free Pasta topped with Parmesan and lemon on a white plate.


A long weekend is the perfect time to try a new recipe. How about this fresh pasta with some tomatoes and basil?

GET THE RECIPE: Gluten-Free Fresh Pasta


Gluten-Free Waffle BLTs

Sep 1, 2015 · 2 Comments

Gluten-Free Waffle BLT on a white plate.

Gluten-Free Waffle BLT on a white plate. BLT is drizzled with basil mayo.


The other night I planned on making “brinner”: breakfast for dinner. It’s one of my favorites. Then I looked at the garden and saw lots of ripe tomatoes. I thought, “Too bad I can’t put tomatoes on pancakes. I guess I’ll make BLTs instead.”

Then I stopped.

Tomatoes on pancakes would be soggy, of course. But I wondered if they’d work on waffles. That’s right, gluten-free waffle blts. Oh, they’d be (w)BLTs! I smiled. I already loved this idea. Don’t you love it when that happens? Inspiration grabs you and you think, “Go, me! That’s great! Self, you are amazing.” (Do I sound like Leslie Knope? I’ve been told I sound a little like her from time to time. OH MY GOD. As I was typing that, I realized that I made a Leslie Knope reference in a waffle post. ahem)


Text on Image: We need to remember what's important in life: friends, waffles, work. Or waffles, friends, work. Doesn't matter, but work is third.


AnyWAY, (w)BLTs  sounded amazing to me. Since the flavors of a classic BLT can’t really be improved, I kept things simple. I added a little chopped rosemary and black pepper to the waffle batter and whipped up some basil-garlic mayo. The results exceeded even my Leslie Knope-high expectations. As we ate, I kept saying, “Why haven’t I done this before? Waffles. Bacon. Tomatoes! It’s perfect.”

I ate my (w)BLT open-faced; Greg–who is a waffle-lover and a BLT-lover and, therefore, was in heaven,– split his waffle in half and used it like bread. Either way worked well as a BLT delivery system. I like to believe that even Leslie Knope would approve.


Gluten-Free Waffle BLT on a white plate.
Print

Waffle BLTs

Prep Time 20 minutes
Cook Time 20 minutes
Total Time 40 minutes
Servings 4
Author GlutenFreeBaking.com

Ingredients

For the Basil Mayo

  • 1/2 cup mayonnaise (4 ounces; 226 grams)
  • 10 basil leaves, finely chopped
  • 1 clove garlic, minced or put through a garlic press
  • freshly ground pepper and salt to taste

For the Topping

  • 1 teaspoon olive oil
  • 8 slices bacon preferably smoked
  • Large bunch baby lettuce leaves or several large Romaine leaves torn into small pieces
  • 2 large tomatoes, thickly

For the Waffles

  • 1 cup white or brown rice flour (4 ounces; 113 grams)
  • 2 ounces 1/2 cup cornstarch or tapioca starch (2 ounces; 56 grams)
  • 1/4 cup sweet rice flour (1 ounce; 28 grams)
  • 1 tablespoon baking powder
  • 1 tablespoon granulated sugar
  • 1 teaspoon rosemary, finely chopped
  • 1/2 teaspoon salt
  • 1/2 teaspoon xanthan gum
  • ½ teaspoon ground black pepper
  • 1 1/4 cups milk
  • 2 large eggs (about 3 1/2 ounces; 100 grams, out of shell)
  • 1/4 cup vegetable oil (1 3/4 ounces; 50 grams)
  • non-stick cooking spray

Instructions

  1. Prepare the Basil-Garlic Mayo: Stir together mayonnaise, basil, and garlic in a small bowl. Season with salt and pepper to taste. Set aside until ready to serve.
  2. Prepare the Bacon: Heat oil in a large skillet over high heat until shimmering but not smoking. Add bacon. Cook until crisp, about five minutes per side. Transfer to a paper-towel lined plate.
  3. Prepare the Waffles: In medium mixing bowl, whisk together white rice flour, cornstarch, sweet rice flour, baking powder, granulated sugar, rosemary, salt, xanthan gum, and black pepper. In small bowl, whisk together milk, eggs, and oil until smooth.
  4. Pour wet ingredients over dry ingredients. Using balloon whisk or handheld mixer, blend until batter is smooth. No lumps should remain.
  5. Heat waffle iron according to manufacturer's directions. Spray iron generously with non-stick cooking spray. Spoon batter onto hot iron (amount of batter will vary depending on your iron) and bake until golden brown and crisp.
  6. Assemble: Remove waffles from iron. Break apart. Spread basil-garlic mayonnaise evenly over waffles. Top with lettuce, tomato and bacon slices. (You might need to break the bacon slices in half so they fit on the waffle.)


How to Make Gluten-Free Tie Dye Cookies

Sep 1, 2015 · Leave a Comment

Gluten-free tie dyed cookie on wire rack.


Gluten-free tie dyed cookie on wire rack.

Remember those tie-dye cupcakes I did last year? They were the inspiration for these cookies! Before we begin, let me say one thing: Yes, my dough is bright. If you don’t want to color your dough as aggressively as I did, simply cut back on the amount of food color you use. Pastel tie-dye cookies look just as cute as my brightly colored ones!

This recipe starts innocently enough with butter and sugar. Yum! Butter and sugar. Two of my favorites.

Creaming butter and sugar for gluten-free cookie dough.

Add two eggs (full recipe follows). Be sure to stop the mixer and scrape down the bowl after you add each egg.


Dry gluten-free cookie dough mixing in a stand mixer bowl.
Add dry ingredients. See this? At first the dough appears dry, crumbly even. This is normal. Mix the dough on medium speed and it will go from what you see above to…

Smooth gluten-free cookie dough in the bowl of a stand mixer.
This! Amazing, isn’t it? Time to play with the dough!

Gluten-free cookie dough on the counter.

Pat the dough into a ball.

Gluten-free cookie dough cut into four pieces.

Cut into four even pieces.

Gluten-free cookie dough with red dye on it.

Flatten one of the pieces. Dab a generous amount of paste/gel food color onto the dough.

Gluten-free cookie dough about to be kneaded to incorporate red dye.

Casually fold over some dough over the blob of food color.

Gluten-free cookie dough ball dyed red.

Put on plastic gloves and knead the color into the dough. Don’t have plastic gloves? No problem!

Gluten-free cookie dough in a plastic bag being dyed yellow.

Plop the dough into a plastic bag. Knead the dough in the bag to keep your hands dye-free. (Trust me on this. I kneaded dye into dough without gloves or a bag while testing this recipe. My hands looked liked I’d strangled a Smurf. To death! I’m still haunted by the idea of that much blue under my nails.

Four logs of gluten-free cookie dough dyed green, blue, red, and yellow.
Color all the dough. (To avoid transfer colors from one dough ball to another, change your gloves/bag after coloring each piece of dough.)

Yellow, red, blue, and green logs of gluten-free cookie dough. Four balls are together to make one cookie.
Pinch off about one teaspoon of dough from each color. Roll dough into balls.

Green, yellow, blue, and red balls of gluten-free cookie dough.

Place the dough into two rows.

Green, yellow, blue, and red gluten-free tie dye cookie dough being pressed together.
Squish the dough balls together.

Gluten-free tie dye cookie dough rolled out into a 12 inch piece.
Roll dough into a long log–like rolling clay snakes as a kid! The log should be between 8 to 12-inches.

Gluten-free tie dye cookie dough.
Roll dough log up into a circle and place on a baking sheet.

Baked gluten-free tie dye cookies cooling on a wire rack.

Place baked cookies on a wire rack to cool.


Gluten-free tie dyed cookie on wire rack.
Print

How to Make Gluten-Free Tie Dye Cookies

Prep Time 45 minutes
Cook Time 12 minutes
Total Time 57 minutes
Servings 2 dozen cookies
Author GlutenFreeBaking.com

Ingredients

  • 2 cups white rice flour (8 ounces; 226 grams)
  • 2/3 cup sweet rice flour (2 2/3 ounces; 75 grams)
  • 1/3 cup cornstarch (1 1/3 ounces; 38 grams)
  • 1 teaspoon baking powder
  • 1/2 teaspoon salt
  • 1/2 teaspoon xanthan gum
  • 1 1/2 sticks unsalted butter, at room temperature (3/4 cup; 6 ounces; 170 grams)
  • 1 3/4 cups granulated sugar (12 1/2 ounces; 347 grams)
  • 2 large eggs (about 3 1/2 ounces; 100 grams)
  • 2 teaspoons vanilla
  • Gel food coloring I used red, blue, green, and yellow.

Instructions

  1. In medium mixing bowl, whisk together dry ingredients. Set aside.
  2. In a large mixing bowl, cream together butter and granulated sugar until a paste forms. Add eggs, one at a time. Blend until thoroughly incorporated. Stop mixer and scrape down bottom and sides of bowl. Add vanilla. Mix to combine.
  3. Add dry ingredients. Mix until a dough forms. At first, dough will appear dry. After about 30 seconds of mixing, it will come together. Chill for 15 minutes.

  4. Preheat oven to 350 degrees F. Line a baking sheet with parchment paper.
  5. Divide dough into four equal pieces. Dab a generous amount of food color onto one of the dough pieces. Knead food color into dough. (You might want to wear plastic gloves or knead the dough in a plastic bag to avoid dying your hands.) Repeat until all dough is colored.
  6. Pinch off about one teaspoon of dough from each colored ball. Roll dough into small balls. Press dough lightly together to form a square. (There will be two rows of two dough balls each.)
  7. Roll dough into a long piece, about 8-inches. Colors blend as you roll the dough. Roll dough into a tight circle and place on prepared baking sheet.
  8. Bake for 10-12 minutes or until edges turn lightly golden brown. Remove and transfer cookies to a baking sheet to cool.


How to Blog–Announcement

Aug 19, 2015 · 1 Comment

It's time to start something new and trust the magic of beginnings.

It's time to start something new and trust


Have you ever thought, “I should start a blog?” Or maybe your friends have nagged you to “start a blog.” This post is for you!

On 9/25, I’m launching my first-ever “how to blog” series. It’s free and open to anyone who’s curious about blogging. This is not limited to food bloggers. I hope you’ll join me!

The course runs six weeks. We’ll start at the beginning: how to pick a name. Then we’ll dig into nailing your niche, scheduling for success, and dealing with procrastination. The course includes fun exercises to get your creative mind chugging. (And if you’re worried you don’t have a creative mind, fear not. We’ll talk about creativity and self-doubt too.)

By the end of six weeks, your blog will be up and running. How awesome is that?

To join, click the button below.

If you’re already on my email list, you MUST join below. This is a separate list. You won’t receive any recipes, only blogging information!

I can’t wait to see what you’ll create!

Elizabeth

Join Today!

Starts 9/25!.


  • « Go to Previous Page
  • Page 1
  • Interim pages omitted …
  • Page 12
  • Page 13
  • Page 14
  • Page 15
  • Page 16
  • Interim pages omitted …
  • Page 20
  • Go to Next Page »

Primary Sidebar

Get Recipes Delivered to Your Inbox! (Free Weekly Newsletter!)


Elizabeth Barbone

I'm Elizabeth. Welcome to GlutenFreeBaking.com --- a judgment-free baking space. Here you'll find easy recipes, product reviews, and other good stuff that makes gluten-free living easy and a lot more fun!

Read More About Elizabeth →

  • Facebook
  • Instagram
  • Pinterest

Foods You Miss the Most

  • A stack of gluten-free pancakes topped with maple syrup and butter on a plate.
    The Best Gluten-Free Pancakes
  • Gluten-free chocolate chip cookies on a cooling rack.
    Gluten-Free Chocolate Chip Cookies
  • Loaf of Baked Gluten-Free Sandwich Bread on Red Cutting Board.
    How to Make the Best Gluten-Free Sandwich Bread: An Easy Recipe for Everyone!
  • Gluten-free flour tortillas on plate.
    How to Make the Best Gluten-Free Flour Tortillas

Footer

↑ back to top

Terms

  • Privacy Policy
  • Terms & Conditions
  • Accessibility Statement

Follow Us

  • Facebook
  • Instagram
  • Pinterest

About

  • Contact
  • About

Copyright © 2025 Gluten-Free Baking